Siç është premtuar duke postuar fotot e procesit të prodhimit të një bordi qark të shtypur.
1. feta një copë snacks tekxtolite.
2. këmbë me zero.
3. Rekomandohet puna e punës nga Pemiolux
4. Pikturuar për 10 sekonda në një zgjidhje të dobët (ngjyrat e "foshnjës së urinës") hekuri klori për aktivizimin e bakrit.
5. Përsëri me Pemiolux përsëri.
6. Gjithsej në një fletë nga revista me shkëlqim në bordin e printerit të lazerit. (Vendosni instalimet elektrike në programin Sprint Layout 4.0)
7. Në mënyrë të ndërlikuar nga bordi me aceton, vendosni një fletë me shkëlqim në tabelë dhe mbërriti.
(Unë jam hije në mënyrë të barabartë duke rritur hekurin në pika të ndryshme të bordit, duke u përpjekur për të shtypur fshatar. Nga përvoja - ju nuk duhet të përzënë hekur në bord, nga seri si të veshin rroba, sepse gjurmët janë palosur dhe Ata mund të mbyllin njëri-tjetrin. Nëse miniera e hekurit dhe është një keqardhje, rekomandojmë që të vihet në mes të hekurit dhe letrës me shkëlqim fletë e zbrazët A4)
8. Unë jap një tarifë për të ftohur dhe hedhur në lavaman nën ujë i ftohtë. Letra mungon dhe heqja e saj me një sfungjer të butë.
9. Në bordin, vendet e papaguara zakonisht mbeten. Nëse ata janë kritikë, atëherë fshij çdo gjë me aceton dhe irrigine edhe një herë që korrespondon me një copë letre të re. Nëse nuk është e mjaftueshme vende të paarsta, atëherë korrigjoni shënuesin e tyre CD dhe hedhin një tarifë në një zgjidhje uji me një hekur klor.
10. Në një foto, 2 banjot janë parë (një në një tjetër) në hekurin e sipërm të klorit, në ujin e nxehtë të nxehtë, unë ndryshoj çdo 1-2 minuta në një hotter. Unë qëndroj dush për përzierjen dhe transferimin e nxehtësisë. Bordi do të tregojë rreth 10-15 minuta. Bakri i zhveshur djeg, ai mbetet nën tonerin.
11. Të kesh një tarifë, sapun dhe fshij.
12. Smash Tunner me një TVSH dhe aceton.
Në fund, unë ushqeu një tarifë të tillë:
Lidhur me LCD - punon.
Fillimisht vënë një tarifë në anën e pasme të Tidy, por parzmore instalime elektrike ishte ndërhyrje e tmerrshme dhe unë kam për të riorganizuar tarifën brenda rastit duke e mbrojtur atë me petë (pa foto)
Shpejtësia hiqet nga sensori i shpejtësisë është furnizuar me inputin për ndërprerjet e jashtme të kontrolluesit.


Tidy kontrollohet nga Microcontroller Atmega8. Firmware është shkruar në programin codevisionavr. Të gjithë sensorët mbeten të vjetra. Informacioni nga sensorë vjen përmes një ndarës të tensionit në një konvertues analoge-dixhital me shumë kontrollues analoge-dixhital, të përpunuar nga formula dhe lëshohet në shfaqje.
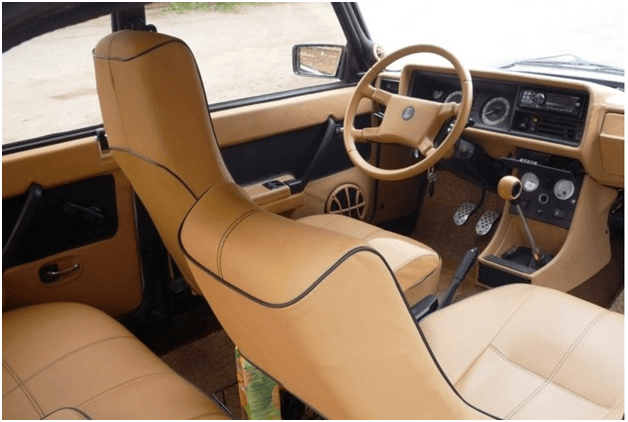
Paneli i instrumentit një nga elemente të rëndësishme Kabina, të cilën shoferi tërheq vëmendjen gjatë udhëtimit. Tuning e saj është gjithmonë e habitshme. Ne do të tregojmë për parimet dhe mënyrat themelore për të përmirësuar panelin.
Në makina të huaja moderne Ekziston një gamë e tërë e instrumenteve dhe sensorëve, duke përfshirë shfaqjet e vogla.
Si mund ta tërheq panelin e instrumenteve

Unë menjëherë dua të them se kufijtë e akordimit të panelit të instrumentit janë të kufizuara vetëm nga fantazia, shija dhe ngjyra juaj për të zgjedhur vetëm ju. Por megjithatë, në pjesën më të madhe, ju mund të zgjidhni zëvendësimin e ndriçimit standard, duke shtuar ndriçimin e sensorëve, shigjetave dhe komponentëve të tjerë.
Përveç ndriçimit, ju mund të ndryshoni pamjen e panelit, duke shtuar stickers special në instrumentet. Kështu, paraqitja e panelit të instrumentit do të ndryshohet. Disa shoferë arrijnë të bëjnë në mënyrë të pavarur stickers të ngjashme duke shtypur në një printer lazer, në letër vetë-ngjitës.
Mënyra e tretë dhe më e shtrenjtë zëvendësim i plotë Pajisjet Kolegjet në Tunned. Më shpesh mund të jetë vendndodhja krejtësisht e ndryshme e instrumenteve, ndriçimi me shumë ngjyra, disponueshmëria pajisje shtesë. Më moderne konsiderohet të instalojë një ekran të madh në vend të instrumenteve analoge, por një kënaqësi e tillë do të kushtojë shumë para.
Pajisjet me bazë LED ndriçojnë

Nuk rrallë ndodh, ndodh që ndriçimi i shurdhër i fabrikës së panelit të instrumentit përzihet të dhënat e instrumenteve ose nuk janë aspak të dukshme. Gjithashtu, për shkak të një ndriçimi të tillë, syri i shoferit të lodhur, gjë që mund të çojë në një aksident.
Shumica. në mënyrë moderne Konsideroj drita neoni Bazuar në kaseta. Së pari, ata janë të lehtë për të blerë në çdo dyqan auto, dhe së dyti, shpejt dhe lehtë instaluar. Gjëja e parë që kemi nevojë për të hequr panelin e instrumentit, në varësi të markës dhe modelit të makinave, paneli hiqet në mënyra të ndryshme, kështu që ne nuk do të përshkruajmë zhvendosjen dhe heqjen e panelit.
Tani duke hequr panelin, ne e rrotullojmë atë në bazë, kështu që mund të jetë lehtësisht i arritshëm për ndriçimin standard. Si rregull, në makina e pasagjerëve Power 12V, të njëjtën ushqim dhe lED strip drite.
Tjetra, është me vlerë Miqtë me një hekur bashkim, ju do të duhet të hiqni llamba të rregullta dhe lidhni fjongën e udhëhequr në vendin e tyre. Ju mund të përdorni dy instalime të vogla si një shtrëngues i bashkimit, por jo shumë i hollë, për shkak të ngarkesës mund të kapërcejë.

Është e këshillueshme që të organizoni kasetë LED në mënyrë të barabartë në të gjithë sipërfaqen. Siç tregon praktika, është më mirë të lidhësh disa kaseta të shkurtra se një kohë të gjatë, dhe probabiliteti i djegies është më pak, dhe nuk do të ketë ngarkesë në një të ushqyerit.
Nëse nuk jeni miq me një hekur bashkim, atëherë do të jetë më mirë të ktheheni në përvojë, pasi ju duhet të jeni të pastër dhe tonny, mbyllja më e vogël mund të djegë të gjithë panelin e instrumentit.
Pas të gjitha shirita të ngjitur, duhet të kontrolloni panelin e instrumentit dhe të aktivizoni ndriçimin, nëse gjithçka është bërë në mënyrë korrekte, të gjitha kaseta do të shkëlqejnë. Vetë shirita mund të bashkëngjiten duke përdorur kasetë dypalëshe, kështu që backlight do të shpërndahet në mënyrë të barabartë në të gjitha pajisjet. Mbetet vetëm për të mbledhur gjithçka në mënyrë të kundërt, tjerr panelin e instrumentit dhe të gëzojnë.
Film në vend të LEDs

Më shumë mënyrë të thjeshtë Ju mund të lexoni përdorimin e filmit në vend të LEDs ose kasetë LED. Avantazhi i kësaj metode është thjeshtësia dhe kostot më të vogla. Fillimi i ngjashëm si në rastin e mëparshëm. Vlen të hiqni dhe të hiqni panelin e instrumentit, pastaj ta çmontoni atë në bazën ku ndodhet backlight. Tani procedura fillon të jetë ndryshe. Zakonisht ndriçimi i fabrikës ngjyrë e bardhë (në makinat e brendshme), dhe ndryshimet e ngjyrave për shkak të filmit në anën e kundërt.
Filmi transparent, më i ndritshëm do të ketë ndriçimin e pajisjeve, në varësi të ngjyrës së filmit, do të ketë dritën e pasme të instrumenteve. Parimi është ndërtuar në mënyrë të tillë që drita nga ndriçimi standard të kalojë përmes filmit, duke ndryshuar kështu ngjyrën dhe duke theksuar pajisjet.

Këtu, siç thonë ata, ngjyrat do të kufizohen në fantazinë tuaj, ju mund të bëni numra me të njëjtën ngjyrë, shigjetat e tjetrit dhe vijën e tretë. Disa amatorë janë të dehur poshtë nga letër zmerile, zero, baza e instrumenteve në anën e kundërt (nga backlight), në mënyrë që shifrat dhe treguesit të duken më të ndritshme. Filmi mund të përdoret si i veçantë, ajo shitet edhe në dyqanet e automjeteve dhe e gjen veten vetë me materiale të forta. Big Plus Mund të konsiderohet se nuk do të bëhen ndryshime në elektronikë, prandaj nuk mund të jetë mbyllja.
Ngjitës ngjitës në pult

Përveç metodave të nxitura më lart në lidhje me ndryshimin në ngjyrën e backlight, ju mund të ndryshoni pamjen, domethënë imazhin e instrumenteve si shoferi do t'i shohë ato.
Për ta bërë këtë, më shpesh përdorin stickers të veçantë. Për ta bërë këtë, është e nevojshme të çmontoni panelin e instrumentit dhe të merrni në substrate në aparatet në të cilat zbatohen vlerat dhe numrat.
Vlen të kujtohet se stickers janë shitur nën çdo model, markë dhe viti i makinës që lëshohen ndaras. Me shembull, mund të ketë të njëjtën makinë, markë dhe model, madje edhe viti i lirimit, dhe paneli i instrumentit është i ndryshëm. Në një do të ketë një tahometër, nuk ka asnjë në tjetrin. Prandaj, stickers duhet të zgjidhen me shumë kujdes.
Para ngjitës, mostër sipërfaqësisht në panelin e fabrikës, është i përshtatshëm për fasteners, nuk ka asgjë ndërhyrë për stickers butë. Nëse veshja e vjetër mund të hiqet, atëherë është më mirë ta bëni këtë, sticker i ri Do të duket shumë e bukur. Tani, kur gjithçka doli në sipërfaqe për t'u ngjitur për të fshirë degreasin. Rrini një anë, dhe shtypni afishe ngadalë vononi shtresën mbrojtëse. Është mbjellë për të zbutur në mënyrë që të mos kishte ajër nën afishe, përndryshe do të bjerë prapa nga sipërfaqja për disa muaj.
Pas kalimit të procedurave, ju mund të mbledhni gjithçka mbrapa dhe montuar në rritje për të parë se sa efikase është përmirësuar paneli instrument. Tjetra, ne mbledhim gjithçka në mënyrë të kundërt duke vendosur panelin në vendin e hedhur.
Ndryshoni panelin e instrumentit në një të re

Siç kemi kujtuar më parë, përveç metodave të shkaktuara, ka ende opsionin më të shtrenjtë, por edhe cilësinë më të lartë, është një zëvendësim i plotë i panelit të instrumentit. Tani në mënyrën e paneleve të instrumenteve, të cilat bazohen në një ekran të madh në vend të instrumenteve analoge.
Madje edhe në makina vendore Ju mund të instaloni një mrekulli të tillë dhe paneli do të fitojë pamje moderne. Kur zgjedhni është e nevojshme të mbani mend të gjitha parametrat e makinës suaj, si edhe motorë të ndryshëm Mund të luajë një rol në zgjedhjen. Një panel i tillë ju lejon të përshtatni plotësisht pajisjet për shijen tuaj, vendndodhjen e tyre, ndriçimin dhe parametrat e tjerë. Me pak fjalë, bëni gjithçka për të shijuar shoferin. Më poshtë kemi një shembull video të funksionimit të një paneli të tillë të instrumenteve me makinë Vaz 2114.
Kjo teknologji bazohet në një ekran të madh në të gjithë panelin e instrumenteve, një mikçmues bazuar në Android dhe një sërë pajisjesh, Wi-Fi, Bluetooth.
Një zëvendësim i tillë është zakonisht i shkurtër, por i kushtueshëm, kështu që para se të mendoni nëse keni nevojë për atë ose vetëm për bukurinë.
Paneli i instrumentit të akordimit të çmimeve

Kostoja e pjesëve mund të varet nga ajo që ju doni të merrni si rezultat. Për një shembull, një shirit LED 10-15 minutësh do të kushtojë rreth 1-2 dollarë, nëse ata marrin një film me ngjyra, atëherë kostot janë më pak ose në të gjitha mund të gjenden në shtëpi në garazh.
E saj ka të bëjë me ekranin në vend të panelit të instrumentit, pastaj në të njëjtën Vaz 2114 do të kushtojë 300-400 dollarë. Por ende, gjithçka varet nga modifikimi i vendosur nga softuer dhe të vendosur karakteristika të tjera Një panel i tillë i instrumenteve. Mesatarisht, zëvendësimi i të gjithë panelit merr disa orë.
Ekran interaktiv video në Vaz 2114:
Pult i makinës është një detaj shumë i rëndësishëm. Është duke përdorur pultin se automobilisti mund të lundrojë shpejt në rrugë dhe të marrë vendimi i duhurPër të kuptuar nëse ai duhet të shtojë shpejtësinë ose do të ishte koha për të shkuar në një kuti tjetër. Në çdo rast, sa e mirë do të funksionojë pultJo vetëm siguria e shoferëve në rrugë do të varet nga rruga, por edhe ngasja e saj e rehatisë.
Vlen gjithashtu duke thënë për pamjen e pultit, sepse pulti vazhdimisht e sheh shoferin para tij. Dhe pikërisht ky element i makinës të ndjekë dhe, nëse është e nevojshme, të vihet në rregull, pavarësisht nëse keni një makinë të vjetër ose një të re.
Edhe me ndihmën e më së shumti veprim i thjeshtëJu mund të bëni pothuajse çdo automobilist që mund të çmontojë pultin tuaj të makinës, ju mund ta transformoni atë dhe me të vërtetë unik.
Çfarë ndodh pulti i akordimit
Aktivizimi i këtij elementi të makinës mund të atribuohet me kusht ose për përmirësime funksionale ose në estetikë. Shpesh shoferët që mendojnë për përmirësimin pult Makina është ndjekur të dyja qëllimet dhe dëshiron ta bëjë panelin edhe më të bukur dhe funksional.
Të plotë të mjaftueshme, por proces interesant tuning pult në detaje:
Tuning funksional është i drejtuar kryesisht ose për të zëvendësuar kontrollet ose instrumentet e makinave për analoge më të avancuara, ose thjesht parashikon shtimin e pajisjeve ose kontrolleve shtesë. Qëllimi kryesor i një akordimi të tillë është përmirësimi i cilësisë së informacionit mbi gjendjen e makinës ose në lidhje me motin ose kushte të tjera jashtë bordit.
Tuning estetike nga ana e tij drejtohet ekskluzivisht për të përmirësuar pamje e jashtme pult. Natyrisht, përmirësime të tilla mund të bëhen edhe në dëm të funksionalitetit, i cili nuk është gjithmonë i mirë që ndikon në veturë, por nëse një person dëshiron të bëjë diçka me makinën e tij, është e vështirë të ndalet.
Kompleksiteti i akordimit funksional
Shpesh, akordimi funksional është i kufizuar vetëm duke zëvendësuar pajisjet e vjetra ose të dështuara të makinave me më të reja dhe moderne. Megjithatë, mos harroni këtë akordim funksional duhet të atribuohet dhe instalohet elemente shtesë Kontrolli i makinës si immobilizer, në kompjuter ose pajisje shtesë të ngulitura. Problemi kryesor me një përmirësim të tillë nuk është aq shumë zgjedhja e komponentëve, sa instalim kompetent. Më shpesh, tifozët e rishikimit të akordimit, të cilat në shtëpi do të duan të kryejnë një konfigurim të tillë, do të duhet të përballen me një problem të tillë si vështirësitë në instrumentet kalibruese. Paramendoni se shpejtësia e shpejtësisë do të tregojë shpejtësinë joadekuate të automjetit ose sensori i karburantit do t'ju mashtrojë në momentin më të papërshtatshëm. 
Më vete, ju duhet të thoni për këtë moment si ligjshmërinë e përpunimit. Kjo është - nëse dizajni i makinës ofrohet nga një shpejtësimatës ose një tahometër pikërisht modeli që është instaluar në fabrikë, do të jetë mjaft e vështirë të shpjegohet zëvendësimi i saj gjatë mirëmbajtjes. Prandaj, është më mirë të kryeni akordimin estetik të pajisjeve, të cilat tashmë janë instaluar në makinë, dhe vend shtesë ose në krye të pultit, ose ato vende që janë ende të lira.
Pyetje estetike
Gjatë kryerjes së akordimit estetik, është e nevojshme të planifikoni me kujdes gjithçka, sepse aftësitë do të duhet jo më pak se kur kryejnë një përmirësim funksional në pult, dhe përveç kësaj, ajo gjithashtu merr një ndjenjë të anuluar të shijes. Nëse ju vetë e dini se çfarë doni, mbetet vetëm për t'u përgatitur materialet e nevojshme Dhe artikujt, dhe ne do të flasim për atë pak më vonë, por nëse nuk keni një plan të qartë, është e nevojshme të zhvilloni atë paraprakisht. 
Së pari, shikoni për frymëzim në forumet e makinave ose kërkoni këshillën nga miqtë e shoferëve që rregullojnë makinat e tyre. Natyrisht, secili person në mënyrë të jashtëzakonshme ka shijen e vet, por modifikimet e përfunduara të dikujt mund t'ju shtyjnë me një vendim interesant, të cilin do të zbatoni më pas.
Përveç kësaj, duke ditur se çfarë doni të arrini me makinën tuaj, ju mund të merrni lehtë materialet e nevojshme dhe të aplikojnë një ose zgjidhje të tjera që lidhen me prodhimin e elementeve të nevojshme për akordim.
Ku të filloni akordimin
Pa marrë parasysh se si keni ndërmend të përmirësoni pultin e makinës, së pari përgatiteni mjetet e kërkuara:
Mjete për të disassembling pult
Tharëse industriale
Thikë shkrimi ose teh të mprehtë
Kërkohen instalime elektrike dhe kontrolle
Hekuri dhe lidhësi i saldimit

Mjetet dhe materialet e mbetura të nevojshme do të ndryshojnë nga njëri-tjetri në varësi të asaj që do të bëni me pultin. Ju gjithashtu mund të keni nevojë për mjete specifike nëse keni nevojë të përdorni teknika jo standarde dhe një mjet jo-standard për të çmontuar panelin. Më parë, zbuloni se cilat mjete nevojiten për të hequr mbulesën e makinës dhe heqjen e atyre elementeve që do të zëvendësohen ose të rafinohen. 
Ne çmontojmë pultin
Specialistët rekomandojnë të shpenzojnë ndonjë punë në një dhomë të thatë në të cilën nuk ka pluhur. Kjo është e mjaftueshme moment i rëndësishëm, në të cilën varet suksesi i përgjithshëm i sipërmarrjes sonë. Së pari, pluhuri mund të na pengojë pikërisht duke fërkuar filma të ndryshëm me ngjyra për të ndryshuar ngjyrën e dritës së ndriçimit të instrumenteve në panel, dhe lagështia e rritur thjesht do të prishë instalimet elektrike.
Ju duhet të hiqni me kujdes trimencën në pultin e makinës suaj për të fituar qasje në ato kontrolle ose duke monitoruar statusin e makinës që dëshironi të punoni. Në rast se do të ndryshoni shkallën në instrumentet, ne ju këshillojmë që të hiqni shigjetat jashtëzakonisht të butë. Për këtë, një shënues i thjeshtë është i përsosur, i cili shënohet me një vend të lidhjes së shigjetës duke përdorur një dash ose pika. Në rast se arritësi është ngjitur, ju mund të përdorni hekurin e saldimit dhe të ngrohtë kallaji që mban shigjetën në spirale. Megjithatë, mos harroni se shigjeta do të vazhdojë të vendosë përsëri, dhe për ta bërë atë të drejtë, ju duhet të caktoni lokacionet e lidhjes, sepse përndryshe kalibrimi mund të kryhet vetëm në shërbimin e makinës. 
Si të përmirësoni pultin
Kur ju çmontoni pultin në shtetin që ju mund të punoni me të, vlen të ndalet dhe të mendosh për atë që planifikoni të bëni. Ju gjithashtu duhet të kontrolloni nëse modifikimet tuaja do të dëmtojnë modifikimet tuaja dhe nëse gjithçka është në rregull, atëherë mund të vazhdoni.
Pas kësaj, me pultin tuaj, ju mund të bëni pothuajse të gjitha që ju dëshironi, por nga bollëku i mundësive të ndryshme, shpesh duke filluar të humbni, kështu që le të shqyrtojmë disa opsione të akordimit.

Ne ndryshojmë shkallën e instrumenteve

Para së gjithash, ju mund të zëvendësoni shkallën në instrumentet. Për ta bërë këtë, ju mund të pikturoni shkallën e vjetër dhe të aplikoni një vizatim në të ose me një klishe, ose të rrini një film të veçantë me një model të shtypur tashmë në shkallë. Më shpesh, ky opsion jep rezultatin më të bukur dhe me cilësi të lartë. 
Në mënyrë që të bëni një film të tillë, madje mjaft në redaktorin më të thjeshtë grafik për të nxjerrë një paraqitje të asaj që dëshironi të shihni në një pajisje të veçantë dhe të shtypni atë film i veçantëPër të cilën mund të kontaktoni shtëpinë e shtypjes. Në të njëjtin rast, nëse doni të ndryshoni ngjyrën e shigjetës ose elemente individuale Në shkallën e pajisjes, ju mund të pikturoni me kujdes seksionet e dëshiruara me bojë. Disa shoferë që duan të arrijnë efekte interesante të luminescencës përdorin një bojë fluoreshente për këtë, e cila shkëlqen në mënyrë të përkryer kur lidhet edhe një i vogël që udhëhiqet në backlight.

Ne zëvendësojmë dritën e pasme të instrumenteve
Meqenëse u diskutua për të shtuar LEDs në ndriçimin e pajisjeve të caktuara, vlen të thuhet se ndriçimi LED i instrumenteve është akordim shumë i popullarizuar.
Megjithatë, pavarësisht nga popullariteti i saj, me shtimin e ose duke zëvendësuar plotësisht dritën e dritës në LED, vlen të jesh shumë i kujdesshëm. Së pari, ju do të duhet të përballeni me mjaft procesi kompleks Heqja e instalimeve të fabrikës dhe llambat e fabrikës të backlight, dhe së dyti, ju mund të lodhni atë me numrin e LEDs. Kjo nuk ndodh, ne ju këshillojmë që të kufizoheni në 1-2 LED në pajisjen, e cila do të jetë mjaft e mjaftueshme për ndriçim të ndritshëm, i cili do të jetë i dukshëm në muzg, por nuk do të mundë në sy gjatë natës. 
Në rast se pajisja është zbatuar nga brenda në pajisje, dhe shkalla e pajisjes në vetvete është transparente, ju mund të shtoni pak më shumë LED, por ia vlen t'i vendosni ato në mënyrë të tillë që drita e tyre e drejtpërdrejtë të mos marrë në sy për shoferin ose pasagjerët.
Një mënyrë interesante për të zëvendësuar pjesën e pasme në Skoda Octavia:
Për të instaluar një ndriçim të tillë, vlen të përdorni instalime elektrike të një makine, siç është e lidhur fillimisht me kontrollet dhe nuk duhet të thyeni kokën se si të ruani ndriçimin ose ku të vendosni butonin për ta kthyer atë.

Rregulloni shkëlqimin e ndriçimit

Më shpesh për të rregulluar shkëlqimin e dritës së pasme, të vendosura prapa pajisjes, ju duhet të mbledhni atë, por nëse diçka nuk rregullon në shkëlqim, pajisja do të duhet të çmontojë dhe të konfigurojë përsëri. Në mënyrë që të mos kaloni kohë për veprime të tilla, ne ju këshillojmë që të lidhni pjesën e pasme përmes rreshtit të ndryshueshëm, të cilat mund të kontrollohen nga intensiteti i shkëlqimit, thjesht ta shtrembëroni atë. Natyrisht, vendosja është më së miri 3 herë - gjatë ditës, në muzg dhe natën, për të kuptuar, është e përshtatshme për të parë instrumentet.

Akordim kompleks
Shpesh shpesh shoferët, të cilët me duart e tyre përmirësojnë pultin e tyre, modifikojnë disa instrumente në të njëjtën kohë ose ndriçimin e përgjithshëm të pultit në mënyrë që të duket më elegant. Në këtë rast, është më mirë të përgatiteni paraprakisht të njëjtat shabllone për shkallët e instrumenteve dhe të njëjtën ngjyrë të LED-ve të backlight. Në të njëjtin rast, nëse nuk keni qasje në LEDs të ngjyrës së dëshiruar, ju mund të bëni nga LED-të konvencionale të bardha dhe thjesht rrini në vendet e dëshiruara, filmi i tejdukshëm i ngjyrës së dëshiruar. Ky film do të jetë një filtër konvencional i dritës, dhe efekti që arrini të njëjtën gjë si kur përdorni LED me ngjyra të ndryshme.

Teknikat e akordimit
Për të kryer me sukses çdo përpunim të makinës ose pultit të tij, ju duhet të keni teknika të shumta të thjeshta që do t'ju lejojnë të kryeni veprimet e nevojshme. Ne kemi thënë tashmë për mënyrën se si të rrinë një film tonor në mënyrë korrekte, domethënë, teknikat e tilla përdoren dhe kur ngjitni filma të tejdukshëm rrugë e kundërt Scoreboard Scoreboard me lojëra elektronike në mënyrë që ndarjet dhe numrat me ngjyra të ndezura dritë e drejtë. Një teknikë tjetër po aq interesante është përdorimi i bojërave fluoreshente për të pikturuar shigjetat ose ndarjen e pajisjes. Në mënyrë që të aplikoni një bojë të tillë, është e mjaftueshme për të përdorur një model të thjeshtë, në krye të të cilave ju mund të sigurtë bojë, ose vetëm butësisht e aplikoni atë me një furçë të hollë.
Gjithashtu, mos harroni për nevojën për të korrigjuar saktë shigjetat pas heqjes së tij, sepse një pajisje e kalibruar gabimisht është shumë problem serioze cila mund të zgjidhet vetëm në qendrën e shërbimit.

Instalimi i instrumenteve dhe pultit të montimit
Kur keni bërë të sigurt se keni bërë gjithçka që kam kërkuar dhe plotësisht të kënaqur me rezultatin, është koha për të vendosur pajisjet e larguara Në vend, lidhni ato dhe mbledhni pultin. Mos harroni të kontrolloni nëse pajisjet janë ngrënë dhe gjithçka është në rregull me fasteners e trim. Nëse ju bëni gjithçka me qetësi dhe mos nxitoni, atëherë një akordim i tillë i pultit jo vetëm që do të jetë më i keq se ai për të cilin ju do të duhet të paguani një sasi të madhe të mjaftueshme në studio, por edhe më mirë, sepse ju do të bëni një akordim të tillë me tuajin duart e veta dhe në çdo kohë mund të ndryshohen ose të hiqen diçka.
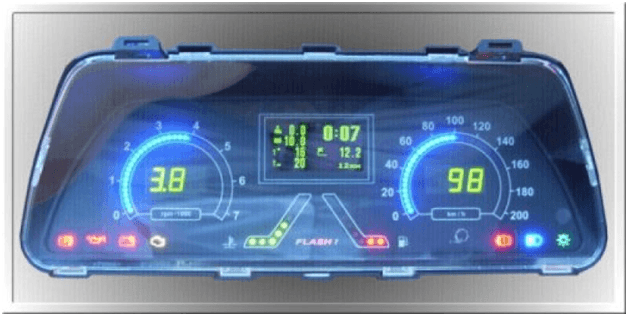
Më makina moderne Keni panele të mira dhe të bukura të instrumentit. Cilat janë disa, disa. Por shumë shpejt në makina do të fillojnë masivisht panelet e instrumenteve digjitale, të cilat do të zëvendësojnë analog. Panelet e reja të instrumenteve tashmë kanë filluar të përdorin disa prodhues. Ne ju ofrojmë dhjetë grupe më të mira digjitale të pajisjeve, të cilat paraqiten sot në tregun e makinave.
Disa më shumë dhe të ngjashme sistemet digjitale do të jetë norma për të gjitha makinat. Pajisjet digjitale të pajisjeve janë shumë më praktike dhe më të sakta për paraardhësit e tyre analog. Si rregull, në panelin e instrumentit, prodhuesi fut ekranin LCD, i cili tregon imitimin e instrumenteve të njohura për ne, të tilla si një shpejtësimatës, tahometer, niveli i karburantit dhe shumë më tepër. Përveç kësaj, panelet e instrumenteve digjitale mund të nxjerrin disa informacion shtesee cila nuk ishte në dispozicion në analog. Për shembull, prodhimi i hartës së navigimit, gjë që e bën më të lehtë për shoferin një pasqyrë të rrugës, praktikisht nuk shpërqendrohet nga rruga.
1) modeli TESLA

Çdo diskutim për të reja teknologjia digjitale Gjithmonë udhëheq kundërshtarët në makina kompanitë Tesla. Pult e tyre është një largim radikal nga ajo që kemi parë për të parë në makina. Paneli i instrumenteve në këto makina është tërësisht elektronik, i cili tregon shumë informacione, duke filluar nga grafiku i efikasitetit të makinës dhe dhënien e informacionit nga interneti për motin.
Opsionet e personalizimit të gjerë do të ndihmojnë shoferin të tërheqë informacione të ndryshme me të. Kur të filloni makinën, analitikët shfaqen udhëtimet tuaja të mëparshme në panelin e instrumentit.
Paneli raporton nëse keni derën e hapur, nëse makina po akuzon dhe shumë më tepër. Dizajni Digital LCD zëvendësoi kombinimet e instrumenteve analoge më të avancuara në tregun e makinave.
2) Audi TT 2015

Sami modeli i fundit, si rregull, ka më shumë. Prandaj, nuk ka asgjë të habitshme në atë që kjo listë është e pranishme model i ri . Risi mori një pult të ri, i cili është një grup dixhital i kombinimit të instrumentit. Elementet shumëngjyrëshe dhe të bukura të imazhit grafik janë shumë të kualitetit të lartë. Paneli ofron një numër të madh të informacionit të ndryshëm, duke përfshirë navigimin.
3) Chevrolet Corvette 2014

Gorous dhe teknologji të lartë. Çfarë është vetëm një ekran i ri i përshtatshëm LCD, i cili është i instaluar në vend të kombinimeve të instrumenteve analoge. Natyrisht, shumë pronarë të makinave të vjetra të kësaj marke do të thonë se pult i ri nuk jep një ndjenjë të tillë të klasikëve sportive. Por megjithatë, panel i ri Pajisjet janë shumë më të mira.
Power çift rrotullues, presioni i gomave, overclocking nga 0 në 100 km / orë dhe shumë informacione të tjera shfaqet në ekran, gjë që e bën panelin me një mjet të vlefshëm për të matur fuqinë e makinës.
4) Dodge Viper SRT

Brezat e fundit, këto makina shpesh "dënuan" shoferët për paaftësi për të menaxhuar makinë e fuqishme. Në brezin e ri që shoferi paralajmëron rrezikun. Për më tepër, "Gadyuk" fillon t'ju paralajmërojë për rrezikun e një mënyre të frikshme në një kuptim literal, duke tërhequr në kombinimet e ekranit LCD të instrumenteve, logon "Stryker", e cila fillon të kërcënojë kërcënimin e kuq.
Duke përdorur këtë ekran, ju mund të gjeni se sa keni pranuar nga 0-100 km / h, nga 0 deri në 200 km / h, çift rrotullimi maksimal në një segment të caktuar të rrugës dhe informacione të tjera.
5) CADILLAC CTS dhe XTS 2014

Paneli i instrumentit analog lamtumirë. Hi kombinim kompjuterik i pajisjeve. I ri panel dixhital U shfaq në makinat e gjeneratës së tretë. Ekran i konfigurueshëm me rezolucion të lartë para se shoferi të mund të ndryshojë cilësimet vizuale si tema në desktopin e Windows 8.
Cilësimet e dizajnit përfshijnë të dyja tre qarqet tradicionale të paneleve të instrumenteve dhe një temë sportive, ku shfaqet një tahometër në plan të parë. Projektuesit e panelit dixhital arritën të krijojnë dekoratë me cilësi të lartë në stilin e minimalizmit. Më shumë gjasa, zhvilluesit u frymëzuan nga science fiction. Gjithashtu, përveç grupeve kryesore të kombinimit të pajisjes, shoferi mund të shfaqë kartën sistemi i navigimit dhe çdo informacion me informacionin sistemi i Argëtimit.
6) 2014 KIA K900 / Kuoris

Vitet e fundit kia. Surpriza me zhvillimin dhe inovacionin e saj. Funksione të teknologjisë së lartë Të përdorura në makina premium. Modeli i fundit luksoz i kompanisë koreane, e cila është e ndezur Tregu rus Mbart një kuoris emri. Ky model ka një grup dixhital mahnitës të kombinimit të instrumentit, me një ekran me ngjyra të ndritshme. Në ekran paraqitet të gjithë informacioni i nevojshëm, duke filluar nga navigimi dhe duke përfunduar me informacion multimedial nga një sistem infotainment.
Por zgjidhja më interesante në trifle. Një kub është tërhequr në ekran, e cila është një mekanizëm i makinës. Ky shesh tregon mënyrën e makinës. Duke u kthyer në mënyrën e sportit, sheshi shfaqet në modalitetin 3-D. Fytyrat e kubit ju tregojnë shpejtësinë e shpejtësisë.
7) 2009 Lexus LFA

Në LFA pas fillimit të motorit, katër shfaqet në ekran pajisjet digjitale: Niveli i karburantit, presioni i naftës, temperatura e motorit dhe rezerva e goditjes. Sapo të shtypni pedalin e gazit, këto pajisje po lëvizin përgjatë skajeve, dhe një shpejtësimatës dhe tachometer shfaqen në qendër.
Sa më shumë që të shtypni pedalin e gazit, aq më mirë të bëhet tachometër. Kur kaloni transferimin, një gjurmë mbetet në ekran nga shpejtësia e mëparshme. Kjo është bërë për t'ju dhënë informacion rreth transmetimit dhe raportit të fundit për atë program që jeni duke lëvizur.
Kohët e fundit, një pult i ngjashëm u shfaq në sedanin e ri është. Ndërsa, megjithatë, në konfigurimin "sport".
8) 2015 BMW I8

Ka një ekran dixhital plotësisht elektronik që zëvendëson kombinimet analoge të pajisjes. Grafika ka punuar shumë mirë dhe të ndritshme. Ekrani mbulon grafikë 3-D.
Përveç pajisjeve kryesore të makinës dhe lundrimit në ekran, shfaqen edhe të ndryshme. informacion teknik. Nëse, për shembull, shoferi zgjedh regjim ekonomik "Eco Pro", duhet të shfaqen këshilla, të cilat i raportohen shoferit, siç është e nevojshme për të shkuar me kursimet maksimale të karburantit, duke kursyer shkarkimin e baterisë.
9) 2014 CADILLAC ELR

Në shikim të parë, ju mund të mendoni se ELR është e pajisur me saktësisht të njëjtën ekran si CTS dhe XTS, por nuk është. Gjë është se makina është e fokusuar në makina elektrikeKush duhet të tregojë shoferin e efikasitetit të menaxhimit dhe të dhënave të tjera specifike makinë hibride. Në vend të përdorimit të treguesit të shpejtësisë, ju tregojnë shpejtësinë e preferuar për efikasitet, në shfaqje me anën e djathtë I shfaqur shenjë e gjelbëre cila, në varësi të ngarkesës lëviz, pastaj poshtë.
Nëse filloni më shpesh për të shtypur pedalin e frenave, ikona lëviz. Nëse hani në një ritëm të qetë ose kodrina, treguesi zbret. Balancimi i kësaj pajisjeje në nivelin e mesëm ju do të arrini lëvizjen optimale të automjeteve, duke kursyer burimet e baterisë. Përveç kësaj, paneli digjital mund të shfaqë hartën e navigimit dhe informacione të tjera nga sistemi i informacionit dhe argëtimit.
10) 2015 GMC Sierra Denali

GMC Sierra Denali ka një ekran dixhital ekskluziv në panelin e instrumentit. Ju nuk do të gjeni ndonjë gjë të tillë për të tjerët. Makina përveç pajisjeve analoge ka një qendër dixhitale të ekranit, e cila shfaqet për vendndodhjen tuaj aktuale. Përfshirë në ekran, mund të shfaqen informacione të ndryshme nga sistemi argëtues, si dhe të dhënat mbi parapaguesin e telefonuesit në të cilin mund të përgjigjeni me të ndërtuarin komunikim me zë të lartë. Gjithashtu në ekran mund të shfaqet fletorja juaj e telefonit celular.
Pajisjet e kontrollit në "shtatë" janë të përqendruara në një bllok të vetëm dhe ndryshojnë në informata të larta. Për makinën VAZ 2107, përveç kombinimit standard, kryhet një panel elektronik pamje origjinale, Të pajisur plotësisht për instalim pa ndryshimin e silureve. Produktet e prodhuesve të produkteve të këtij lloji të disa prej tyre dhe secili prej tyre ofron opsionin e vet.
Në modelin e makinës Vaz 2107 të ashtuquajturat Europantel pajisjet e kontrollit Mund të instalohet dhe të lidhet me duart tuaja pa tërhequr specialistë. Përfshirë, të gjitha pjesët e nevojshme janë në dispozicion, lidhësit standardë janë montuar për kalimin e pajisjes me një rrjet në bord në mbylljen e saj. Përveç kësaj, ka një udhëzues për instalim dhe certifikata teknikee cila vendos një shenjë për shitjen e dyqanit.
Çmontimin e një kombinimi të rregullt të pajisjes
Hiq panelin e fabrikës nga makina Vaz 2107 është mjaft e thjeshtë, është instaluar në një vend në kllapa të veçanta dhe të fiksuara në to me vida. Urdhri i çmontimit të pajisjes është si vijon:
- Ne prodhojmë mbyllje bateri rechargeable Duke shkëputur tela negative nga prodhimi përkatës i baterisë.
- Duke vepruar një kaçavidë të sheshtë, të marrë dorezat nga levat e kontrollit të sistemit të ventilimit dhe ngrohjes së brendshme.
- Një arrë mbajtëse e çelës së bashkimit të njehsorit të përditshëm kthehet rreth çelësit dhe hiqni atë së bashku me rondele.
- Ne nxjerrim prizën e vidës që lidh panelin dekorativ dhe të heqim atë.
- Me një kthesë të vogël, ne marrim një nyje nga një vend dhe të marrim qasje në një kombinim të instrumenteve.
- Me dorën tuaj, ne heqim reshjet e shpejtësisë në pajisje dhe e pasqyrojmë atë.
- Hiqni tubin nga montimi i ekonometës dhe bëjmë një mbyllje lidhësit elektrikë në numrin e tre copave.

Më pas panel dekorativ Me një kombinim të instrumenteve, është hequr plotësisht nga kamari dhe mund të punoni në tavolinë. Siç mund të shihet nga përshkrimi i paraqitur, çmontimi kjo pajisje Makina Vaz 2107 nuk përbën një vështirësi të veçantë dhe mund të kryhet nga një automobilist në mënyrë të pavarur.
Përshkrimi i pajisjes elektronike
Në vendin tonë ka disa prodhues të këtij lloji të pajisjeve që ofrojnë produktet e tyre për konsumatorin. Panel elektronik Për një makinë, modeli VAZ 2107 është një grup treguesish dhe blloqe të pajisjeve matëse të mbledhura në një strehim të vetëm dhe përshtatur për instalimin në vend të fabrikës. Elementet e mëposhtme janë të pranishme në një kombinim të tillë të instrumenteve:
- kompjuteri në bord me një ekran të lëngshëm kristal shfaq 132x48 pikë;
- shpejtësia e shpejtësisë;
- tahometër;
- indeksi i nivelit të karburantit;
- ekonome;
- treguesit e treguesve të rrotullimit;
- llambat e kontrollit të presionit të naftës në sistemin e lubrifikimit dhe nivelin e ngarkesës së baterisë.
Për lehtësinë e perceptimit të informacionit nga shoferi, paneli i kompjuterizuar i pultit për makinën VAZ 2107 ka një vështrim të njohur. Speedometer, Tachometër dhe Indeksi i Nivelit të Karburantit janë të dekoruara në formën e treguesve të revoleve. Ky kombinim i instrumenteve ka funksionalitetin e mëposhtëm:
- tester diagnostik;
- kompjuteri i udhëtimit;
- treguesi i alarmit;
- clock me orën dhe kalendarin e alarmit;
- treguesi i parametrave dinamikë;
- magazinimi dhe shfaqja e informacionit të librit të shërbimit.

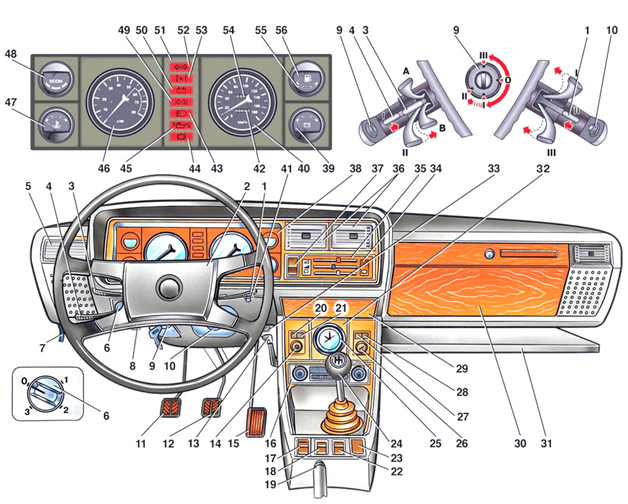
Pas vendosjes së duhur, një kombinim i tillë i instrumenteve do të kujtojë nevojën për të kryer operacione për të mirëmbajtje makinë. Informativiteti i një paneli të tillë me makinë Vaz 2107 është në shumë nivel i lartë, dhe ndriçimi i zgjedhur me kompetent nuk shpërqendron nga kontrolli i makinës. Kombinim instrument Punon në parimin e treguesit vetëm nga ato parametër që kanë devijime të rëndësishme nga të specifikuara.
Pajtueshmërinë e kombinimit elektronik me rrjetin në bord
Dashboard i përshkruar më sipër mund të përdoret në automjetet Vaz 2107 të pajisura me një sistem injeksion modifikime të ndryshme. Zhvilluesit e përdorur për të lidhur lidhësit e ngjyrave të ngjyrave të instalimeve të instalimeve elektrike që korrespondojnë me fabrikën, e cila lehtëson në masë të madhe instalimin dhe kalimin e pajisjeve. Dimensionet gjeometrike, Forma dhe vendndodhja e kllapave të fiksimit janë krejtësisht identike me panelin e rregullt.

Pajisjet e përshtatura për të punuar me blloqe kontroll elektronik Modelet e motorit 5.1 janar dhe Bosch M1.5.4. Është e mundur të riprogramosh kombinimin e instrumenteve duke përdorur një encoder me lidhjen e fundit përmes një lidhësi të veçantë. Elektronikë evropiane është në përputhje me një sensor parkimi të të njëjtit prodhues, informacion nga i cili shfaqet në një ekran të lëngët kristal.
Instalimi i kësaj pajisjeje për makinën me ndihmën e komponentëve të përfshirë në grupin e dorëzimit:
- parzmore instalimi;
- lidhës i veçantë i formës;
- mbërthimi i bulonave.
Kjo pult ishte projektuar posaçërisht për makinën VAZ 2107 si versionin e saj elektronik dhe në mënyrë organike përshtatet në dizajnin e brendshëm. Rregullimi automatik i backlight bën lexime të dallueshme dhe në të njëjtën kohë nuk e bezdisshëm vizionin e shoferit dhe pasagjerëve.
Instalimi i një kombinimi elektronik
Pajisjet e fituara hiqen nga paketimi dhe inspektohen dhe bashkangjitur duke përdorur vida vetë-përgjimi në rreshtim dekorativ. Për të vendosur në rrugë e kundërt Lidhësit lidhin pajimet e instalimeve në rrjet në bord Makina Vaz 2107, për lehtësi që ata kanë formë të ndryshme dhe ndryshojnë në ngjyrë. Kombinimi i instrumentit futet në një vend dhe fiks në të duke përdorur një vidë.