Së pari, le të kuptojmë se çfarë është një deflektor. Më shpesh, deflektorët quhen vizorë. Përkthyer nga anglishtja, deflektor do të thotë një prerës. Defektorët nuk janë aksesorë të zakonshëm për një pamje interesante të makinës, ata kanë të tjerë funksione të dobishme... Ato janë krijuar për të ofruar rehati shtesë dhe për të përmirësuar aerodinamikën.
Funksione të dobishme deflektori
- Defektorët janë bërë nga një formë e thjeshtë, e cila nuk lejon që shiu dhe bora të hyjnë në brendësi të makinës suaj përmes një dritareje paksa të hapur.
- Për ata që duan të pinë duhan në makinë, deflektorët janë një domosdoshmëri! Tymi është tërhequr mirë dhe shkëmbimi natyror i ajrit bëhet në kabinë.
- Defektorët mbrojnë nga hyrja e ujit të ndotur nga poshtë rrotave të automjeteve të tjera.
- Ata janë në gjendje të theksojnë siluetën e një makine dhe të ndryshojnë pamjen estetike. Defektorët janë zgjedhur nën markë specifike dhe modeli i makinës.
Kjo është e rëndësishme të merret parasysh para instalimit.
Para se të instaloni deflektorët në dritaret e makinës, duhet të njiheni me disa hollësi, të cilat do të diskutohen më poshtë.
Këshilla më e rëndësishme: kur blini deflektorë të dritareve anësore, ato duhet të provohen për makinën në të cilën do të instalohen. Problemi kryesor me disa deflektorë është se ata nuk përshtaten mirë me makinën dhe për këtë arsye nuk ngjiten mirë me derën.
Zgjidhni defektorët që të mos bllokojnë pasqyrën e pasme, përndryshe do t'ju pengojnë pak pamjen!
Është e dëshirueshme që gjatë instalimit të deflektorëve, temperatura Mjedisi ishte të paktën +10 gradë.
Udhëzime për instalimin e deflektorëve në shirit
Pra, le të kalojmë në vetë procesin e instalimit. Nëse zgjidhen deflektorë që janë instaluar vetëm në shirit, atëherë instalimi do të jetë më i lehtë.

|
Ne heqim mbulesat mbrojtëse nga deflektori, si rregull, kjo është një mbështjellje plastike. |

|
Para instalimit, duhet të bashkëngjitni deflektorë për të kuptuar se si do të vendosen saktë. Deflektori duhet të kalojë përgjatë skajit të dritares! Vendosni shenja ku do të vendoset deflektori. Kjo mund të bëhet me shirit maskues. |

|
Pas kësaj, pastroni vendin e ngjitjes me alkool ose lëngje që përmbajnë alkool. Zakonisht, deflektorët e rinj vijnë me një leckë për heqjen e yndyrës. Pasi të keni hequr yndyrën, fshijeni sipërfaqen me një leckë të thatë dhe të pastër ose thjesht lëreni të thahet. |

|
Pastaj hiqni shiritin mbrojtës të shiritit të dyanshëm disa centimetra dhe përkulni fragmentet e qëruara. |

|
Ngjitni butësisht deflektorin në vendin që tashmë është shënuar, duke shkëputur gradualisht pjesën tjetër të shiritit. |

|
Menjëherë pas kësaj, deflektori duhet të shtypet fort. Është më mirë ta bëni këtë me një leckë të pastër të thatë. |
Në faza e fundit heqim shenjat që kemi bërë në fillim. Ngrohim me tharëse flokësh në mënyrë që vendi i ngjitjes të kapet më shpejt. Nëse nuk e keni ngrohur me tharëse flokësh, atëherë këshillohet që uji të mos hyjë në makinë për të paktën një ditë. Gjithçka, deflektorët janë të instaluar.
Instalimi i deflektorëve në kapëse: hap pas hapi

Ka deflektore që jo vetëm janë ngjitur në makinë në shirit të dyanshëm, por gjithashtu kanë vrima për montime shtesë... Prandaj, vetë montimet shtesë përfshihen me deflektorë të tillë. Procesi i instalimit të deflektorëve të tillë është i ngjashëm me procesin e instalimit të deflektorëve pa fiksues shtesë.

|
Për të filluar, ne aplikojmë deflektorë dhe vendosim shenja, fshijmë vendin e ngjitjes. |

|
Pas kësaj, ju duhet të instaloni kapëse nën brezin elastik në harkun e derës |

|
Aty ku ka vrima në deflektor. |

|
Kapëset janë instaluar në një skaj nën një brez elastik dhe ato duhet të mbyten atje sa më thellë që të jetë e mundur. |

|
Më pas shkëputim pjesërisht shiritin e sipërm. ngjitni deflektorin dhe shtypeni fort. |

|
Ne e përkulim shiritin në mënyrë që buza të duket jashtë. |

|
Marrim unazën e gomës dhe e fusim në pjesën tjetër të kapëses. Pastaj e instalojmë në vrimën në deflektor nga brenda, e kombinojmë me kapësin që ishte instaluar më parë nën brezin elastik të harkut të derës. |

|
Më pas e fusim këtë karafil. |

|
Kështu duket klipi i instaluar nga jashtë. |

|
Dhe kështu nga brenda. |
Defektori i instaluar!
Procedura e instalimit të deflektorëve me lidhëse të brendshme

Ekziston një lloj tjetër lidhësish, kur së pari instalohet një deflektor, dhe më pas futen fiksuesit brenda. Kur xhami ngrihet, ai bie në vend dhe fikson fort deflektorin, duke e zgjeruar atë. Në diagram, instalimi i një deflektori me lidhëse duket si ky:

Si instalohen vizorë të tillë, shihni tabelën e mëposhtme.

|
Kështu duket një grup deflektorësh me kllapa. Dy për çdo deflektor. |

|
Përveç kësaj, shirit ngjitës aplikohet në deflektorët. |

|
Ne e vendosim vizoren në qoshet e dyerve nën brezin elastik, pasi të kemi hequr shiritin mbrojtës nga shiriti. |

|
Ju lutemi vini re se kllapat e fiksimit kanë një "gërshërë", me këtë "grizë" lidhësit kthehen drejt ndarjes së pasagjerëve. |

|
Ata tërhiqen pak nga buza e deflektorit. Dhe ata instalojnë lidhësit këtu. |

|
Dhe në këtë vend. |
Si të instaloni saktë deflektorët në dimër
Për të filluar, le të bëjmë një pyetje, a është e mundur të instaloni vizore në dimër? Në dimër, instalimi i deflektorëve sigurisht që nuk rekomandohet, pasi shiriti i dyanshëm nuk do të ngjitet në të ftohtë. Por nëse, megjithatë, lind një nevojë e tillë, atëherë duhet të bëhet në një hangar ose garazh të ngrohtë, ku temperatura nuk është më e ulët se +10 gradë. Nëse kjo gjendje nuk respektohet, atëherë deflektorët do të hiqen pas disa orësh. Nëse nuk ka asnjë mënyrë për të përdorur garazh i ngrohtë ose një hangar, është mirë të kontaktoni një specialist të shërbimit të makinave ose të prisni sezonin e ngrohtë!
Si hyrje, ju sugjerojmë të shikoni një video që tregon se si të instaloni deflektorë në pjesën e përparme dhe xhamat e pasme makinë.
Video: instalimi i deflektorëve të xhamit të përparmë
Video: montimi i deflektorit në dritaren e pasme
Një shtëpi moderne private e ndërtuar nga materiale të reja duke përdorur teknologji inovative, me struktura plastike të instaluara në hapjet e dritareve dhe dyerve, kërkon një shkëmbim të detyrueshëm efektiv ajri. Përndryshe, jo vetëm që do të jetë e padurueshme të jetosh në të, por edhe thjesht të jesh. Vetëm ventilimi i zgjedhur dhe i instaluar saktë do të ndihmojë në zgjidhjen e problemit të krijimit të një klime të shëndetshme të brendshme. Një deflektor ventilimi përdoret për të rritur tërheqjen.
Deflektori është një pjesë integrale e sistemit të ventilimit
Organizimi i shkëmbimit të ajrit në shtëpi kryhet nga një sistem elementësh, montimesh, mekanizmash që sigurojnë veprimin e tij shumëfunksional: hyrje, heqje, ozonim, ngrohje të ajrit dhe operacione të tjera. Rol i rendesishem në të luan deflektori i ventilimit të shkarkimit. Pajisja e tipit aerodinamik është e pajisur me një "kapak". Është montuar në çati nga lart në tubin e ventilimit të shkarkimit në shumë pika kryesore... Funksione:
- Mbron kanalin e ventilimit.
- Krijon tërheqje të pandërprerë për të gjithë sistemin e ventilimit, aktivizon punën e tij.
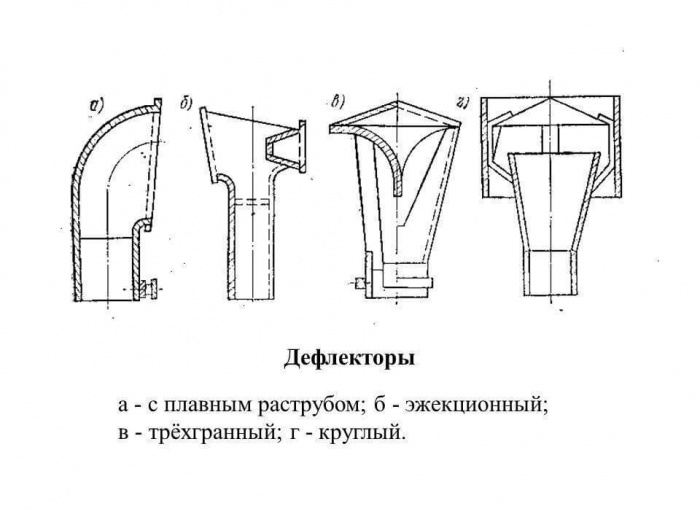
Dizajni është i ndryshëm, por ka elementë bazë të përbashkët:
- Dy gota: e jashtme është pak e zgjeruar në pjesën e poshtme, e brendshme është e barabartë.
- Një ombrellë (kapak) është një element mbrojtës që parandalon hyrjen e mbeturinave të ajrit, reshjeve dhe insekteve të vogla.
- Kllapa për fiksimin e kapakut.
- Dega e tubit.
- Disa pajisje ofrojnë rrjetë mbrojtëse, duke parandaluar hyrjen e mbeturinave në tub, por duke dobësuar tërheqjen, megjithëse jo në mënyrë të konsiderueshme.
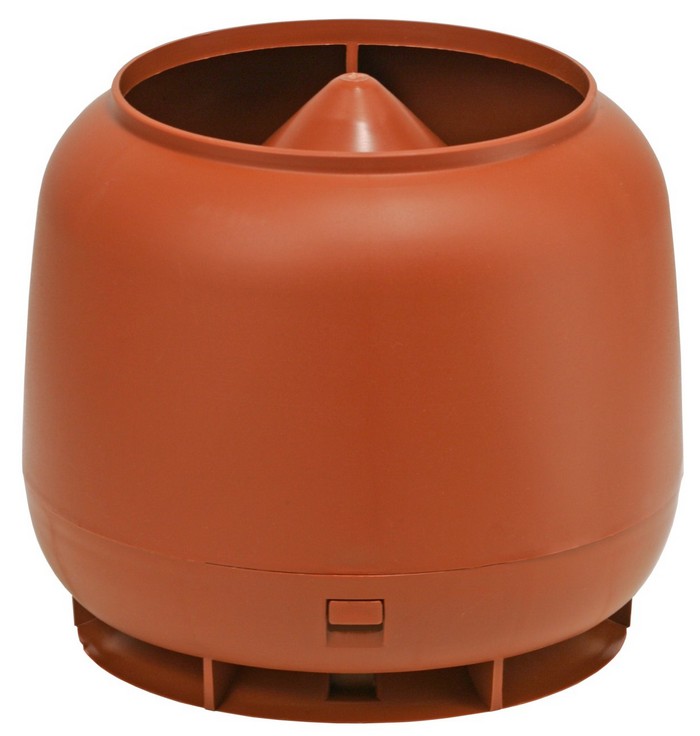
Predhat e trupave janë në formë cilindrash, të cilët mbahen njëra mbi tjetrën. Mbi pjesën e sipërme është ngjitur një kapak. Pjesa e sipërme e çdo cilindri është e pajisur me unaza. Ky lloj rikthimi është krijuar për të korrigjuar drejtimin e rrjedhës së ajrit në deflektorin e ventilimit të madhësive të ndryshme. Instalimi i tyre është planifikuar në mënyrë që flukset e ajrit depërtues të krijojnë thithjen e tij përmes rrjedhjeve midis unazave, duke përshpejtuar kështu largimin e gazrave nga ventilimi.
Funksionimi i defektorit
Për të kuptuar se çfarë është një deflektor në ventilim, një përshkrim i funksionimit të tij do të ndihmojë. Funksionaliteti i pajisjes është i thjeshtë, bazuar në reflektimin e rrjedhës së ajrit nga rrafshi i difuzionit. Kur masa e ajrit përplaset me të, kolona e ajrit shtypet. Shfaqet një zonë rrallimi, efikasiteti i shtytjes rritet. Deflektori i ventilimit nuk është vetëm një "shkop magjik" në kushtet e rrymës së pamjaftueshme për shkëmbimin e ajrit. Është një element i domosdoshëm i ventilimit në çdo rast. Prona kryesore është rritja e efikasitetit real të ventilimit. Kjo shifër mund të arrijë rreth 20%. Numri standard i deflektorëve (dm) nga 3 në 10 përmban informacion për cilin diametër të jashtëm të boshtit të ventilimit janë të destinuara. Lartësia optimale e instalimit është 1,5-2,0 m më e lartë se kreshta e shtëpisë.

Parimi i funksionimit të deflektorit të ventilimit të shkarkimit është krijimi i një zone me presion të reduktuar për të rritur tërheqjen. Sa më intensivisht të lëvizë ajri në një rrjedhë me një seksion kryq të ndryshëm, aq më i madh është rënia e presionit dhe efekti i shkarkimit të ajrit. Forca e erës që vepron në tub krijon një vakum relativ në afërsi të kokës.
Rrjedha e ajrit takohet me një pengesë gjatë rrugës në formë sipërfaqja e jashtme deflektor, rrjedh rreth tij. Ajri hyn në sistemin e ventilimit përmes çarjeve speciale në cilindrin e sipërm. Krijohet një rrallim i ajrit. Kjo orienton lëvizjen lart të kolonës së ajrit, duke rritur shtytjen. Deflektori i ventilimit punon me efikasitet optimal në kanalet e ventilimit me hapje dhe kthesa të gjata horizontale.
Nëse mungon në tubin e ventilimit, gjasat për një ulje të seksionit të brendshëm të prizës rriten për shkak të vendosjes dhe grumbullimit të yndyrës në mure dhe pluhurit dhe mbeturinave që ngjiten në to.
Dallimet e modeleve
Problemet e zbuluara me ventilim joefektiv zgjidhen nga një deflektor në tubin e ventilimit. Gjithashtu mbron sistemin e ventilimit nga efekti i rrymës së kundërt. Ekzistojnë disa dhjetëra modele të deflektorëve të ventilimit. Duke kryer të njëjtat funksione, pajisjet mund të ndryshojnë ndërmjet tyre:
- pamja;
- takimi;
- material.

Përveç shkëmbimit të ajrit në dhoma, deflektorët përdoren në industrinë e aviacionit dhe inxhinierinë mekanike. Materiali për prodhimin e tyre është:
- qeramika;
- plastike;
- çeliku i dhomës së bojlerit, inox dhe i galvanizuar;
- alumini;
- bakri (i rrallë).
Ekzistojnë gjithashtu modele të kombinuara: metal me një shtresë të sipërme plastike ose smalt. Deflektorët më të thjeshtë janë të disponueshëm për vetë-prodhim.
Kujdes! Përzgjidhet një deflektor për ventilim, bazuar në aftësitë financiare, dizajnin, si dhe drejtimin mbizotërues të trëndafilit të erës në një zonë të caktuar. Zgjedhja e dizajnit konsiderohet si një prioritet dhe lidhjet e nevojshme dhe dimensionet e përgjithshme tashmë janë përshtatur me të.
Dallimet sipas parimit të funksionimit:
- rrotullues;
- i palëvizshëm.
Karakteristikat e shkurtra të varieteteve kryesore

- Deflektor Grigorovich (universal) - për ventilim dhe heqjen e tymit.
- Modeli i Institutit Qendror Aerohidrodinamik është varianti më i zakonshëm. Ai përbëhet nga një pjesë hyrëse cilindrike e zbrazët, një difuzor, një trup, kllapa fiksuese dhe një "ombrellë".
- Astato është një lloj instalimi i hapur në formë disku i tipit statodinamik të performancës së kombinuar (natyrore dhe të detyrueshme). Ndërtim i thjeshtë dhe efikasitet të pranueshëm me konsum ekonomik të energjisë.
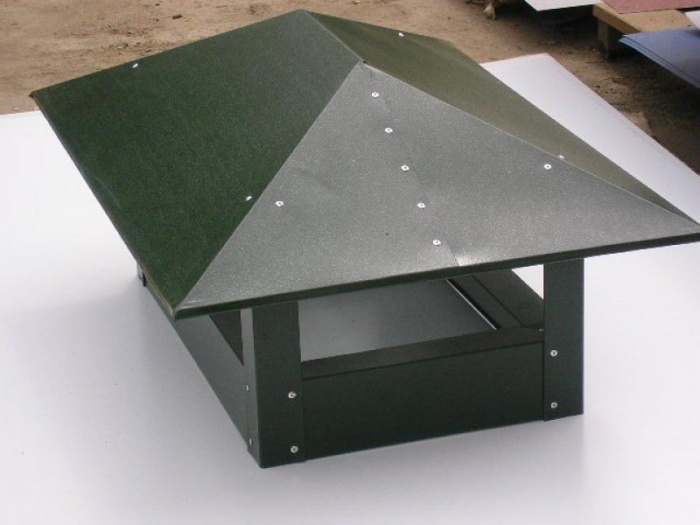
- Modele në formë H: të dallueshme nga dy deflektorë njëherësh në njërën kokë, të tjerët.
Karakteristikat e deflektorëve rrotullues dhe statikë
Modele rrotulluese (rrotulluese) të dizajnit kompleks me një sistem tehe. Projektuar për të organizuar tërheqje ekskluzivisht në ambiente të mbyllura. Ata largojnë avujt, aromat, gazrat. Motivuese forcë rrotulluese- shpërthime natyrore të erës. Dizajni bën të mundur orientimin e kokës së lëvizshme në një drejtim të caktuar dhe nuk varet nga fuqia dhe orientimi i erës që fryn. Gjatë rrotullimit të tij krijohet një vakum, i cili nuk lejon zhvillimin e shtytjes së kundërt.
Vlen të përmendet ndërtimi statik me njësi ventilimi pamje boshtore. Punon për thithjen e ajrit nga dhomat. Vetë deflektori statik (DS) është i instaluar në çati, rrotullohet në një sektor të caktuar. Instaluar në daljen e kanalit të ventilimit. Këtu, nën deflektor, një tifoz boshtor me presion të ulët me zhurmë të ulët është montuar brenda mëngës.
Fillimi kryhet në modaliteti automatik nga një sinjal nga një sensor presioni, por me vlera të parëndësishme të presionit gravitacional. Kompleti plotësohet me një kullues të lidhur me një xhami të izoluar dhe një kanal ajri 1 m. Struktura statike e ventilimit është e maskuar mbi tavanin e varur.
E rëndësishme! Nën normale kushtet e jashtme sistemi i ventilimit funksionon në gjendje statike normale. Një ulje e temperaturës dhe presionit të erës e shtyn ventilatorin të funksionojë, duke u rikthyer shtytja e duhur në kanale.
Deflektorët statikë përdoren në sistemin e ventilimit për të hequr ajrin nga banesa dhe kanalet e ajrimit kolektiv. Në shtëpitë e çdo numri katesh, ndërtesa të sapondërtuara dhe gjatë rindërtimit të atyre tashmë në përdorim.
Koncepti i "deflektorit" është ndoshta i njohur për shumë pronarë të makinave. Defektorët në kapuç, në dritare janë bërë një pjesë e njohur për akordimin e makinave. Më pak njerëz dinë për një lloj tjetër të këtyre pajisjeve të përdorura në ndërtim - deflektorët "ventilues". Çfarë është një deflektor në të kuptuarit e ndërtuesve?
Deflektori për ventilim është një pajisje aerodinamike e ngjitur në kokën e oxhakut (kanalit). Instalimi i një deflektori rrit tërheqjen e tymit dhe kanaleve të ventilimit dhe rrit efikasitetin e përgjithshëm të gazit të gripit ose sistemit të ventilimit.
Pajisja punon në parimin e efektit Bernoulli, një fizikan zviceran i cili zbuloi marrëdhënien midis shkallës së rrjedhës së një lëngu ose gazi dhe presionit në një kanal. Në ngushtimin e kanalit, ndodh një rritje në shkallën e rrjedhës së lëngut ose gazit, duke shkaktuar një ulje të presionit në këtë seksion të tubacionit (kanali i ajrit).
Shënim: Deflektori i ventilimit "kap" erën që kalon përmes një kanali të ngushtë - një shpërndarës. Kjo provokon një rënie të presionit në pjesën e sipërme të kanalit të ventilimit ose oxhakut (në vendin ku është instaluar deflektori). Vakuumi nën difuzor është i mbushur me ajër që ngrihet përmes kanalit të ventilimit ose shkarkimit të tymit.
Deflektorët me cilësi të lartë, instalimi i të cilëve kryhet në përputhje me të gjitha rregullat, rregullojnë rrjedhën e ajrit në difuzor dhe drejtimin e shkarkimit të gazrave të furnizuar nga oxhaku. E projektuar mirë dhe në rregull deflektori i instaluar ventilimi rrit efikasitetin e kanalit të shkarkimit me 20%. Kjo ju lejon të niveloni mungesën e lartësisë së oxhakut ose seksionin e pamjaftueshëm të kanalit të ventilimit.
Varietetet
Tregu i ndërtimit ofron shumë lloje të deflektorëve. Ato ndryshojnë në materialin e prodhimit, llojin e ndërtimit, qëllimin dhe pamjen... Vlen të përmendet se nuk ka vetëm deflektorë të ventilimit. Defektorët e përdorur në industrinë e avionëve dhe automobilave janë më të njohur për publikun e gjerë. Dashamirët e akordimit përdorin deflektorët e makinave, instalimi i të cilave ndryshon rrjedhën e ajrit rreth trupit të makinës.

Para së gjithash, është një deflektor i kapuçit, deflektorë (vizorë) për dritare auto, të quajtur "vizorë". Nëse plastika të ndryshme janë të përshtatshme për prodhimin e deflektorëve të automobilave, pajisjet për sistemet e ventilimit dhe kanalet e tymit janë bërë ekskluzivisht prej metali. Prodhimi i tyre përdor:
- alumini;
- çelik inox;
- galvanizuar;
- bakër (përdoret rrallë për shkak të çmimit të lartë).
Është e qartë me fushat e aplikimit dhe materialet. Tani mund të merrni parasysh dallimet në dizajn deflektorët. Nga këtë veçori pajisjet ndahen në:
Përveç llojeve bazë, ka shumë modele të ndryshme që ndonjëherë mund të jenë të vështira për t'u klasifikuar. Këta janë deflektorë rrotullues modernë me tehe spirale që rrotullohen mbi një kushinetë, ose mbulesa elementare të ombrellës. Deflektorët e thjeshtë janë shumë të njohur, instalimi i të cilave mund të rrisë ndjeshëm tërheqjen.
Vlen të përmendet një metodë tjetër e klasifikimit të këtyre pajisjeve - ndarja në deflektorë statikë (të palëvizshëm) dhe rrotullues (rrotullues).
Nëse flitet për karakteristikat teknike që dallojnë pajisje të tilla, nuk ka shumë prej tyre:
- materiali i prodhimit;
- madhësive.
Kur zgjidhni një deflektor, duhet t'i kushtoni vëmendje modelit të produktit. Pas zgjedhjes së dëshiruar lloji konstruktiv, mund të filloni të zgjidhni madhësinë optimale.
Llogaritja e performancës dhe zgjedhja e modelit optimal të deflektorëve të ventilimit është një temë për një artikull të veçantë. Në këtë tekst, ne do të shqyrtojmë pajisjet për oxhaqet e oxhaqeve dhe sobave.
Deflektorët rrotullues
Pajisjet rrotulluese përdoren në sistemet e ventilimit dhe në oxhaqe. Ata nuk kërkojnë një motor - ata rrotullohen nën ndikimin e erës. Turbina rrotulluese krijon një vakum në kanal, i cili nxjerr jashtë nxehtësinë dhe lagështinë e tepërt, gazrat dhe pluhurin e dëmshëm dhe mbron brendësinë nga kondensimi.

Pavarësisht nga drejtimi i erës, koka e deflektorit rrotullues rrotullohet në një drejtim, duke rritur tërheqjen në kanalin e tymit dhe ventilimit për shkak të vakumit. Koka rrotulluese parandalon shtytjen prapa në kanal.
Është veçanërisht e përshtatshme që instalimi i deflektorëve të tipit rrotullues të mos kërkojë furnizim me energji elektrike. Ata përdorin energjinë e erës.
Pajisja e defektorit
Siç u përmend më lart, deflektori i ventilimit i dizajnit të Grigorovich është më i miri pajisje e thjeshtë... Le të shqyrtojmë modelin e produkteve duke përdorur shembullin e tij.

Nëse jeni të interesuar për vetëprodhimi dhe instalimi i deflektorëve, është më mirë të merret si bazë ky dizajn i veçantë. Më mirë të filloni thjesht.
Dizajni i deflektorit përbëhet nga elementët e mëposhtëm:
- cilindër i sipërm;
- cilindër i poshtëm;
- tub i degës (hyn në cilindrin e poshtëm);
- kon (kapelë);
- kllapa montimi.
Cilindri i sipërm është opsional dhe mund të mungojë. Në këtë rast, deflektori përfshin:
- cilindër i poshtëm, i vendosur (tubi i ventilimit);
- një shpërndarës që ndërpret rrjedhën e ajrit;
- kone (të kundërta dhe të drejta).
Në këtë mishërim të deflektorit, koni është në të njëjtën kohë një kapak që mbron tubin nga reshjet.
Deflektor me duart tuaja
Deflektori më i thjeshtë - diagramiËshtë mjaft e thjeshtë të bësh vetë një deflektor ventilimi. Do t'ju nevojiten mjetet dhe materialet e mëposhtme, të cilat janë të lehta për t'u blerë në çdo "hozmag":
- metal (i galvanizuar, çelik inox);
- gërshërë për metal;
- thumba me thumba ose thjesht bulona me arra;
- vizore dhe shënues (laps);
- karton i trashë;
- gërshërë ose thikë e dobishme.
Është e nevojshme të filloni me matjet dhe llogaritjet - matni lartësinë dhe diametrin e tubit, vendosni dimensionet e planifikuara të deflektorit të prodhuar. Nëse kjo është hera juaj e parë që bëni këtë lloj pune, së pari duhet të provoni të bëni një plan urbanistik. Ky material ju lejon të bëni shpejt dhe me lehtësi një kopje të plotë të deflektorit metalik, dhe kostoja e gabimit është e ulët.
Puna duhet të fillojë me prodhimin e cilindrit të poshtëm. Diametri i tij caktohet sipas diametrit të tubit.
Shënim:Është e rëndësishme të mos gaboheni: diametri i brendshëm cilindri duhet të përputhet me diametrin e jashtëm të tubit.
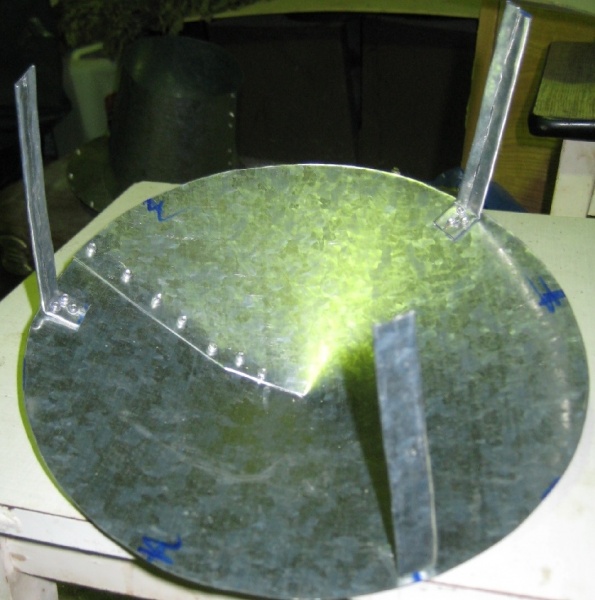
Më pas bëhet një kon, për të cilin një pjesë e rrumbullakët është prerë nga metali. Bëhet një çarë përgjatë rrezes së pjesës (nga buza në qendër) dhe njëra skaj është plagosur pas tjetrës, duke formuar një kon.
Pjesa tjetër e pjesëve të deflektorit bëhen në të njëjtën mënyrë.
Është më mirë të lidhni pjesët me njëra-tjetrën duke përdorur thumba ose lidhje me bulona sipas diagramit. Si rezultat, ne kemi deflektorë, instalimi i të cilave në tub nuk kërkon shumë përpjekje.

Prodhimi i deflektorëve rrotullues është shumë më i ndërlikuar. Nëse keni pak përvojë në prodhimin e produkteve të tilla, një deflektor rrotullues është më i lehtë për t'u blerë. problemi kryesorështë se pjesët rrotulluese kërkojnë llogaritje dhe prodhim shumë të saktë me toleranca të afërta. Prandaj, nëse vendosni të bëni një deflektor ventilimi me duart tuaja, është më mirë të qëndroni në një strukturë statike.
Një sistem ventilimi i projektuar siç duhet siguron ajër të pastër dhe të freskët të brendshëm. Kushti kryesor për të punë efektiveështë prania e shtytjes. Fatkeqësisht, mbeturinat dhe pluhuri që hyjnë në kanale mund të prishin punë normale pajisje. Për të parandaluar që kjo të ndodhë, një deflektor duhet të instalohet në tubin e ventilimit.
Nëse nuk ka deflektor në tubin e ventilimit, atëherë diametri i tij gradualisht do të ulet. Në masën më të madhe, kjo lehtësohet nga yndyra, e cila grumbullohet në muret e kanalit të ajrit. Është mbi të që pluhuri dhe mbeturinat ngjiten.
Deflektori i ventilimit është instaluar në kokën e tubit. Në pamje të parë, kjo mbron kanalet nga mbeturinat që mund të vijnë nga jashtë. Por nuk është kaq e thjeshtë. Pajisja kryen linjë e tërë funksione, secila prej të cilave është e rëndësishme.
Veçoritë
Instalimi i një deflektori në një tub ventilimi rrit ndjeshëm rrymën. Pajisja refuzon rrymat e ajrit... Si rezultat, një zonë me presion të ulët formohet në daljen e boshtit të ventilimit. Falë kësaj, ajri brenda tubit ngrihet lart. Kështu kompensohet presioni.
Ka shumë modele të deflektorëve, por të gjithë punojnë sipas parimit të përshkruar më sipër. Interesante, shumica pajisje moderne ka një ngushtim të kanalit. Kjo bën të mundur arritjen e një rritje të shpejtësisë me të cilën rrjedhat e ajrit kalojnë mbi kokën e tubit. Si rezultat, shtytja rritet. Ky efekt quhet "parimi i furçës së ajrit".
Nëse përdorni siç duhet deflektorin në tubin e ventilimit, atëherë mund të arrini një rritje të konsiderueshme të efikasitetit të të gjithë sistemit. Në zgjedhja e duhur pajisjen dhe të saj instalimi optimal fitimi i fuqisë mund të jetë deri në 20 përqind.
Kujdes! Deflektori i ventilimit tregon efikasitetin më të lartë kur instalohet në kanalet e ventilimit me kthesa dhe seksione të mëdha horizontale.
Por qëllimi kryesor i deflektorit është ende të mbrojë kanalin nga mbeturinat, insektet, zogjtë e vegjël dhe reshjet atmosferike. Meqenëse pajisja është e instaluar nga jashtë, materiali i kutisë është çelik inox ose qeramike. Në disa raste, mund të shihet edhe plastika e zakonshme.
Avantazhet dhe disavantazhet

Para se të montoni njësinë me duart tuaja, duhet të zbuloni jo vetëm aspektet e saj pozitive, por edhe ato negative. Së pari, le të përqendrohemi në pozitive. Struktura e ombrellës mbron në mënyrë efektive tubin nga reshjet dhe papastërtitë, dhe gjithashtu mund të vërehet një rritje e shtytjes.
Disavantazhi kryesor i deflektorit në tubin e ventilimit është se kur era fryn nga poshtë, rrjedha godet pjesa e sipërme struktura dhe nuk lejon që ajri të dalë normalisht. Prandaj, ndonjëherë mund të ketë probleme me funksionimin e sistemit. Për fat të mirë, kjo ndodh rrallë.
Përveç kësaj, u shpikën kundërmasa efektive. E thënë thjesht, strukturat filluan të pajisen me dy kone, të cilat lidhen me baza. Pra, nëse doni të bëheni të vërtetë njësi e besueshme, kjo merret parasysh më së miri kur krijoni një vizatim.

Kujdes! Sa më i fortë të jetë tërheqja, aq më i lartë është presioni brenda deflektori i ventilimit që është instaluar në tub.
Pamje
Ekzistojnë shumë lloje të deflektorëve për tubat e ventilimit:
- Deflektori Tsagi është në kërkesë të madhe. Pajisja ka fituar popullaritet të lartë për shkak të thjeshtësisë së dizajnit dhe efikasitetit të lartë.
- Deflektori Grigorovich është shumë i popullarizuar.
- Aparati në formë H është më efektiv kur instalohet në oxhaqe.
Është gjithashtu mjaft e zakonshme të gjesh struktura të hapura. Meqenëse ka mjaft dizajne të ndryshme në treg, ato klasifikohen sipas parametrave të mëposhtëm:
- top forme,
- parimi i funksionimit të rrotullimit ose turbinës,
- lloji i korsisë së motit.
Materiali nga i cili është bërë deflektori luan një rol të veçantë. Për shembull, produkte plastike kanë relativisht çmim të ulët, por në të njëjtën kohë jeta e tyre e shërbimit nuk është shumë e gjatë. Mund të vihet re edhe pamja e sofistikuar.

Është për shkak të estetikës që deflektorët plastikë mund të shihen në shumicën e tubave në shtëpi private. Fatkeqësisht, plastika nuk mund të qëndrojë temperaturat e larta prandaj nuk mund të instalohet në oxhaqe.
Deflektori rrotullues i ventilimit rrit tërheqjen dhe mbron në mënyrë efektive kanalet nga mbeturinat e ndryshme që hyjnë në brendësi. Karakteristika kryesore pajisja është sferike.
Deflektori i ventilimit të tubit rrotullues mund të quhet gjithashtu turbinë. Pajisja është e aftë të sigurojë lëvizjen e turbinës për shkak të energjisë së erës. Brenda tij, ajri rrotullohet si një tornado. Kjo, nga ana tjetër, rrit draftin në kanal. Si rezultat, ju mund të vëzhgoni tërheqje e mirë edhe në verë.
Deflektor Grigorovich

Ka shumë lloje të deflektorëve të ventilimit të tubave. Nëse marrim parasysh dizajnin, i cili kombinon thjeshtësinë dhe efikasitetin, atëherë kjo është, natyrisht, një njësi Grigorovich.
Ky deflektor i ventilimit të tubit ka një kon të cunguar. Quhet gjithashtu difuzues. Vetë tubi i ventilimit duhet të hyjë pak në të. Një ombrellë mbrojtëse është montuar në krye. Nën të është instaluar një strukturë që siguron një presion të reduktuar edhe me era e kundërt... Ka një formë koni. Sigurisht, si tipar i projektimit rrit tërheqjen.
Ne bëjmë një deflektor me duart tona
Punë përgatitore

Për të bërë një deflektor ventilimi me duart tuaja dhe për ta instaluar në një tub, së pari duhet të kryeni disa punë përgatitore... Pajisja përbëhet nga elementët kryesorë të mëposhtëm:
- tub hyrjeje,
- shpërndarës,
- kapak.
Është mirë të zgjidhni çelik inox si material. Vetitë e tij të larta kundër korrozionit do të ofrojnë afatgjatë shërbimi i deflektorit në tubin e ventilimit.
Para se të filloni të montoni me duart tuaja, duhet të kujdeseni për praninë e mjeteve të nevojshme, ai përfshin:
- bullgare,
- stërvitje,
- kapëse,
- çekiç,
- ruletë,
- gërshërë për metal,
- bulona dhe dado,
- ribatina.
Gjithashtu, duhet të mendoni për gjetjen e fletëve metalike të përshtatshme për njësinë. Vëmendje e veçantë duhet t'i kushtohet pajisjeve mbrojtëse. Mos filloni punën pa doreza dhe syze.
Procesi përgatitor përfshin gjithashtu krijimin e një vizatimi për një deflektor ventilimi me duart tuaja. Duhet të pranojmë se kjo është një detyrë mjaft e vështirë. Sigurisht, vetë dizajni nuk mund të quhet super i ndërlikuar, megjithatë, për të marrë një njësi të përshtatshme për funksionim afatgjatë, gjithçka duhet të llogaritet me kujdes.
Do të jetë optimale të merret tashmë vizatimi i përfunduar, për shembull, një nga ky artikull. Por duhet të keni parasysh që dimensionet e tubit tuaj mund të jenë krejtësisht të ndryshme. Prandaj, gjatë zbatimit të projektit, mund të nevojiten rregullime shtesë. Opsioni më i mirë do të kontaktojnë byronë e projektimit, ku do të bëjnë projekti i përfunduar, të cilat mund t'i vini në jetë me duart tuaja.
Kuvendi
Pasi të keni përgatitur të gjithë mjeti i duhur dhe kujdesuni për mbrojtjen personale, mund ta filloni vetë procesin. Së pari ju duhet të përktheni konturet nga vizatimi në metal. Ku Vëmendje e veçantë u jepet elementëve të mëposhtëm:
- kapak,
- shpërndarës,
- cilindër i jashtëm,
- raftet.
Rezultati përfundimtar në formën e një njësie të gatshme për përdorim varet nga sa me kujdes vizatoni gjithçka. Pasi të vendosen shenjat, mund të filloni të prisni format e dëshiruara, natyrisht, për këtë ju nevojiten gërshërë metalike.

Përdorni një pistoletë për të bashkuar elementët e prerë së bashku. Në këtë rast, raftet do të veprojnë si një lloj ure midis dy pjesëve të strukturës kryesore.
Kujdes! Drejtuesit duhet të priten nga i njëjti metal si dy pjesët kryesore të njësisë.
Pasi të jetë montuar njësia, ajo mund të instalohet në kokën e tubit. Në këtë rast, vetë struktura është e bashkangjitur me kapëse. Kjo përfundon procesin e prodhimit dhe instalimit.
Rezultatet
Deflektori i ventilimit është element i rëndësishëm në sistemin e ventilimit. Rrit performancën e sistemit deri në 20 për qind ndërsa mbron kanalet e brendshme nga mbeturinat, pluhuri dhe reshjet. Më shpesh, njësitë e kësaj klase janë bërë nga fletë çeliku inox, por opsione të tjera janë gjithashtu të mundshme.
Deflektorët e dritareve anësore
ka dy lloje: lloji i parë futet nën brezin elastik, i dyti, ato që janë ngjitur në kornizën e derës (sipërm). Deflektori i kapuçit eEkzistojnë dy lloje montimesh që nuk do të dëmtojnë automjetin tuaj.1.Instalimi i deflektorëve të dritareve të sipërme:
Instalimi i defektorëve ngjitës të dritareve anësore
zgjat rreth 10 minuta, si rregull, kompleti përfshin peceta alkoolike për degresimin e sipërfaqes së kornizës së derës. Është e rëndësishme të dini se kaseta me dy anë me cilësi të ulët mund të përdoret në Rusisht Kushtet e motit(-20 +30, shi, borë) ekziston një probabilitet i lartë që disa nga vizoret thjesht të bien. (Epo, nëse jo shofer). Prodhuesit e rekomanduar nga ne përdorin vetëm shirit të veçantë gjerman të dyanshëm. Lidhja bëhet menjëherë, pa pasur nevojë për asnjë pajisje speciale dhe eliminon shumë operacione të mundimshme: shpimin e vrimave, instalimin e lidhësve, pastrimin e sipërfaqes nga mbetjet e ngjitësit, etj. Sipërfaqet mbeten të paprekura, dhe linja e lidhjes është pothuajse e padukshme midis pjesëve të lidhura. Së pari ju duhet të lidhni secilën pjesë në kornizën e derës. Imagjinoni deri në çfarë skaji është më mirë t'i instaloni ato dhe si duhet të shtrihet në pasqyrën e pamjes së pasme. Si rregull, ato arrijnë në pasqyrat anësore në mënyrë që të mos ndërhyjnë në pamjen. Pastaj duhet të pastroni sipërfaqen e kornizës së derës me një pecetë alkooli nga papastërtitë dhe yndyrat, më pas të hiqni filmin mbrojtës nga shiriti, ndërsa jo të gjithë, por rreth 5 cm nga çdo skaj, synoni më saktë dhe ngjitni. Shikoni se çfarë keni ngjitur saktësisht, në fillim mund ta grisni dhe ta ringjisni, më pas shiriti ngjitës do të thahet dhe është praktikisht e pamundur ta grisni. Nëse gjithçka është ngjitur në mënyrë të barabartë, tërhiqni antenat film mbrojtës ngjitni shiritin, më pas shtypni buzën e vizorit dhe mbajeni për disa minuta. Nëse keni një tharëse flokësh, mund ta ngrohni shiritin me të, ajo mbahet shumë më mirë. Ky lloj fiksimi përdoret nga kompani të tilla si EGR, SIM, LUND, AVS, Cobra dhe të tjerët.Këshilla
Ne cdo servis makinash ju mund të instaloni deflektorë të dritareve të sipërme për 300-500 rubla
Në dimër dhe brenda mot i ftohtë mund të instalohet në mënyrë të pavarur në një parking të ngrohtë të çdo dyqani të madh, mjafton që makina të qëndrojë për 30 minuta.
Nëse nuk ka peceta alkooli në komplet, atëherë mund të blini peceta për injeksion në çdo farmaci për 3-7 rubla secila.
Përpara se të filloni se si të hiqni shiritin dhe të ngjitni produktet, lidhni të gjitha 4 ose 2 (në varësi të markës së makinës) dhe sigurohuni që ato të jenë saktësisht për makinën tuaj dhe të mos kenë defekte dhe defekte.
Shirit ngjitës 100% arrihet 72 orë pas instalimit
Brenda 3 ditëve pas instalimit, duhet të përmbaheni nga larja e makinës
Gjatë instalimit të modeleve ngjitëse (para ngjitjes), sipërfaqja e derës duhet të jetë shumë mirë e degosur dhe e NXEHUR! Ngroheni me tharëse flokësh ose lëreni makinën nën diell në mesditë për rreth një ose dy orë. Pas këtyre procedurave, ato ngjiten shumë mirë në shiritin ngjitës. Edhe në klimën tonë të ashpër.
2.Instalimi i deflektorëve të dritareve:
Duhen rreth 10 minuta, vizoret futen nën kornizën e derës në ndarës, në brazdë ku hyn xhami, në dyert e përparme që mbajnë për shkak të formës gjeometrike dhe në dyert e pasme, si rregull, janë ngjitur me shirit të dyanshëm rreth perimetrit të produktit. Uleni xhamin dhe futni deflektorin duke e përkulur pak në formën e derës së makinës suaj. Merrni kohën tuaj dhe kini kujdes, nuk është e vështirë ta prishni atë gjatë instalimit. kushtojini vëmendje tipar tipik prodhues të lirë - pjesa që futet nën shiritin e gomës nuk është konsumuar siç duhet, gjë që çon në dëmtimin e ashensorëve të xhamit dhe filmit mbrojtës të xhamit (shumë makina janë të pajisura me një film tashmë nga fabrika, si dhe shumë makina moderne e pajisur me një "lift xhami inteligjent", d.m.th. Dritarja juaj thjesht nuk do të mbyllet nëse ato kanë një skaj të trashë. Prodhuesit e vizoreve plug-in të shitura nga ne bluajnë skajin në mënyrë që në shumicën e rasteve produkti të mos ndërhyjë në mbylljen e dritareve, por edhe drejtuesit kanë përjashtime, sepse ka makina të tilla në të cilat mund të vendosni vetëm ato të ngjitura. .
Ky lloj fiksimi përdoret nga kompani të tilla si HEKO, CLIMAIR.Këshilla
Në çdo shërbim të makinave, mund të instaloni (fusni) për 300-500 rubla.
Mbani mend shumë makina moderne pajisur me “smart windows” dmth. nëse diçka ndërhyn me xhamin, atëherë ajo funksionon ana e kundërt... Kjo është bërë kryesisht për sigurinë e fëmijëve. Zgjidhja e problemit: e para është të çaktivizoni këtë funksion në shërbimin tuaj, e dyta është të vendosni ato vizore që janë ngjitur. Ne mbajmë një listë të tillë " makina me probleme”, të cilën mund ta kontrolloni me menaxherin tonë.
Për të futur deflektorin në dera e shoferit, duhet të bëni pak përpjekje për ta përkulur më pas pak. Kjo duhet bërë me shumë kujdes në mënyrë që të mos prishet produkti !!!
3. Instalimi i defektorit të kapuçit:
Instalimi i mbrojtjes së aspiratorit zgjat rreth 5-15 minuta, pa shpuar kapuçin dhe në vendet e rregullta. Ajo mbron kapuçin dhe xhami i përparmë nga papastërtitë dhe patate të skuqura nga gurët. Ekzistojnë dy lloje të montuesve të mbulesës që nuk do të dëmtojnë automjetin tuaj.
1. Mbulesa e mizave është instaluar në vende të rregullta. Në amplifikuesin e mbulesës ka vrima në të cilat futen kunjat speciale (për secilën makinë të vetën), mbrojtja është ngjitur në kapuç me vida që duhet të vidhosen në dowels. Ky montim përdoret nga EGR, AVS, LUND.
2. Ngjiten me kapuç me mbërthyes të posaçëm, gjithashtu edhe në amplifikatorin e kapuçit. Ky montim përdoret nga CA Plastic.
Për të instaluar produktin, mjafton të keni me vete një kaçavidë Phillips, kompleti tashmë vjen me një sërë lidhësesh, të cilat janë zhvilluar nga inxhinierë posaçërisht për makinën tuaj. Duhet të montohet në mënyrë që të vendoset në një distancë nga vetë kapuçi dhe të mos ndërhyjë në rrjedhën e ujit. Nuk mban lagështi, papastërti dhe rërë të imët. Auto deflector shet mbrojtëse të kapuçit që parandalojnë grumbullimin e papastërtive midis kapakut të makinës dhe mbrojtësit, i cili lahet lehtësisht me një rrymë uji gjatë një lavazhi.
Këshilla
Në çdo shërbim të makinave, mund të instaloni mbrojtje në kapuç për 400-500 rubla.
Shumë njerëz blejnë mbrojtje të kapuçit për të fshehur defektet kur shesin një makinë, kini kujdes!
Mos blini një gërshërë mizash në kapuç që është ngjitur plotësisht në shirit ngjitës, sepse uji, papastërtia dhe rëra do të grumbullohen atje. Ne rekomandojmë ato produkte që në të vërtetë do të mbrojnë kapuçin tuaj. Ata janë montuar mbi kapak në një distancë që fryhet dhe skuqet.