Proiectat corespunzător sistem de ventilatie oferă aer curat și proaspăt în interior. Starea sa principală munca eficienta este prezența tracțiunii. Din păcate, resturile și praful care intră în canale pot perturba munca normala echipamente. Pentru a preveni acest lucru, trebuie instalat un deflector pe conducta de ventilație.
Dacă nu există deflector pe conducta de ventilație, atunci diametrul acesteia va scădea treptat. În cea mai mare măsură, acest lucru este facilitat de grăsimea, care se acumulează pe pereții canalului. Acolo se lipește praful și resturile.
Deflectorul de ventilație este montat pe capul țevii. La prima vedere, acest lucru protejează canalele de resturile care pot pătrunde din exterior. Dar nu totul este atât de simplu. Aparatul funcționează întreaga linie funcții, fiecare dintre ele importantă.
Particularități
Instalarea unui deflector pe conducta de ventilație crește foarte mult tirajul. Dispozitivul deviază curenții de aer. Ca urmare, se formează o zonă de presiune scăzută la ieșirea puțului de ventilație. Din acest motiv, aerul din interiorul conductei se ridică. Astfel, are loc compensarea presiunii.
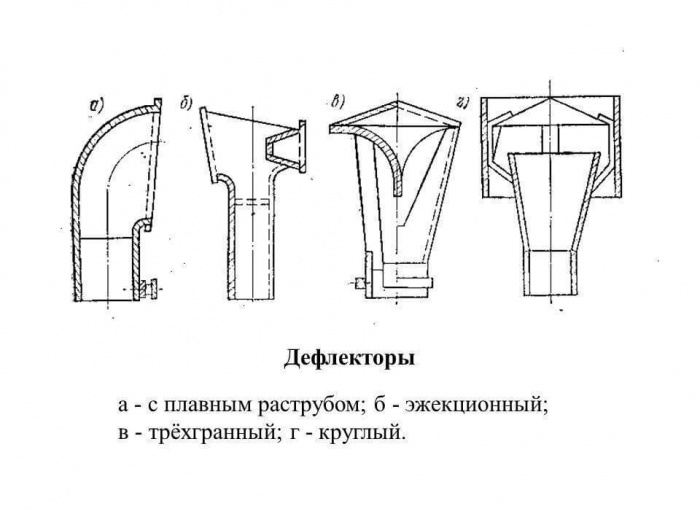
Există multe modele de deflectoare, dar toate funcționează conform principiului descris mai sus. Interesant, în majoritatea aparate moderne are loc o îngustare a canalului. Acest lucru vă permite să obțineți o creștere a vitezei cu care aerul curge peste capul țevii. Ca urmare, tracțiunea crește. Acest efect se numește principiul aerografului.

Dacă utilizați corect deflectorul pe conducta de ventilație, puteți obține o creștere semnificativă a eficienței întregului sistem. La alegerea potrivita dispozitivul și acesta instalare optimă câștigul de putere poate fi de până la 20 la sută.
Atenţie! Deflectorul de ventilație prezintă cea mai mare eficiență atunci când este instalat pe canale de ventilație cu coturi și secțiuni orizontale mari.
Dar scopul principal al deflectorului este încă acela de a proteja conducta împotriva pătrunderii în interior de resturi, insecte, păsări mici și precipitații. Deoarece dispozitivul este instalat în exterior, materialul corpului este din oțel inoxidabil sau ceramică. În unele cazuri, puteți vedea și plastic obișnuit.
Avantaje și dezavantaje

Înainte de a asambla unitatea cu propriile mâini, trebuie să aflați nu numai aspectele sale pozitive, ci și cele negative. În primul rând, să ne concentrăm asupra pozitivului. Structura umbrelei protejează eficient conducta de precipitații și murdărie și se poate observa și o creștere a tracțiunii.
Principalul dezavantaj al deflectorului de pe conducta de ventilație este că atunci când vântul bate de jos, debitul lovește partea de sus construcție și nu permite aerului să iasă în mod normal. Prin urmare, uneori pot apărea probleme cu funcționarea sistemului. Din fericire, acest lucru se întâmplă destul de rar.
În plus, au fost concepute contramăsuri eficiente. Mai simplu spus, structurile au început să fie echipate cu două conuri, care sunt conectate prin baze. Deci dacă chiar vrei să primești unitate de încredere, acest lucru este cel mai bine luat în considerare atunci când creați un desen.

Atenţie! Cu cât curentul descendent este mai puternic, cu atât presiunea în interior este mai mare deflector de ventilație care se instalează pe conductă.
feluri
Există mai multe tipuri de deflectoare pentru conductele de ventilație:
- Deflectorul Tsagi este foarte popular. Dispozitivul a câștigat o mare popularitate datorită designului său simplu și eficienței ridicate.
- Deflectorul Grigorovici este foarte popular.
- Aparatul în formă de H este cel mai eficient atunci când este instalat pe coșuri.
De asemenea, este destul de comun să găsiți structuri deschise. Deoarece pe piață există destul de multe modele diferite, acestea sunt clasificate în funcție de următorii parametri:
- formă de pom,
- principiul de funcționare rotativ sau cu turbină,
- tip giroută.
Un rol deosebit îl joacă materialul din care este realizat deflectorul. De exemplu, produse din plastic posedă comparativ preț scăzut, dar în același timp durata lor de viață nu este foarte lungă. De remarcat este și subtilul aspect.
Din cauza esteticii, deflectoarele din plastic pot fi văzute pe majoritatea țevilor din casele private. Din păcate, plasticul nu rezistă temperaturi mari de aceea nu poate fi instalat pe cosuri de fum.
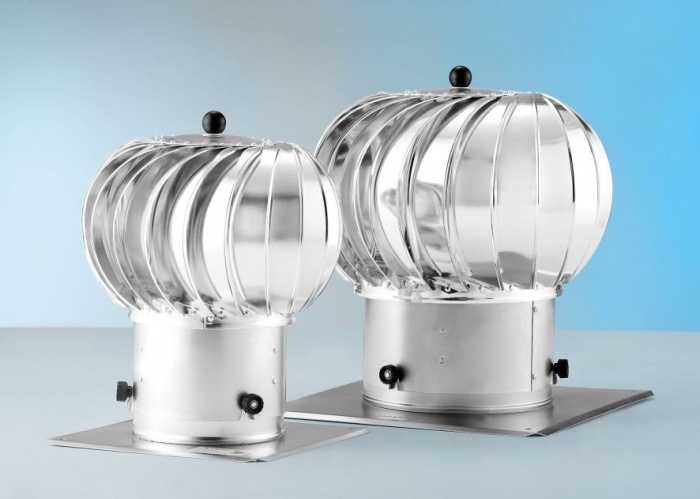
Deflectorul rotativ de ventilație îmbunătățește tirajul și protejează eficient canalele împotriva pătrunderii într-o varietate de resturi. Caracteristica principală Dispozitivul are formă sferică.
Un deflector rotativ de aerisire pentru o conductă poate fi numit și turbină. Dispozitivul este capabil să utilizeze energia eoliană pentru a asigura mișcarea turbinei. Înăuntru, aerul se învârte ca o tornadă. Aceasta, la rândul său, crește tirajul în conductă. Drept urmare, puteți vedea tractiune buna chiar și vara.
Deflectorul Grigorovici

Există multe varietăți de deflectoare de ventilație pentru țevi. Dacă luăm în considerare designul, care combină simplitatea și eficiența, atunci aceasta este, desigur, unitatea Grigorovici.
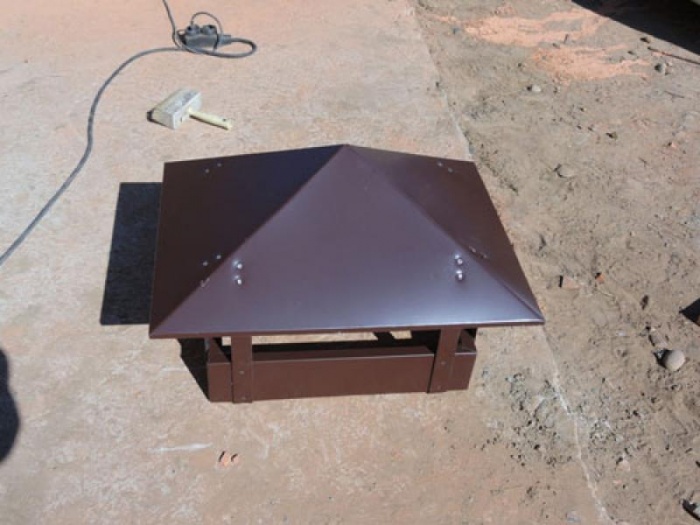
Acest deflector de aerisire a conductei are un trunchi de con. Se mai numește și difuzor. Conducta de ventilație în sine ar trebui să intre puțin în ea. Deasupra este montată o umbrelă de protecție. Sub ea este instalată o structură care asigură o presiune redusă chiar și atunci când vânt lateral. Are forma unui con. Desigur, așa caracteristica de proiectare crește tracțiunea.
Facem un deflector cu propriile noastre mâini
Munca pregatitoare
Pentru a face un deflector de ventilație cu propriile mâini și a-l instala pe o țeavă, mai întâi trebuie să efectuați anumite munca pregatitoare. Dispozitivul este format din următoarele elemente principale:
- conducta de admisie,
- difuzor,
- capac.
Cel mai bun material de utilizat este oțelul inoxidabil. Proprietățile sale ridicate anti-coroziune oferă termen lung serviciu deflector pe conducta de ventilatie.

Înainte de a începe asamblarea cu propriile mâini, trebuie să aveți grijă de disponibilitatea instrumentelor necesare, acestea includ:
- Bulgară,
- burghiu,
- cleme,
- ciocan,
- ruletă,
- foarfece metalice,
- suruburi si piulite,
- nituri.
De asemenea, trebuie să vă gândiți să găsiți foi de metal potrivite pentru unitate. O atenție deosebită trebuie acordată echipamentului de protecție. Nu începeți munca fără mănuși și ochelari de protecție.
Procesul pregătitor include, de asemenea, crearea unui desen pentru un deflector de ventilație de tip „do-it-yourself”. Merită să recunoaștem că aceasta este o sarcină destul de dificilă. Desigur, designul în sine nu poate fi numit super-complex, totuși, pentru a obține o unitate potrivită pentru funcționare pe termen lung, totul trebuie calculat cu atenție.
Cel mai bine ar fi să luați desenul terminat, de exemplu, unul din acest articol. Dar trebuie să țineți cont de faptul că dimensiunile conductelor dvs. pot fi complet diferite. Prin urmare, în timpul implementării proiectului, pot fi necesare ajustări suplimentare. Cea mai bună opțiune va aplica la biroul de proiectare, unde vă vor face proiect finalizat, pe care o poți aduce la viață cu propriile mâini.
Asamblare

După ce ai pregătit totul instrumentul potrivitși aveți grijă de protecția personală, va fi posibil să treceți la procesul în sine. Mai întâi trebuie să transferați contururile din desen pe metal. în care Atentie speciala dat la următoarele elemente:
- capac,
- difuzor
- cilindru exterior,
- rafturi.
Rezultatul final sub forma unei unități gata de lucru depinde de cât de atent desenați totul. Odată făcute semnele, puteți începe să decupați formele dorite, desigur, pentru aceasta veți avea nevoie de foarfece metalice.

Pentru a conecta elementele tăiate între ele, utilizați un pistol de nituri. În același timp, rafturile vor acționa ca punți deosebite între cele două părți ale structurii principale.
Atenţie! Stâlpii trebuie tăiați din același metal ca cele două părți principale ale unității.
După ce unitatea este asamblată, aceasta poate fi instalată pe capul țevii. În acest caz, structura în sine este fixată cu cleme. Pe aceasta, procesul de fabricație și instalare poate fi considerat finalizat.
Rezultate
Deflectorul de ventilație este element importantîn sistemul de ventilație. Vă permite să creșteți performanța sistemului cu 20 la sută și, în același timp, protejează canalele interne de reziduuri, praf și precipitații. Cel mai adesea, unitățile din această clasă sunt fabricate din foi de oțel inoxidabil, dar sunt posibile alte opțiuni.
Deflectoarele geamurilor laterale sunt una dintre cele mai comune și Optiuni Disponibile reglare pentru mașiniși SUV-uri. Pe lângă funcția lor decorativă, au și o serie de avantaje. Vom vorbi despre ele și despre cum să instalați această piesă pe o mașină cu propriile mâini în acest articol.
1
Pentru a evita dificultățile atunci când instalați singur deflectoarele laterale pe geamurile mașinii, trebuie să abordați cu competență procesul de alegere a acestor piese pentru reglare. La fel ca deflectoarele cromate ale capotei, căptușelile capacului portbagajului, plasticul lateral sau deflectoarele cromate sunt fabricate pentru o anumită marcă și model de mașină, așa că atunci când alegeți, trebuie să fiți atenți dacă acest kit se potrivește mașinii dvs. din punct de vedere al parametrilor. Notele adecvate, de regulă, sunt pe ambalaj cu piesa sau în interior instrucțiuni detaliate prin instalare.
Deflectoare geamuri laterale
Există și opțiuni universale, totuși, atunci când le alegeți, există un risc mare ca acestea să nu se potrivească, ceea ce înseamnă că vor trebui tăiate și ajustate. La rândul său, acest lucru complică procesul de instalare. Vă recomandăm să alegeți piese originale pentru caracteristicile specifice ale ușilor sau analogilor chinezești sau productie domestica realizate din material de calitate. Dacă ați fost la magazin, încercați încă o dată accesoriile originale pentru geamurile laterale, evaluați posibilitățile de prindere comodă și cât mai eficientă prin atașarea lor pe corp. În alte cazuri, este mai bine să luați dimensiunile de la ușile laterale și să determinați cea mai bună metodă de instalare pentru o anumită variantă de caroserie și model de mașină.
2
Pe lângă funcția decorativă și îmbunătățirea aspectului mașinii, împreună cu alte opțiuni reglaj extern, cum ar fi nuanțarea, inserțiile cromate, instalarea extensiilor arcului, trusa caroseriei, căptușeala pe capotă sau, deflectoarele geamurilor laterale au o serie de caracteristici utile, printre care se numără:
- parțial, dar protectie eficienta interior de expunerea la lumina soarelui;
- îmbunătățirea proprietăților aerodinamice ale corpului;
- ventilație interioară și capacitatea de a arunca resturile, praful și murdăria fină de drum în timpul conducerii.

Mașini cu deflectoare geamuri laterale
Daca ati ales piese de calitate din producători cunoscuți, atunci vor dura mult timp și nu se vor deforma sub influența schimbărilor de temperatură și a luminii solare. Cu toate acestea, este important nu numai să alegeți modelul și producătorul potrivit, ci și să implementați instalare de calitate aceste accesorii pentru mașina dvs. cu propriile mâini.
3
Până în prezent, sunt populare trei metode de instalare, fiecare dintre ele fiind utilizată în funcție de modelul mașinii. Deflectoarele ferestrelor laterale pot fi montate cu suporturi exterioare din plastic sau fier, lipite direct de suprafata exterioara corp sau introduceți-le între banda de cauciucși un cadru de ușă (mai ales valabil pentru modelele VAZ „clasice”). Accesorii moderne pentru mașini străine și unele mașini domestice in kit au un strat adeziv special la suprafata, care faciliteaza foarte mult procesul de instalare a acestora in anumite conditii.

Instalarea deflectoarelor
Pentru a lipi singur deflectorul, trebuie să instalați mașina pe o suprafață plană, să clătiți bine și să uscați locul autocolantului.
Pentru a face acest lucru, mai întâi trebuie să spălați mașina și apoi să tratați suprafața cu o soluție de degresare pe bază de săpun sau să utilizați lichide speciale. Instalarea, ca și în cazul, se face cel mai bine în aer liber, pe vreme uscată și calmă sau într-un garaj uscat și cald. Înainte de a începe instalarea, încercați mai întâi deflectorul în jurul perimetrului geamului lateral pe ambele părți, puteți nota dacă există așchii sau crăpături. În plus, arcul poate avea un strat suplimentar de crom.
Apoi, îndepărtați stratul de folie de plastic de pe deflector și protecția de pe stratul adeziv. Este mai bine să lipiți de la margini, îndoind treptat stratul principal și apăsând de-a lungul perimetrului dimensionării. Pentru unele modele, în special VAZ și mașini străine ieftine, deflectoarele originale nu au un strat adeziv. Sunt cu priză și sunt realizate în așa fel încât să fie relativ ușor de introdus între cauciucul de etanșare și tocul lateral al ușii, sunt și ușor de îndepărtat. Pentru a le instala, trebuie să coborâți puțin geamuri laterale, apoi folosiți o șurubelniță sau alt material plat pentru a ridica ușor garnitura de cauciuc (catifea). Îndoiți ușor deflectorul, introduceți marginile în golul format între cadru și garnitură.
Dacă instalarea este efectuată corect, sticla ar trebui să se închidă liber și să intre înapoi în garnitura de cauciuc. Pentru eficiența fixării, puteți acoperi suplimentar sigiliul cu adeziv. Dacă în timpul instalării deflectoarele originale cu un strat de bandă adezivă nu aderă strâns la suprafață sau sunt dezlipite constant, vă recomandăm să utilizați o bandă adezivă specială cu două fețe. Este necesar să scoateți deflectorul, să curățați și să degresați din nou suprafața de instalare, să lipiți bandă cu două fețe conform instrucțiunilor și să fixați locul de instalare cât mai strâns posibil. În acest caz, se va obține un strat dublu adeziv, iar deflectorul se va lipi mult timp.
Metoda folosind suporturi metalice sau din plastic este de asemenea eficientă, totuși, în timpul procesului de instalare, sticla sau vopseaua ușii se pot deteriora, în plus, piesa este foarte greu de îndepărtat sau repus. Mai mult decât atât, mulți producători cunoscuți de accesorii de tuning nu mai produc produse pentru acest tip de prindere, ci fac doar deflectoare plug-in sau accesorii cu strat adeziv.
X Mai crezi că diagnosticarea mașinii este dificilă?
Dacă citiți aceste rânduri, atunci aveți un interes să faceți ceva singur în mașină și salvează cu adevărat pentru ca stii deja ca:
- Stațiile de service fac o mulțime de bani pentru diagnosticarea simplă pe computer
- Pentru a afla greșeala trebuie să mergeți la specialiști
- În servicii funcționează cheile simple și bun specialist nu poate găsi
Și bineînțeles că te-ai săturat să arunci banii, și este exclus să te plimbi prin service tot timpul, atunci ai nevoie de un simplu AUTO SCANNER ROADGID S6 Pro, care se conectează la orice mașină și printr-un smartphone obișnuit vei găsiți întotdeauna o problemă, plătiți CECUL și nu salvați rău!!!
Am testat noi înșine acest scaner diferite mașini si a aratat rezultate excelente Acum îl recomandăm TUTUROR! Ca să nu fii prins Fals chinezesc, publicăm aici un link către site-ul oficial al Autoscanner.
Deflectoare geamuri laterale
Există două tipuri: primul tip - introdus sub elastic, al doilea, cele care sunt lipite de tocul ușii (de deasupra capului). La deflectorul capotei eExistă două tipuri de suporturi care nu vor dăuna mașinii.1. Instalarea deflectoarelor de geam deasupra capului:
Instalarea deflectoare adezive pentru geamuri laterale
durează aproximativ 10 minute, de regulă, șervețelele cu alcool sunt incluse în kit pentru a degresa suprafața tocului ușii. Este important să știți că banda cu două fețe de calitate scăzută poate fi folosită și în rusă conditiile meteo(-20 +30, ploaie, ninsoare) există o probabilitate mare ca unele dintre deflectoarele de vânt să cadă pur și simplu. (Ei bine, dacă nu a șoferului). Producătorii recomandați de noi folosesc numai bandă specială germană cu două fețe. Legătura are loc instantaneu, fără a fi nevoie de niciuna echipament specialși elimină multe operațiuni care necesită forță de muncă intensivă: forarea găurilor, instalarea elementelor de fixare, curățarea suprafeței de reziduuri de adeziv și așa mai departe. Suprafețele rămân intacte, iar linia de legătură este aproape invizibilă între părțile conectate. Mai întâi trebuie să atașați fiecare produs pe tocul ușii. Imaginează-ți mental până la ce margine este mai bine să le instalezi și cum ar trebui să se afle pe oglinda retrovizoare. De regulă, ele ajung în oglinzile retrovizoare laterale pentru a nu interfera cu revizuirea. Apoi trebuie să curățați suprafața tocului ușii cu un șervețel cu alcool de murdărie și grăsime, apoi să îndepărtați folia de protecție de pe banda adezivă, nu toată, ci la aproximativ 5 cm de fiecare margine, țintiți mai precis și lipiți-o. . Uită-te la ceea ce ai lipit uniform, la început poți încă să-l rupi și să-l relipești, apoi banda se va usca și este aproape imposibil să o rupi. Dacă totul este lipit uniform, trageți antenele folie protectoare bandă, apoi apăsați pe marginea vizierei și țineți apăsat timp de câteva minute. Dacă aveți un uscător de păr de construcție, puteți încălzi banda cu el, se păstrează mult mai bine. Acest tip de prindere este folosit de companii precum EGR, SIM, LUND, AVS, Cobra și altele.Sfat
În orice service auto puteți instala viziere pentru ferestre pentru 300-500 de ruble
Iarna si in vreme geroasă poate fi instalat independent într-o parcare caldă a oricărui magazin mare, este suficient ca mașina să stea timp de 30 de minute.
Dacă nu există șervețele cu alcool în kit, atunci puteți cumpăra șervețele injectabile la orice farmacie pentru 3-7 ruble bucata.
Înainte de a îndepărta banda adezivă și de a lipi produsele, atașează toate cele 4 sau 2 (în funcție de marca mașinii) și asigură-te că sunt exact pe mașina ta și nu prezintă defecte sau defecte.
Lipirea 100% cu bandă de calafat se realizează la 72 de ore de la instalare
În termen de 3 zile de la instalare, ar trebui să vă abțineți de la spălarea mașinii
La montarea modelelor adezive (inainte de lipire), suprafata usii trebuie sa fie foarte bine degresata si INCALZITA! Încălziți-vă cu un uscător de păr sau lăsați mașina sub soare la prânz timp de aproximativ o oră sau două. După aceste proceduri, acestea aderă foarte bine la banda adezivă. Chiar și în climatul nostru dur.
2. Instalarea deflectoarelor de ferestre plug-in:
Durează aproximativ 10 minute, deflectoarele de vânt sunt introduse sub tocul ușii în distanțier, în canelura în care trece sticla, sunt ținute pe ușile din față datorită formei geometrice, iar pe ușile din spate, de regulă, sunt lipite cu bandă dublu de-a lungul perimetrului produsului. Coborâți geamul și introduceți deflectorul îndoindu-l ușor după forma ușii mașinii dvs. Luați-vă timp și aveți grijă, spargerea acestuia în timpul instalării nu este dificilă. fi atent la caracteristică tipică producători ieftini - partea care este introdusă sub banda de cauciuc nu este șlefuită corespunzător, ceea ce duce la deteriorarea dispozitivelor de ridicare a sticlei și a foliei de protecție a sticlei (multe mașini sunt echipate cu o peliculă deja din fabrică, precum și multe mașini moderne echipat cu un „lift inteligent din sticlă”, adică Fereastra ta pur și simplu nu se va închide dacă are o margine groasă. Producătorii de deflectoare de vânt plug-in vândute de noi șlefuiesc marginea astfel încât în cele mai multe cazuri produsul să nu interfereze cu închiderea ferestrelor, dar chiar și liderii au excepții, deoarece există astfel de mașini pe care le puteți pune doar adezive.
Acest tip de prindere este folosit de companii precum HEKO, CLIMAIR.Sfat
În orice service auto puteți instala (inserați) pentru 300-500 de ruble.
Amintește-ți multe mașini moderne echipat cu „geamuri electrice inteligente”, adică dacă ceva interferează cu sticla, atunci funcționează reversul. În primul rând, acest lucru se face pentru siguranța copiilor. Soluția problemei: prima este să dezactivați această funcție în serviciul dvs., a doua este să instalați acele viziere care sunt lipite. Ținem o listă cu astfel de persoane mașini cu probleme”, ceea ce poate fi clarificat cu managerul nostru.
Pentru a introduce un deflector în usa soferului, trebuie să faci un mic efort pentru a-l îndoi apoi puțin. Acest lucru trebuie făcut cu FOARTE ATENȚIE pentru a nu sparge produsul !!!
3. Instalarea deflectorului capotei:
Instalarea protectiei hotei dureaza aproximativ 5-15 minute, fara gaurirea capotei si in locuri obisnuite. Protejează capota și parbrizul de murdărie și așchii de pietre. Există două tipuri de suporturi pentru capotă care nu vor dăuna mașinii.
1. Stropitorul de muște este instalat în locuri obișnuite. Există găuri în amplificatorul capotei în care sunt introduse dibluri speciale (pentru fiecare mașină sunt proprii), protecția este atașată de capotă cu șuruburi care trebuie înșurubate în dibluri. Acest suport este folosit de EGR, AVS, LUND.
2. Se ataseaza de capota cu elemente de fixare speciale, precum si de armatura capotei. Acest suport este folosit de CA Plastic.
Pentru a instala produsul, este suficient să ai la tine o șurubelniță Phillips, kit-ul vine deja cu un set de elemente de fixare, pe care inginerii l-au dezvoltat special pentru mașina ta. Ar trebui să fie fixat astfel încât să fie situat la o distanță de hota în sine și să nu interfereze cu fluxul de apă. Nu reține umiditatea, murdăria și nisipul fin. Auto Deflector vinde protectii pentru capota care impiedica murdaria sa se acumuleze intre capota si protectie, care se spala cu usurinta cu un jet de apa in timpul unei spalatorii auto.
Sfat
În orice service auto, puteți instala protecție pe capotă pentru 400-500 de ruble.
Mulți oameni cumpără protecție pentru capotă pentru a ascunde defectele atunci când vinde o mașină, aveți grijă!
Nu cumpărați un ștergător de muște pe capotă care este complet lipit de banda adezivă, pentru că. Acolo se vor acumula apă, murdărie și nisip. Vă recomandăm acele produse care vă vor proteja cu adevărat hota. Sunt montate deasupra capotei la o distanta care este suflata si spalata.
A avea parbrize frumoase este dorința multor pasionați de mașini, iar motivul pentru aceasta nu este doar popularitatea filmelor de la Hollywood, care gloriifică frumusețea vitezei și a esteticii. mașini sport precum seria Fast and the Furious. Dar nu toată lumea salută astfel de „tuning” - puteți auzi adesea cum poate strica aspectul cu designul său obsesiv și provocator.
Cu toate acestea, instalarea deflectoarelor ajută la evitarea multor probleme pentru șofer, permițându-vă pe termen lung să economisiți liniștea sufletească, timp și bani - într-adevăr, instalarea lor nu va dura mai mult de o oră. Trebuie remarcat faptul că toate acestea vor fi relevante numai dacă deflectoarele sunt instalate pe cont propriu - din păcate, acest serviciu este foarte popular într-un service auto și, prin urmare, prețul se poate dovedi a fi destul de „rău”.
Cu toate acestea, așa cum am menționat mai devreme, instalarea lor nu este un proces laborios, nu necesită mult timp și este destul de în puterea chiar și a șoferilor fără experiență. În plus, articolul va dezvălui principalele motive pentru care ar trebui să vă gândiți la cumpărarea și instalarea deflectoarelor, tipurile acestora, diferite locații de instalare pe lângă hotă, câteva caracteristici ale instalării instalației în sine și se vor trage concluzii care conțin unele argumente privind acest subiect și rezumand tot ce este scris mai jos.
Deflectorul, numit în mod popular „fly swatter” este un tampon special pe mașină, a cărui funcție principală este protecția împotriva multor pietre mici, insecte, praf și alte obiecte care zboară în mașină cu viteză mare. Cel mai adesea, acestea sunt fabricate din sticlă acrilică sau plastic de înaltă rezistență.
Arată ca un deflector de mașină
Probabil primul motiv pentru a instala deflectoare pe o mașină este căutarea stilului. Ei captează privirea, captează privirile trecătorilor, bineînțeles fetelor! Trusa de tuning, tot de la marca faimoasa, nu poate decât să transforme exteriorul mașinii tale.
Deflectorul este realizat într-un design aerodinamic, care vă permite să creați un flux ascendent de aer în timpul conducerii, ceea ce salvează parbrizul, capota și ștergătoarele de posibilitatea contaminării. Dar, cel mai important, este nevoie de lovituri de la obiecte mari care zboară, luându-le departe parbriz, ceea ce poate reduce semnificativ probabilitatea de fisuri pe parbriz.

Principiul de funcționare al deflectorului
Adesea puteți auzi plângeri de la șoferi în care valoarea deflectoarelor este mult depreciată - într-adevăr, pe nu viteze mari opera lui este aproape invizibilă. Doar la conducerea cu viteze peste 70-80 km/h. poate apărea flux de aer a acelei forțe, capabilă să „împingă” pietrele cu forța necesară.
Internetul este plin de nu numai recenzii negative despre cum funcționează aceste patch-uri. Unii șoferi susțin că deflectoarele sunt capabile să creeze curenți de aer atât de puternici, încât se descurcă nu numai cu insectele și praful, ci chiar și cu acele volume de pietriș fin și murdărie care zboară din camioanele care se deplasează în apropiere cu viteză mare.

Mașină cu deflector pe capotă
Partea frontală a capotei, grila radiatorului fals și bara de protecție sunt cele mai vulnerabile la daune provocate de nisip, pietriș și diverse viețuitoare, care nu au avut norocul să se rupă de vopseaua fragilă în timpul călătoriei.
Deflectoarele pot fi instalate nu numai pe capotă, ci și pe uși, geamuri și chiar pe oglinzile auto. Instalarea parbrizelor ușilor va elimina problema pătrunderii ploii în cabină, acest lucru este valabil mai ales atunci când aveți de-a face cu geamurile cețoase - indiferent cât de tare este ploaia, datorită parbrizelor puteți lăsa un spațiu bun pentru aer și toată apa va curge în jos.

Deflectoare pe geamurile mașinii
Utile, deflectoarele de uși vor fi găsite și de iubitorii de fumat în mașină. După instalarea acestora, fluxurile de aer vor merge la distanță de geamurile și ușile mașinii, astfel încât tot fumul să iasă afară.
În multe privințe, rezultatul instalării unui „stropitor de muște” va depinde de modelul deflectorului pe care șoferul îl va achiziționa. Atunci când alegeți, este important să rețineți că deflectoarele sunt un dispozitiv destul de specific, chiar foarte specializat și conceput pentru unul marcă specificăși modele de mașini. Dacă cumpărați un tampon care nu este conceput special pentru o mașină existentă, atunci este posibil ca pur și simplu să nu „se ridice” sau să zboare foarte repede de la cea mai mică coliziune cu aceleași pietricele sau nisip.

Diferite tipuri și forme de deflectoare pentru capotă
Atunci când alegeți un deflector, în primul rând, nu trebuie să luați în considerare calitatea plasticului zdrobitor de muște și nici măcar tipul de atașament - ar trebui să vă interesați instrucțiunile de instalare, claritatea și corectitudinea acestora. Șoferii începători ar trebui să se familiarizeze cu acesta înainte de a cumpăra, ceea ce în multe feluri, dacă informațiile din acesta sunt clare și redundante, ar trebui să predetermina alegerea unui deflector și a vânzătorului acestuia.

Un exemplu de instrucțiuni pentru instalarea unui deflector pe capota unei mașini
De îndată ce șoferul înțelege mostrele de pe piață, achiziția finală va ridica problema alegerii unui deflector cu cea mai buna vedere monturi. Pe acest moment, pe piata componentelor sunt comune următoarele tipuri monturi:
- Fixare pe șuruburi prin deschideri speciale;
- Lipirea cu benzi elastice flexibile;
- Montare cu suport-cleme;
- Instalare în găurile de montare implicite.

Când luați în considerare aceste opțiuni, ar trebui să respingeți imediat primele două opțiuni - este doar ucigașii vopsea pe capotă . Mai mult, odată cu îndepărtarea ulterioară a deflectorului dintr-un motiv sau altul, vor rămâne urme pe suprafața capotei sub formă de găuri și bulgări de lipici și benzi de cauciuc. Îndepărtarea urmelor de lipici este foarte dificilă, aproape imposibilă fără a deteriora vopseaua, ca să nu mai vorbim de găuri. Astfel, merită să acordați atenție doar ultimelor două metode din lista de mai sus.
Înainte de a scrie ceva despre instalarea unui ștergător de muște, observăm că majoritatea șoferilor recomandă instalarea acestuia în conformitate cu instrucțiunile disponibile.
Poate părea surprinzător, dar în rândul oamenilor, una dintre cele mai obișnuite modalități de a instala deflectoare este să-l lipiți pe bandă cu două fețe. Pe de o parte, această metodă este cea mai simplă, pe de altă parte, ieftinitatea nu ne permite să vorbim despre calitate și orice fiabilitate. Cu toate acestea, dacă deflectorul este montat pe o bandă adezivă specială, este necesar să se mărească numărul de locuri pentru fixarea acestei benzi adezive. Pentru a vă asigura că „șchiorul de muște” nu trebuie căutat pe drum noapte întunecată undeva în pădure, trebuie să faci patru sau cinci zone pentru fixarea acestei bandă adezivă.

Instalarea deflectorului pe bandă dublă este una dintre cele cele mai proaste optiuni instalatii
Pe unele mașini străine moderneîntr-o formă sau alta, deflectorul poate fi deja instalat. Mașinile în această configurație sunt deja echipate cu elemente de fixare speciale încorporate în constituția mașinii de către producătorul acesteia. Puteți afla despre prezența acestora din descrierea mașinii, atunci când găsiți informații despre „elementele de fixare Euro”. Unii șoferi caută în mod intenționat modele într-o configurație similară, deoarece prezența „zvatterului de muște” furnizat elimină orice acțiune ulterioară.

Deflectorul original Toyota Hilux Exclusiv
O altă modalitate, care este una dintre cele mai ușoare și mai sigure pentru vopseaua auto, este instalarea unui deflector cu cleme speciale pentru suport. Acest tip de prindere presupune montarea unui deflector pe marginea capacului capotei pe un fel de agrafe de rufe. La interior, aceste cleme sunt echipate cu tampoane moi, ceea ce face posibilă evitarea deteriorarii vopselei de pe capotă. Procesul de instalare a unui astfel de vizor este destul de simplu, nu necesită eforturi serioase și trece printr-o serie de pași executați succesiv:
- Suprafața capotei mașinii este bine spălată și uscată.

- După ce a pregătit suprafața capotei, „stropitorul de muște” este scos din ambalaj, după care este încercat la locul de montare prevăzut.

- După ce a despachetat deflectorul și elementele de fixare ale acestuia, suporturile de montare sunt fixate pe acesta, după care montarea se repetă și se fac semne pe capotă la locul instalării prevăzute.
- În unele ansambluri, mici suprapuneri transparente, asemănătoare cu bandă adezivă, merg la deflector. Numărul lor coincide de obicei cu numărul de găuri deflector. Acestea trebuie lipite sub capota unde vor fi puse clemele. Acest lucru se face astfel încât să nu zgârie exact capota.

- Următorul pas este îndepărtarea elementelor de fixare din deflector, după care acestea sunt instalate pe marginea capotei.

- După instalarea elementelor de fixare pe marginea capotei, deflectorul este luat și așezat pe corpul capotei în conformitate cu marcajele făcute mai devreme, după care întreaga structură este fixată cu părți de susținere pe plan.

- În cele din urmă, cu ajutorul șuruburilor de montare, dacă designul capacului permite acest lucru, suporturile sunt atașate de cadrul interior al hotei.

În ciuda simplității metodei de mai sus de instalare a unui ștergător de muște, mulți producători, străduindu-se să fie lideri în cursa pentru simplitate și practic, au introdus tipuri de deflectoare care sunt complet lipsite de suporturi de montare. Inutil să spun că acest tip de detaliu nu necesită deloc cunoștințe de „afacere auto” și poate fi instalat chiar și de către un copil.
Astfel de deflectoare sunt utilizate pe scară largă printre mașinile străine noi, dar dacă vă uitați, puteți găsi analogi pentru o mașină uzată. „Noile” „stropitoare de muște” se disting prin prezența a trei petale curbate în față, golurile în care se suprapun în mod ideal cu golurile elementului de fixare elastic de pe marginea frontală a capotei. Procesul de instalare a unei astfel de piese pare și mai simplu:
- După ce a deschis capota, elementele de fixare din plastic sunt desfășurate și îndepărtate, situate exact ca acele petale de „zvațător de muște”.
- Componentele de fixare sunt montate în „ochii” existente.
- Suprapunerea este așezată pe părțile proeminente ale elementelor de fixare, după care totul este răsturnat cu șuruburi (dacă este necesar).
- Cu găuri în plăci în formă de elipsă, este posibilă reglarea poziției deflectorului față de linia centrală a capotei pentru a obține cele mai bune calități aerodinamice.
- Fixarea șuruburilor rămase.

Cel mai simplu mod de a instala un deflector pe capotă
Concluzie
Cititorul atent poate să fi observat asta autoinstalare deflectorul nu cauzează dificultăți deosebite și va fi de acord că implementarea sa este disponibilă pentru marea majoritate a proprietarilor de mașini. Dacă, după citirea textului, mai există întrebări de instalare, World Wide Web este plin nu doar de instrucțiuni detaliate text, ci și de materiale video, în special pe cunoscutul Youtube.
Vă reamintim că nu este recomandat să vă grăbiți cu problema instalării efective a căptușelii pe mașină. În primul rând, ar trebui să studiați nuanțele designului mașinii - acest tip de „tuning” este unul dintre cele mai ieftine și mai comune și există componente pentru lucrul „cosmetic” în fiecare magazin specializat.
Trebuie amintit că nu toți șoferii le consideră cu adevărat utile. Îmbunătățirea calităților aerodinamice devine vizibilă doar la conducerea cu viteze mari, așa că pentru mulți, acest element rămâne doar „decorativ”.
Sperăm că aceste materiale au fost utile la instalarea „șchiatorului de muște” și au conținut răspunsuri la întrebările pe care le căutați.
Cum se instalează un deflector (stropitor de muște) pe capotă: instrucțiuni foto pas cu pas
5 (100%) 4 au votatDeflectoarele de automobile, sunt și deflectoare de vânt, le pot plăcea sau nu vizual, dar nu are sens să le negăm utilitatea. Unii șoferi cred că o astfel de „tuning” strică aspectul mașinii, dar cu siguranță poate economisi o mulțime de nervi, bani și timp pentru proprietarul mașinii. Deflectoarele sunt ieftine, iar instalarea lor nu durează mai mult de 20 de minute. În același timp, în orice service, specialiștii vor avea nevoie de mulți bani pentru a instala deflectoarele de vânt. În acest articol, ne vom uita la cum să instalăm deflectoarele pe cont propriu, precum și cum să cumpărăm deflectoare de vânt.
De ce ai nevoie de deflectoare pe o mașină
Funcția principală a deflectoarelor, desigur, nu este estetică și sunt instalate în scop de protecție și dorința de a păstra intactă sticla mașinii, precum și vopsirea acesteia. Deflectoarele de vânt sunt instalate cel mai adesea pe ușile mașinii și, în unele cazuri, pe capotă. Prezența deflectoarelor permite:

Este de remarcat: dacă există o trapă pe acoperișul mașinii, uneori sunt instalate deflectoare în apropierea acesteia. Acestea au nu numai funcții de protecție, dar vă permit și să reduceți nivelul de zgomot din mașină.
Designul deflectoarelor este gândit astfel încât atunci când mașina se mișcă, acestea creează un flux dens de aer care îndepărtează murdăria, pietrele mici, particulele de ploaie și diverse resturi. În acest caz, deflectoarele sunt instalate în zonă presiune ridicata, și este necesar să le securizați bine în timpul instalării, astfel încât să nu se desprindă în timpul călătoriei.
Tipuri de deflectoare pentru ușile auto

La vânzare puteți găsi diverse parbrize care diferă prin formă, cost, producător, disponibilitate accesorii suplimentareîn kit, culoare și mulți alți parametri. În același timp, principalul criteriu după care ar trebui alese deflectoarele este modul în care sunt instalate pe mașină. La vânzare puteți găsi următoarele tipuri de parbrize:
- Conecteaza. Aceste modele sunt mai ușor de instalat, dar au performanțe mai slabe la utilizare. Între geam și cauciucul de etanșare sunt instalate deflectoare de vânt, ceea ce poate provoca neplăceri la deschiderea/închiderea geamului la unele modele de mașini;
- deasupra capului. Acest tip de deflector este atașat de tocul ușii, iar instalarea lui va dura puțin mai mult. De asemenea, instalarea unor astfel de deflectoare de vânt este ceva mai complicată, dar cu instalare corectă vor rezista mai mult și nu vor obtura geamul mașinii.
Atunci când cumpărați parbrize într-un magazin, trebuie să alegeți modele care se potrivesc special mașinii dvs. Este mai bine să acordați preferință opțiunilor pentru deflectoare de la producători cunoscuți. În cele mai multe cazuri, aceste modele vin cu consumabile necesare pentru a instala produsul.
Cum se instalează deflectoarele de ferestre
 În funcție de utilizarea deflectoarelor conectabile sau deasupra capului, este necesar să se cunoască caracteristicile instalării acestora, precum și modul în care are loc procesul de instalare a accesoriilor în sine.
Important: Când instalați deflectoare, nu uitați să monitorizați vizibilitatea din mașină. Acestea trebuie montate astfel încât să nu blocheze vederea la drum.
Cum se instalează deflectoarele plug-in
Deflectoarele plug-in sunt montate sub tocul ușii - în canelura în care trece sticla la ridicare. Pentru a le instala, aveți nevoie de:

După instalarea vizierei, asigurați-vă că geamul se închide liniștit, iar instalarea deflectorului nu afectează funcționarea ascensoarelor.
Trebuie remarcat faptul că deflectoarele plug-in pot cădea în orice moment și pentru aceasta nu sunt deosebit de apreciate de șoferi. Faptul este că la temperaturi ridicate sau scăzute, baza adezivă își pierde proprietățile atunci când este conectată la canelura.
Cum se instalează deflectoarele de deasupra capului
Instalarea deflectoarelor deasupra capului este puțin mai dificilă și va necesita unele unelte. Cu toate acestea, la instalare corectă, deflectoarele de deasupra capului vor rezista mult mai mult decat cele cu priza, si nu au nici un efect asupra functionarii geamului electric, eliminand si riscul de zgarieturi pe geam din cauza parbrizelor.