Ditë të mbarë të gjithëve. Sot jam ti, Miq te dashur Unë do t'ju prezantoj me një pajisje interesante, si për mua. Quhet - tregues dixhital përfshirë transferimin. Por gjërat e para së pari.
Historia e blerjeve
Shumë në faqe janë tashmë të njohur me mua dhe me botimet e mia. Gjithashtu, shumë e dinë gjithashtu se familja ime ka një flotë prej katër makinash. Shumë ndoshta mbajnë mend postimet e mia në lidhje me Lanche Delta Integral, të cilat po i ndërtoj për veten dhe për veten time. Por, këtu isha pak dinak ... Puna është se unë bëj "Graalin" jo vetëm për veten time, por edhe për djalin tim. Unë kurrë nuk kam shkruar për të më parë, por sot në postimin tim do ta përmend më shumë se një herë.
Kjo histori filloi rreth dy muaj e gjysmë më parë. Gjë është se djali im Artyom, i cili mbushi gjashtëmbëdhjetë vjeç në fillim të qershorit, vendosi të merrte licencën e tij. Për këtë, me rekomandimin tim urgjent, ai shkoi për të studiuar në një shkollë ngarje. Ju kërkoj falje për devijimin retorik, por në përgjithësi jam një mbështetës i faktit se të drejtat për të përdorur automobilin automjet ju duhet të merrni vetë, dhe jo të blini. Studimi në kurse automobilistike në autoshkolla tani zgjat vetëm tre muaj dhe në fund të shtatorit Artyom tashmë do të marrë licencën e tij.
Deri një vit më parë, Artem nuk tregoi shumë entuziazëm për automjetet. Gjë është se kur Artyom ishte tetë vjeç ne patëm një aksident të tmerrshëm. Që atëherë, Artyom kishte një frikë të tmerrshme nga automjetet. Në praktikën mjekësore, termi përdoret - amaksofobi. Ishte me këtë sindromë që vizituam mjekët për ca kohë, pasi në një kohë Artyom madje shkoi në shkollë në këmbë (ndodhet shtatë blloqe nga shtëpia jonë).
Në maj të pozës së vitit të kaluar, ne shkuam në natyrë. U nisëm me makinë rruga e fshatit ku makina kalon një herë në vit. Por, rruga atje është vetëm një përrallë (deputeti i popullit i bëri një dhuratë fshatit të tij të lindjes disa vjet më parë në formën e dhjetë kilometrave rruga perfekte) Në përgjithësi, unë me shaka ofrova ta merrja atë pas timonit. Për habinë time, ai u pajtua. Në atë kohë, ne kishim një Peugeot 407 me të transmetim automatik marsh. Në përgjithësi, ai u ul dhe u largua. I thashë të vërtetën =). Ose do të ngadalësohet ndjeshëm, ose përkundrazi, merr shpejtësi atje ku nuk është e nevojshme ... Në përgjithësi, atij i pëlqente të ngiste. Në rrugën e kthimit, ai vetë kërkoi të ulej pas timonit. Cila ishte surpriza ime, ju, miq të dashur, thjesht nuk mund të shpreheni me fjalë =).
Që nga koha e Artemko, gjithnjë e më shpesh më kërkohej të shkoja diku me të për një udhëtim. Në fillim, ne hipëm jashtë qytetit në rrugë ku praktikisht nuk ka makina, pastaj kishte udhëtime me gjyshin tim (babanë tim) në aeroport dhe terrenet e trajnimit (babai im është një ish -ushtarak). Në përgjithësi, ne hipëm shumë ku ... Në qytet, megjithëse nuk e lashë të ulej pas timonit.
I gjithë problemi ynë ishte se Artyom hipi menjëherë në makinë transmetim automatik dhe ai nuk hipi fare në një kuti manuale. Sipas rekomandimit tim të fortë, në autoshkollën Artem zgjodhi një Zhiguli të vjetër të modelit të shtatë me transmetim manual(Unë nuk kam parë transmetime automatike në Zhigi 2107). Doli të ishte një proces shumë i vështirë për Artemka të stërvitej në tre pedale dhe një kuti ingranazhesh manuale. Makinat tuaja janë ndezur kuti manuale, as unë dhe as gruaja ime nuk donim t'i jepnim Artemkës, pasi ai ende nuk e ka dhënë shofer me përvojë... Prandaj, gruaja ime dhe unë vendosëm të blinim për të - makinën e tij të parë.
Makina e parë, siç besoj, duhet të jetë diçka nga e jona industrinë e automobilave vendas, dhe opsioni më ideal për këtë është, natyrisht, Lada 2108.
Pasi jo kërkime të gjata në internet, ne blemë një "Tetë" plotësisht normale në gjendje të drejtë dhe për para të mira. Çmimi i blerjes ishte vetëm shtatëqind dollarë.
Në përgjithësi, djali ishte i kënaqur me dhuratën tonë. Një javë pasi bleu makinën, ai mësoi se si të fillonte normalisht dhe të mos hidhte tufën. E vetmja gjë që ai ende ngatërron është transmetimet. Në "Tetë" ka një kuti ingranazhi me pesë shpejtësi dhe kur shkoni, për shembull, nga e dyta në të tretën, shpesh shkon nga e dyta në të pestën. Gjithashtu, mjaft shpesh, ai kalon nga ingranazhi i parë në të katërtin, dhe ajo që është më e pakëndshme është se ai përpiqet ta drejtojë atë ... Por, natyrisht, makina nuk tërhiqet dhe thjesht ndalon ...
Në përgjithësi, ai ende nuk është mësuar me të (dua të them pikën e kontrollit). Dhe vendosa ta ndihmoja. Ndihma ime, ishte në një sensor që do të tregonte të përfshirë në ky moment transferim. Fillimisht, mendova të mblidhja një tregues të tillë me dorën time, bazuar në një tabelë qarku të shtypur dhe çelsin e kallamit. Por pastaj, vendosa ta kërkoja vetëm në internet. Vendi më i mirë për të kërkuar pajisje të tilla, natyrisht, është kineze Aliexpress. Siç doli, tregues të tillë në Kinë janë një duzinë. Për çdo shije dhe ngjyrë, madje edhe për makina me gjashtë dhe shtatë kuti të shkallëzuara marsh. Çmimet për një "kënaqësi" të tillë janë gjithashtu të ndryshme, për shembull tregues i shpejtësisë gati dymbëdhjetë dollarë, dhe këtu një tregues tjetër, vetëm për tetëdhjetë dollarë.
Vendosa të kërkoj dhe e gjeta këtë këtu është një variant i treguesit me Transport falas dhe një çmim qesharak - vetëm dy dollarë dhe pesë cent.
Porosia dhe dorëzimi
Mallrat më erdhën për pak më shumë se një muaj. Shitësi e dërgoi atë brenda tre ditëve pasi porositi dhe më dërgoi një numër pista 02178122455 me një shënim në lidhje me kompaninë transportuese "China Post Ordinary Small Packet Plus".
Vështrim i përgjithshëm
Këtu është një zarf kaq i verdhë që mora në zyrën postare
Brenda zarfit ishte vetë sensori 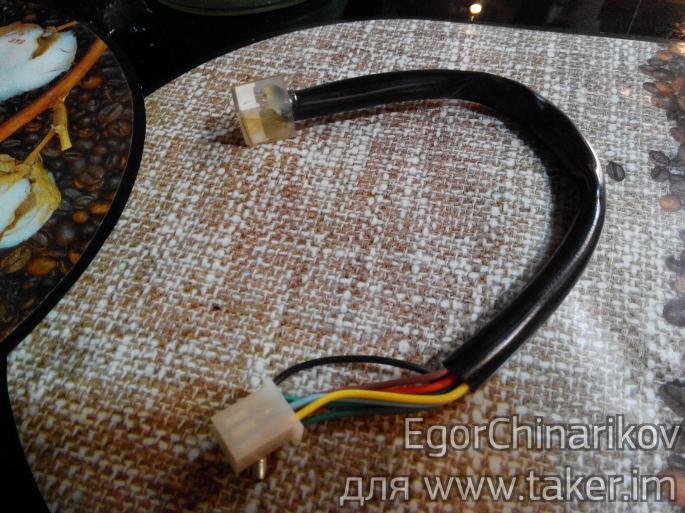
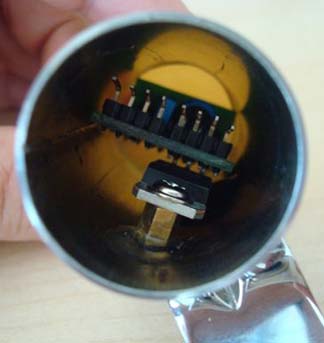
Kështu duket
Terminal për gjashtë tela, secila prej të cilave është përgjegjëse për një shifër të caktuar (numri i transmetimit). 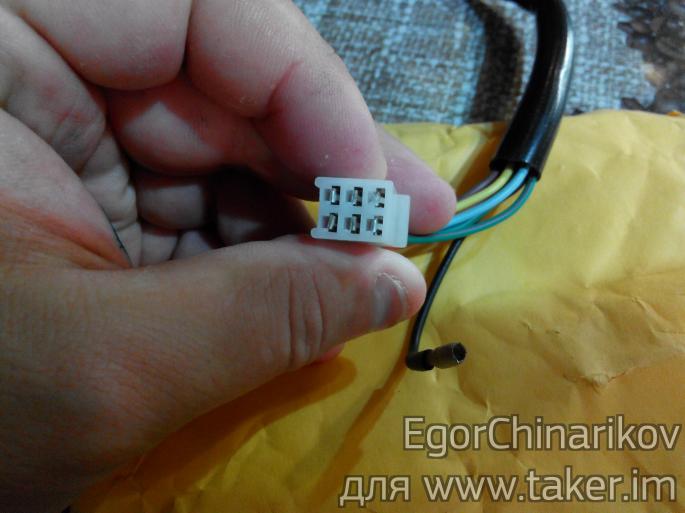
Teli i zi jashtë terminalit është pozitiv
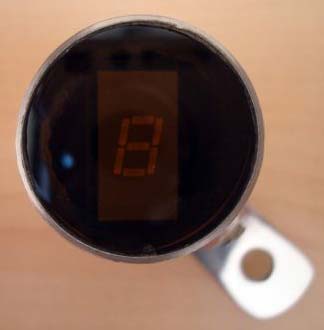
Kështu duket ekrani dixhital. 
ME ana e pasme, derdhet ose me zam ose silikon. 
Duket e mbyllur hermetikisht
Ky artikull do të flasë për një pajisje elektrike automobilistike që mund ta ndërtoni vetë, me duart tuaja. Ky është një qark ose pajisje e krijuar për të treguar frenën e parkimit, neutrale, të pasme dhe numrin e ingranazheve të përfshira (për shumë njerëz, ky funksion mund të jetë shumë i përshtatshëm). Ekziston një tregues neutral (kur autostart është i bllokuar) dhe shumë funksione shtesë të dobishme. Për të pasur një ide se çfarë do të diskutohet, mund të shikoni menjëherë një fragment të vogël video në fund të artikullit.

Pra, le të shohim se si funksionon pajisja - Në treguesin, kur është ndezur dhe neutral, ai funksionon si një gjarpër rreth të gjithë konturit të treguesit të figurës -tetë. Kur ndezim ingranazhin, "gjarpri" funksionon shpejt në tregues dhe shfaqet numri i ingranazheve të përfshira. Kur ndizet ingranazh mbrapsht, tre segmente nga figura tetë shkojnë nga lart poshtë. Treguesi tregon shkronjën P (domethënë parkimin), kjo shkronjë shfaqet kur makina është në gjendje neutrale, pulson - do të thotë që frena e dorës është e ndezur, kur kaloni në shpejtësi, treguesi ndizet menjëherë. E ndërtuar dhe e tillë funksion i dobishëm si SHIFT LIGHT, nëse nuk keni nevojë për të, mund ta fikni duke vendosur kërcyesin JP1.
Tani do të përshkruaj pak përparësinë e këtij funksioni. Pra, nëse e kemi aktivizuar këtë funksion, atëherë sinjali i furnizuar nga tahometri përpunohet nga pajisja dhe shifra e transmetimit (e cila aktualisht është aktive) do të ndizet në këtë rast:
Kur shpejtësia e motorit është më e lartë se 3000 dhe më pak se 1000, sikur rekomandon që të kalojmë në më të lartë ose zbritje... Nëse motori funksionon në rangun nga 1000 në 3000, atëherë shifra nuk ndizet.
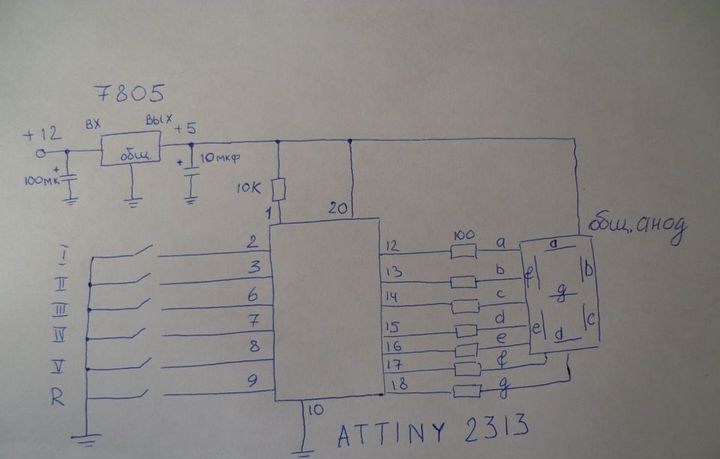
Nëse treguesi dhe kontrolli i frenës së parkimit nuk kërkohet, atëherë hyrja thjesht nuk është e lidhur dhe nuk do të merret parasysh nga ne. Këtu është një diagram pak i thjeshtuar, ku vetëm numrat e ingranazheve shfaqen në tregues dhe kjo është ajo.
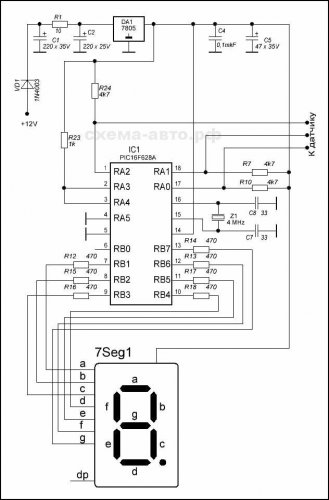
Në këto qarqe, përdoret një ndërprerës kallami, i cili është i lidhur me mikrokontrolluesin përmes një koduesi diodë. Duke bërë këtë, ne kemi zvogëluar numrin e telave. Për ingranazhin e kundërt dhe frenën e parkimit, marrim "zhabet" standarde, në diagram ka dy mundësi kur ndizeni nën tokë dhe +12 volt. Kjo do të thotë, duke e bërë këtë, ne e bëmë atë në mënyrë që kjo pajisje të jetë e dizajnuar për çdo makinë, përjashtimi i vetëm janë makinat me një transmetim automatik, por unë mendoj se ata nuk do të kenë nevojë për këtë skemë. Hyrja nga tahometri është krijuar për të dyja pa kontakt dhe sistemi i kontaktit ndezjen, e vetmja gjë që mund të keni për të zgjedhur është rezistenca R2 dhe përcjellësi C6 (për të përjashtuar harmonikun e dytë). Çdo gjë tjetër është bërë thjesht dhe nuk ka nevojë për cilësime.
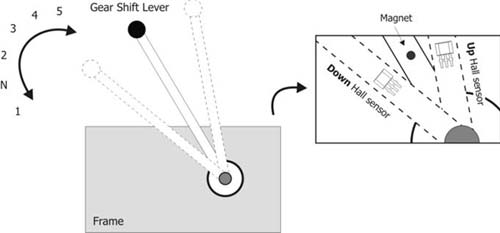
Vështirësia e vetme mund të lindë kur vendosni çelësin e kallamit në makinë. Necessaryshtë e nevojshme të sigurohemi që kur një ingranazh i caktuar është ndezur, aktivizohet vetëm çelësi i kallamit që na nevojitet. Në vetë shufrën, leva e ingranazheve, është e bashkangjitur magnet i përhershëm, por çelsat e kallamishteve janë të vendosura rreth levës.
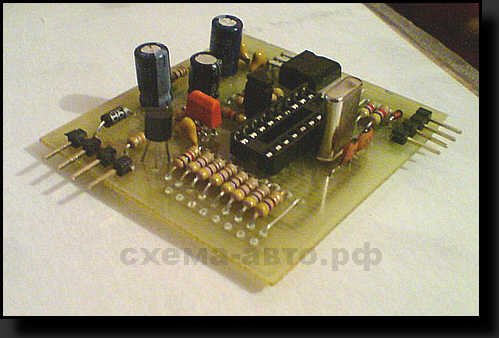
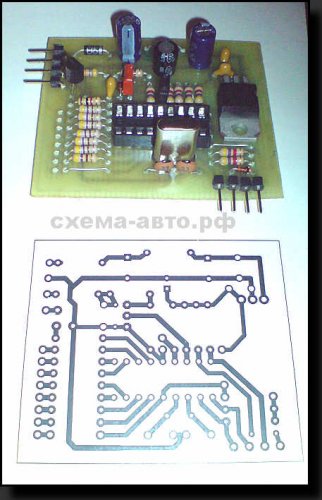
Kështu duket në tabelë ...
Ne e vendosim vetë treguesin aty ku është i përshtatshëm për ju pult, është e mundur në vetë çelësin e ndërrimit të ingranazheve, veçanërisht pasi vetë pajisja është e vogël dhe mund ta fshehni lirshëm në çelësin e kutisë së shpejtësisë. Dhe mbuloni të gjitha këto me mbulesën tuaj. Ne furnizojmë me energji qarkun nga çelësi i ndezjes, pasi pajisja nuk ka nevojë për një furnizim të vazhdueshëm të energjisë.
Vizatimi i PCB (LAY):
Kjo pajisje përdoret për të shfaqur ingranazhet aktuale të motoçikletës. Dallimi kryesor kjo pajisje në atë që shfaq ingranazhin aktual në varësi të sinjaleve nga sensorët në dorezën e ndërprerës ... ndryshe nga pajisjet e tjera, ku ingranazhi aktual i motoçikletës u përcaktua bazuar në të dhënat nga shpejtësia dhe shpejtësia (e përdorur në disa modele motoçikleta të shtrenjta) Pajisja përmban një tabelë kryesore me një tregues 7 segmentesh, dy sensorë Hall të vendosur në kornizën e motorit dhe një magnet të vogël të vendosur në çelësin e ndërrimit të ingranazheve.
Në zemër të qark elektrik shtrihet mikrokontrolluesi AVR ATTINY25 / 45/85, i cili përpunon sinjalet nga dy sensorë dhe nxjerr të dhënat e transmetimit në tregues përmes numëruesit / dekoduesit 4026.

Kodi burimor i programit është shkruar në AVR-GCC (WinAVR). Siguresat kur programoni - të gjitha si parazgjedhje (MK ATTINY25 dhe programues USBTiny). E vetmja gjë është se konstantja TOP_GEAR 5 për një motor me gjashtë shpejtësi duhet të ndryshohet në 6.
Bordi i qarkut të shtypur është bërë i dyanshëm, në një model miniaturë. Mikrokontrolluesi dhe mikroqarku 4026 në versionin SMD. Treguesi me 7 segmente është bërë si një tabelë modulare e veçantë dhe është e lidhur me fundin e tabelës kryesore (me shkronjën D). Ekzistojnë 2 variante të tabelës së qarkut të shtypur të treguesit - për treguesit e 7 segmenteve të kuq dhe blu.

Lista e elementeve të përdorur:
Nëse treguesi i përdorur është i tipit LED, atëherë rezistenca R3 mund të zëvendësohet me një diodë 1N4148:


Pranimet:


Kur fuqia lidhet me qarkun (12V furnizohet me kontaktet TO_POWER_1 dhe TO_POWER_2), pajisja vetë-testohet duke kaluar nëpër të gjitha shifrat e treguesit. Pas përfundimit të testit, pajisja është gati për përdorim.
Sensori duhet të pozicionohet si më poshtë - poli verior i magnetit duhet të jetë përballë sensorit (nëse anasjelltas, nuk do të funksionojë). Prandaj, nëse nuk funksionon, atëherë shpalosni magnetin ose sensorët.
Gjithashtu, nëse gjendet veshje neutrale(nga çelësi neutral i lidhur me TO_POWER_4), ekrani do të tregojë zero.
Kur energjia është e fikur, transmetimi aktual i shkruhet EEPROM të mikrokontrolluesit dhe kur pajisja ndizet përsëri, lexohet nga kujtesa dhe shfaqet në ekran.
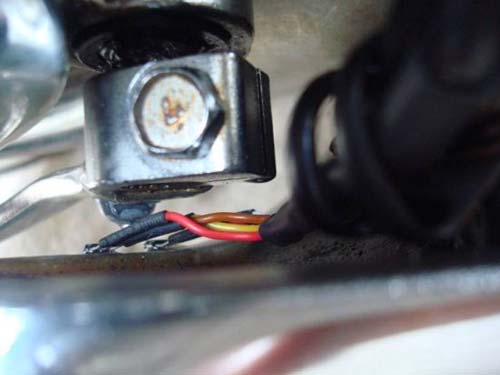
Për sensorët përdoret një kabllo me 4 bërthama. Pikat e saldimit dhe telat e zhveshur të telit vendosen në tubat e tkurrjes së nxehtësisë. Terminalet pranë sensorit mund të mbushen me llak ose epoksi. Mund të përpiqeni të fusni të gjithë sensorin me priza në tkurrjen e nxehtësisë.

Pasi të jetë montuar qarku, para se ta instaloni në motor, është e nevojshme të kontrolloni funksionueshmërinë e tij. Videoja më poshtë tregon se si funksionon qarku:
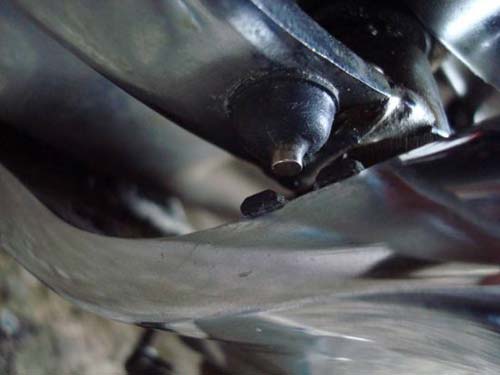
Disa fotografi të instalimit të pajisjes në Motor Suzuki Ndërhyrës VS400:

Video e instalimit dhe funksionimit të pajisjes:
Sensorë të çelësit të ingranazheve
Vetë-testimi dhe funksionimi i pajisjes
Ruajtja e transmetimit të fundit në kujtesë
Më poshtë mund të shkarkoni skedarë skematikë për, burimet dhe firmware, skedarët PCB
Lista e elementeve radio
| Përcaktimi | Lloji i | Emërtimi | sasi | shënim | Dyqan | Fletorja ime |
|---|---|---|---|---|---|---|
| Counter | Logjikë e veçantë | CD4026B | 1 | Kërko LCSC | Në fletore | |
| MCU | MK AVR 8-bit | ATtiny25 | 1 | Kërko LCSC | Në fletore | |
| IC3 | Rregullator linear | LM7805 | 1 | Kërko LCSC | Në fletore | |
| C1 | Kondensator elektrolitik | 220 uF 35V | 1 | Kërko LCSC | Në fletore | |
| C2 | Kondensator | 100 nF | 1 | Kërko LCSC | Në fletore | |
| BLU | Ekran LED | SC03-11PBWA / A | 1 | Kingbright 0.3 " | Kërko LCSC | Në fletore |
| E KUQE | Ekran LED | SC03-12EWA | 1 | Kingbright 0.3 " | Kërko LCSC | Në fletore |
| R1 | Rezistencë | 10-220 Ohm | 1 | 0.5 vat |
Për t'i dhënë çelësit të ingranazheve origjinale pamjen mund ta bëni të ndriçuar nga treguesi LED që tregon numrin e ingranazheve të përfshira ose neutrale. Një zanat i tillë është shumë i lehtë për tu bërë nëse keni të paktën një përvojë të vogël në programimin e mikrokontrolluesve AVR.
Parimi i funksionimit të pajisjes është si më poshtë. Ai ndizet përmes ndezjes. Gjëja kryesore këtu është mikrokontrolluesi që komunikon me çelsin e kallamit. Kur transmetimi është i ndezur, magneti i bashkangjitur me lëkundësin mbështetet në ndërprerësin e kallamit dhe fushën e tij magnetike, duke mbyllur kështu kontaktet e tij. Sinjali i dërgohet kontrolluesit, i cili shfaq imazhin e shifrës që korrespondon me çelësin e kallamit në tregues. Kur doreza është brenda pozicion neutral asnjë nga çelsat e kallamishteve nuk është i mbyllur, atëherë një gjarpër po rrotullohet në mënyrë ciklike në tregues.
Një tregues i tillë i numrit të ingranazheve në çelësin e ndërrimit të ingranazheve mund të bëhet mjaft lehtë vetë.
Në procesin e prodhimit, ju patjetër do të keni nevojë për pjesë radio:
- Mikrokontrolluesi ATtiny2313;
- Treguesi LED me një anodë të zakonshme;
- Çelësa kallami për mbyllje në shumën prej 6 copë;
- Seria e stabilizuesit të tensionit 7805;
- Rezistencat kufizuese aktuale për 100 Ohm (7 copë) dhe një për 10 kOhm;
- Kondensatorët 100 dhe 10 μF;
- Dy magnete;
- Set për levën e ingranazheve të prodhuesit turk SAHLER.


Bordi është bërë nga PCB të veshur me fletë metalike, në të janë vendosur çelsat e kallamishteve. Magnetët janë ngjitur në rrëshqitje.
Kompleti i fituar me çelësin e ndërrimit të ingranazheve është i mrekullueshëm në atë që mund të çmontohet plotësisht, dhe ka hapësirë të mjaftueshme brenda për të bërë të gjitha fantazitë tuaja të vërteta. Ju mund të vendosni me lehtësi një tregues dixhital në dorezë, për të cilin kapaku i rrumbullakët plastik hiqet nga doreza dhe ndryshohet në të njëjtin, i prerë paraprakisht nga pleksiglas, i lyer nga brenda me një film për bukuri.


Vendi për treguesin është regjistruar me kujdes me një skedar, pas së cilës të tetë telat përmes të cilëve treguesi është i lidhur me kontrolluesin kalohen brenda dorezës.
Tjetra, ju duhet të vendosni tabelën me katër çelsa kallami të fiksuar në të. Për ta bërë këtë, së pari, nën tavëll, një tunel plastik me një vrimë të bërë më parë në fund të tij është ngjitur me anë të vidhave të vetë-përgjimit, nëpër të cilat do të kalojë bordi.
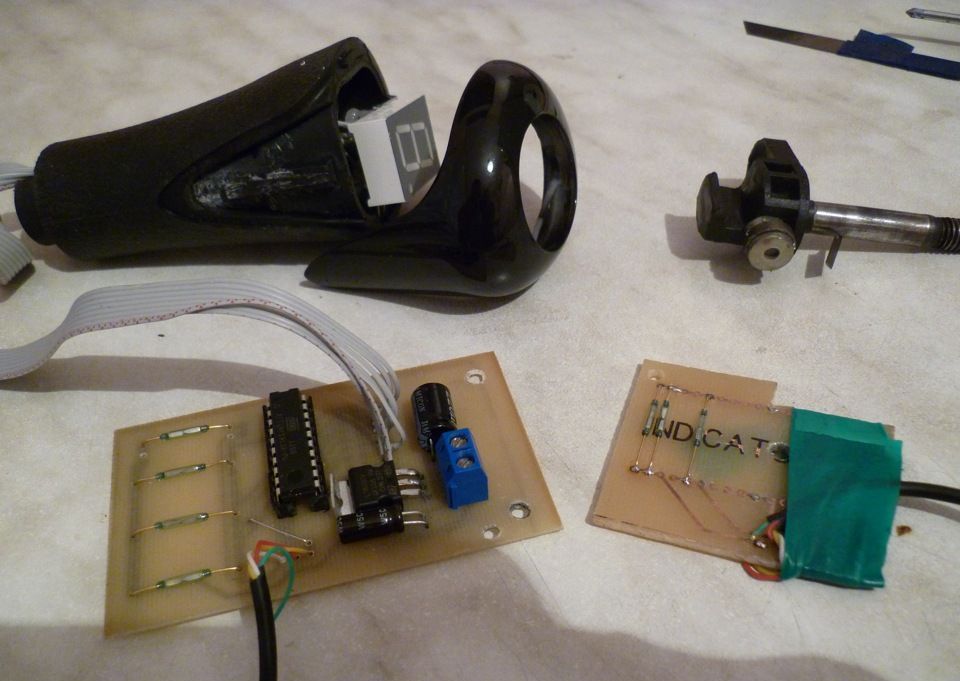

Pllaka e dytë me çelsat e kallamit të mbetur është e lidhur me të parën me një tel të zi dhe është ngjitur gjithashtu në tunelin plastik duke përdorur një vidë vetë-përgjimi. Çelsat e kallamishteve gjithashtu mund të ngjiten me zam, por gjëja kryesore është t'i vendosni ato në mënyrë të tillë që ata patjetër të reagojnë ndaj efektit të magnetit.
Në mënyrë që mikrokontrolluesi të funksionojë, duhet ta programoni, për të cilën disa vegla kompjuterike janë të dobishme:
- Programues. Me ndihmën e kësaj pajisje, skedarët e firmware transferohen nga kompjuteri në mikrokontrollues. Ka shumë programues të ndryshëm që mund t'i blini ose montoni vetë - diagrami i qarkut, signet dhe firmware për to mund të shkarkohen falas nga Interneti.
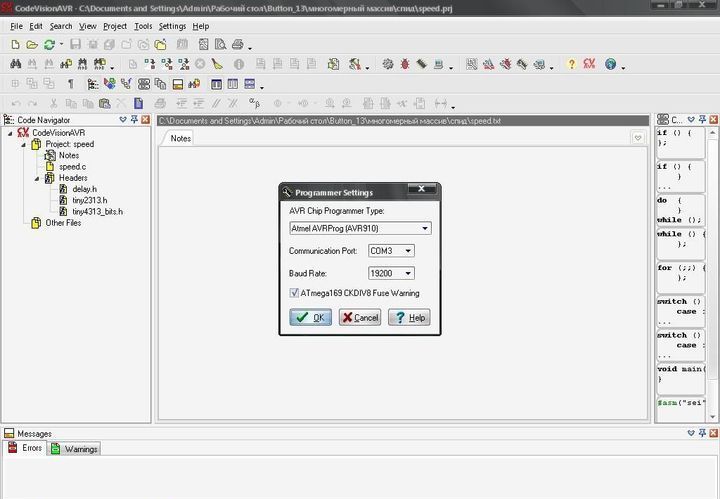
- Program. Me fjalë të tjera, kërkohet një mjedis për zhvillim dhe programim, për shembull, CodeVision AVR.
Mikrokontrolluesi lidhet me programuesin përmes ndërfaqes SPI. 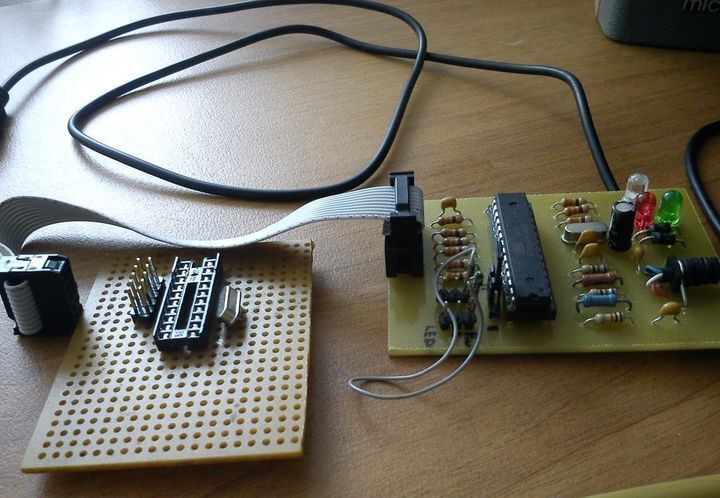

Kur programuesi është i lidhur me kompjuterin përmes folesë USB, dhe mikrokontrolluesi është i lidhur me programuesin përmes tabelës së korrigjimit, mund të ekzekutoni programin CodeVision AVR. Në menunë e programit, kërkoni skedën Cilësimet, zgjidhni linjën e Programuesit në të dhe vendosni cilësimet e kërkuara.
Pastaj ju duhet të hapni skedën Tools dhe zgjidhni Chip Programmer.

Në linjën Chip, zgjidhet kontrolluesi i kërkuar ATtiny 2313. Për të kontrolluar lidhjen e saktë, mund të shtypni Reset Chip; asnjë gabim nuk duhet të zbulohet gjatë kontrollit. Tani ne vazhdojmë drejtpërdrejt me programimin. Nëse ka nevojë të pastroni çipin, atëherë në skedën Program, klikoni në veprimin Erase Chip
Në skedën File, klikoni Load FLASH dhe zgjidhni skedarin e kërkuar të firmuerit.
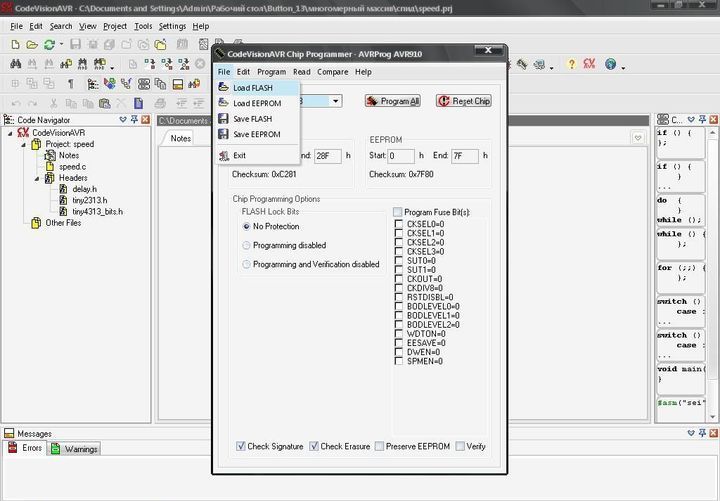
Pastaj, në skedën Program, zgjidhni FLASH dhe procesi i regjistrimit duhet të shfaqet në ekran. Kështu, programimi i mikrokontrolluesit ka përfunduar dhe gjithçka që mbetet është ta transferoni atë në një pajisje tashmë të përfunduar.
Duhet të theksohet se një akordim i tillë mund të bëhet jo vetëm për VAZ të modelit të dhjetë, por edhe për makina të huaja në të cilat ekziston një skemë e ngjashme e çelësit të ndërrimit të ingranazheve.