Se întâmplă că știftul roții se defectează și nu este posibil să-l fixați în siguranță pe butuc. Acest lucru se întâmplă adesea când roata este îndepărtată frecvent. Deteriorarea poate fi diferită - aceasta este defalcarea părții filetate, ruperea știftului sau curbura acestuia. Uzura apare din cauza îngrijirii necorespunzătoare a acestora. Intră murdărie și nisip, care la rândul său joacă rolul unui abraziv. Cauza uzurii este, de asemenea, rea piuliță strânsă... Ruperea piesei se poate datora lovitură puternică iar din momentul strângerii piuliței roții. Ca urmare, conducerea unei mașini devine nesigură. Acest fapt poate duce la avarii mai grave și la accidente rutiere.
Soluție la această problemă
Dacă apare acest tip de defecțiune, este necesar să înlocuiți știftul roata din fata... În acest caz, este recomandabil să schimbați nu numai partea ruptă, ci și întregul set. Aceasta se caracterizează prin faptul că, atunci când unul se rupe, restul știfturilor ar putea fi deteriorate, deși vizual acest lucru nu poate fi observat.
Pe baza mărcii dvs. vehicul, procesul de înlocuire poate avea loc atât pe hub eliminat, și direct pe mașină. Este legat de caracteristici de proiectare mașini. Dar, de regulă, reparațiile pot fi făcute fără a scoate butucul. Aproape fiecare automobilist poate instala independent un ac de păr. Este suficient să ai instrumentul necesar și ceva experiență în lucrări de renovare.
Dar dacă acul de păr se rupe pe drum? Înlătura această defecțiune în acest caz este aproape imposibil. Datorită faptului că roata este atașată la butuc cu un anumit număr de știfturi (de la patru la șase, cu excepția „OKA” - trei), puteți ajunge acasă sau la stația de service pentru restul. În acest caz, mai întâi trebuie să verificați gradul de strângere a piulițelor roții și să vă deplasați cu mare atenție, evitând umflături mari și să nu formați viteza mare... Înlocuirea știftului butucului roții din față nu este un proces foarte laborios, dar necesită anumite abilități și răbdare.
Cum se demontează o parte inutilizabilă
Mai jos sunt modalități de a elimina această problemă folosind exemplul mai multor mărci „populare” de mașini, atât interne, cât și de import. Pe scurt, lucrări de renovare nu sunt deosebit de diferite în ceea ce privește tehnologia lor, dar există încă unele diferențe asociate cu dispozitivul mașinii.
Înlocuirea știftului roții din față - Toyota
ÎN în acest caz obiectul reparației va fi o mașină Toyota Corolla. 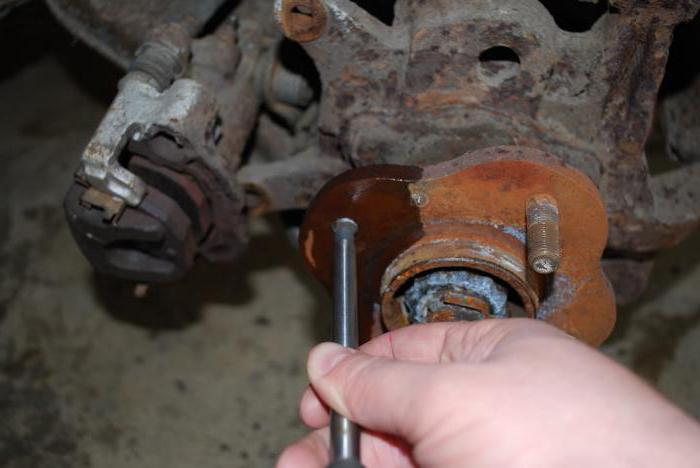 Imediat înainte de înlocuire, trebuie să decideți achiziționarea unui set de știfturi de rezervă. Cea mai bună opțiune va cumpăra exact piese originale, a cărui calitate este fără îndoială. În caz contrar, există riscul de a cumpăra știfturi de calitate inferioarăcare se poate rupe rapid sau partea lor filetată se va rupe în curând. De asemenea, nu trebuie să vă înșelați cu locația instalării lor. Față și au diferite știfturi. Acest sfat se aplică tuturor vehiculelor care necesită înlocuirea știftului roții.
Proces de înlocuire pas cu pas
Pentru muncă veți avea nevoie set standard chei cu soclu, ciocan, set-up, cheie pentru roți și cric. Mașina este instalată pe o suprafață plană și așezată pe. Apoi, eliberați piulițele roții și, ridicând mașina, scoateți roata.
După lucrările pregătitoare, ar trebui să începeți să scoateți etrierul de frână. 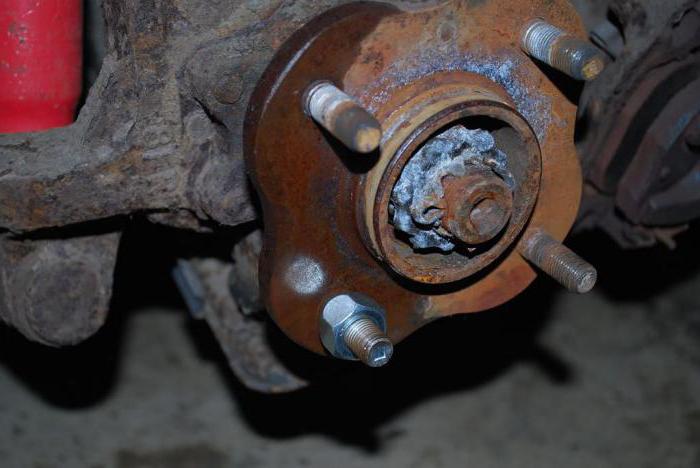 Cu capetele 17, deșurubați șuruburile de fixare a etrierului și scoateți-le de pe disc. Deconectați furtunul de alimentare lichid de frână nu este necesar, doar mișcă corpul mecanism de frânare puțin în lateral.
Pe partea interioară a butucului există un conector tehnologic pentru demontarea și montarea știftului. Rotim butucul astfel încât știftul deteriorat să fie situat vizavi de acest conector. Apoi, folosiți un ciocan pentru a bate acul de păr. Dacă este ținut în siguranță în scaun, atunci trebuie să-l tratați cu WD-40 sau motorină și să-l lăsați să se oprească puțin. După aceea, dezmembrarea va merge mai ușor, dacă este necesar, puteți utiliza un ghid.
După îndepărtarea piesei deteriorate, instalați una nouă în locul ei. Instalarea este la fel ca eliminarea. Când știftul și-a luat locul, ar trebui să-l strângeți cu piulița roții, astfel încât să se potrivească perfect în discul de frână. Înlocuirea știftului roții din față (inclusiv Toyota Camry) a fost finalizată cu succes. Dacă este necesar să înlocuiți pinii rămași, operația are loc în aceeași ordine.
Trebuie remarcat faptul că nu este recomandabil să aplicați piulițe la șuruburile noi care au fost instalate pe știfturi vechi, deoarece există posibilitatea deteriorării filetelor lor. Ca urmare, acest lucru poate duce la uzura rapidă a unui nou set de produse.
Procesul de reparații pe VAZ
Înlocuirea știfturilor roții din față (inclusiv „Niva”) se efectuează aproape în același mod ca și pe mașina anterioară.
Mașina este suspendată cu un cric, roata, etrierul și etrierul de protecție al mecanismului de frână sunt scoase. Apoi, știftul șurubului este lovit cu un ciocan, după ce l-a asortat anterior cu decupajul pentru demontare. Pentru a preveni rotirea butucului roții, trebuie să cuplați prima treaptă de viteză. Scaun este curățat de murdărie și rugină și apoi este instalat un nou șurub în el. Există fante longitudinale pe corpul știftului și în potrivirea acestuia. 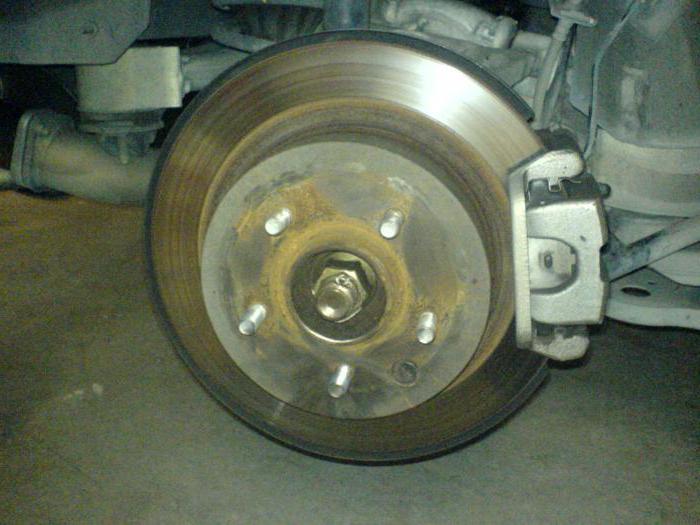 Prin urmare, trebuie să vă asigurați că se potrivesc. Acționând din partea motorului, știftul este introdus cu un ciocan și apoi strâns cu o piuliță până când se așează complet. Întreaga gamă de lucru durează aproximativ o oră și jumătate.
Înlocuirea știftului roții din față cu scoaterea butucului
Să luăm în considerare un exemplu de înlocuire a unei piese pe mașinile Matiz. Este imposibil să demontați piesa deteriorată de pe această mașină fără a scoate butucul, deoarece interferează
Primul pas este extragerea oprirea sprijinului asamblat cu tampoane și pus deoparte. Deșurubați din prima tija de direcție... Apoi, fixarea butucului la raft este demontată, deșurubată și scosă rulment sferic... După ce ați deșurubat anterior piuliță butuc, scoateți butucul și arborele de antrenare este fixat astfel încât articulația CV să nu iasă din cutia de viteze.
În viitor, butucul este dezasamblat și apare accesul la știfturi. 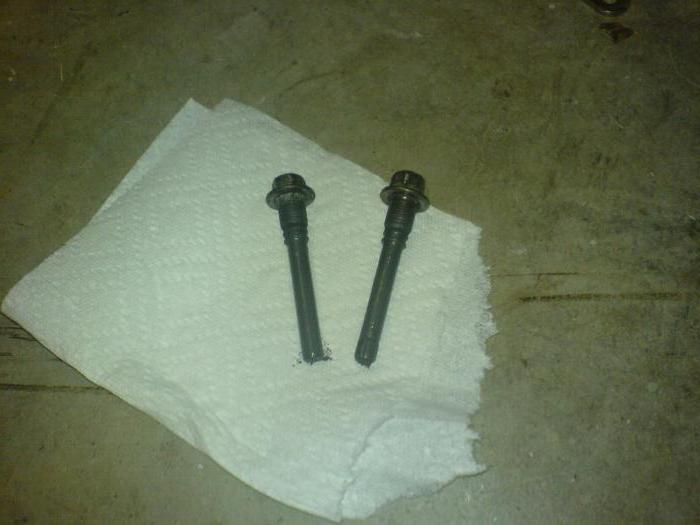 Înlocuirea știftului roții din față este standard. Cel deteriorat este apăsat și unul nou este instalat în locul său. După aceea, puteți începe asamblarea mecanismului de suspendare.
Demontarea și instalarea știfturilor pe „Chevrolet”
În primul rând, toate munca pregatitoare pentru acces facil la piese deteriorate... Roata, etrierul și discul de frână sunt demontate din butuc. Pentru ușurința accesului la penultimele șuruburi de montare, este necesar să schimbați poziția rotației butucului cu volanul. Înlocuirea știftului roții din față („Aveo 1.6” inclusiv) este după cum urmează. Piesa nepotrivită este presată cu un ciocan cu ajutorul unui distanțier din lemn și un nou știft este montat în locul său. Mai mult, întregul ansamblu este asamblat în ordinea inversă a îndepărtării.
După cum puteți vedea, demontarea și instalarea unui nou set de șuruburi ale butucului roții din față sunt destul de fezabile acasă. Înlocuirea știftului roții din față (inclusiv "Lacetti") are loc în același mod, cu excepția unuia - datorită designului butucului, discul de frână nu este îndepărtat.
Repararea știfturilor
Adesea, șoferii nu recomandă repararea șuruburilor. În primul rând, nu este întotdeauna posibil să o faci (bumbac și curbură). În al doilea rând, siguranța conducerii unui vehicul este redusă. Dar le puteți restabili în continuare. 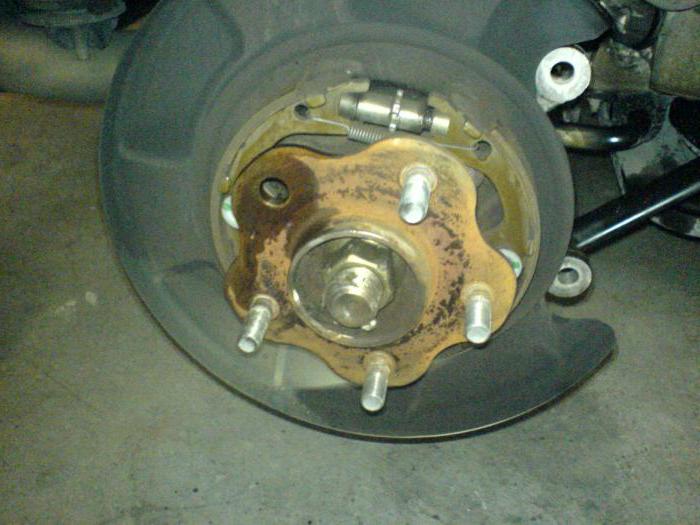 Acesta este un fir deteriorat. Înlocuirea știftului roții din față nu poate fi efectuată dacă firele sunt restabilite. Pentru aceasta, știftul este îndepărtat din butuc. Apoi este prins într-un menghină și teșitura este îndepărtată din partea finală cu un fișier. Apoi, folosind dimensiunea necesară a matriței, conduceți zona deteriorată. Dacă piesa nu are fisuri și așchii la bază, poate fi utilizată ulterior.
Îngrijire
Pentru a nu face față unei astfel de probleme precum ruperea și înlocuirea știftului roții din față, este necesar să se monitorizeze gradul de strângere a piulițelor. Când este lansat, discul bate împotriva știfturilor. Acest lucru duce la ruperea lor și uzura firului. Înainte de a scoate o roată dintr-o mașină, trebuie să curățați bine șuruburile de murdărie, astfel încât să nu ajungă pe viraje conexiune filetată... Aceeași operație trebuie efectuată înainte de a strânge piulița. 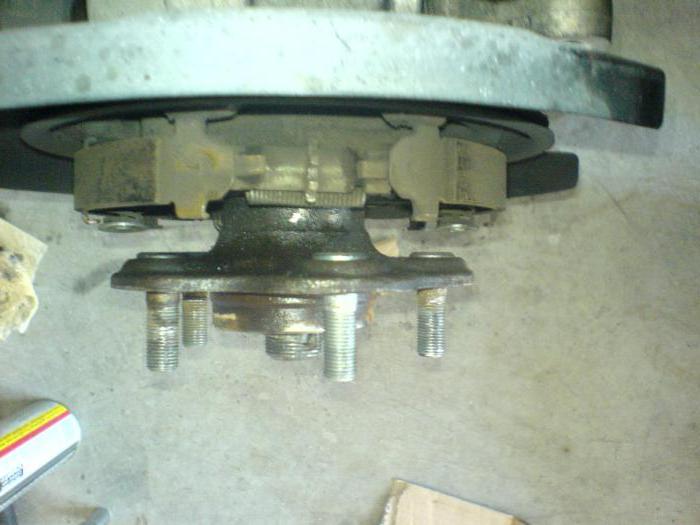 Este recomandabil, deșurubând roata, să umeziți în prealabil firele folosind orice tip de produse petroliere. Acest lucru va facilita mișcarea piuliței. Aceste manipulări simple contribuie la siguranța piesei și necesită mult mai puțin timp decât înlocuirea și repararea știfturilor roților.
În plus, asigurați-vă că verificați strângerea piulițelor și șuruburilor după ce ați vizitat un magazin de anvelope. Sunt mari șanse ca, într-o grabă, un lucrător de service să rateze roata și acest lucru va deteriora știfturile în cel mai bun caz.
Pin rupt pe roată.
Am fost la un service auto pentru a repara o roată. Mi-au pus o roată, m-au rotit cu un pistol pneumatic. În următoarele zile și săptămâni, nucile au început să dispară din această roată. Se pare că au căzut împreună cu știfturile. Într-o săptămână, unul dintre știfturile roții din față a rămas în centrul atenției mele, al doilea a căzut în curte, norocos.
Fotografia de mai sus este deja roata din față stângă. Acelul nu a fost tăiat, dar piulița a fost strânsă în prealabil, nu cu mâna, ci imediat cu un pistol. A rupt firul știftului butucului roții. Mulțumesc lucrătorului de service auto.
Nuci rotile din spate pe loc (bine că acel angajat nu i-a atins), prin urmare „înlocuirea acului de păr roata din spate va rămâne în culise. "
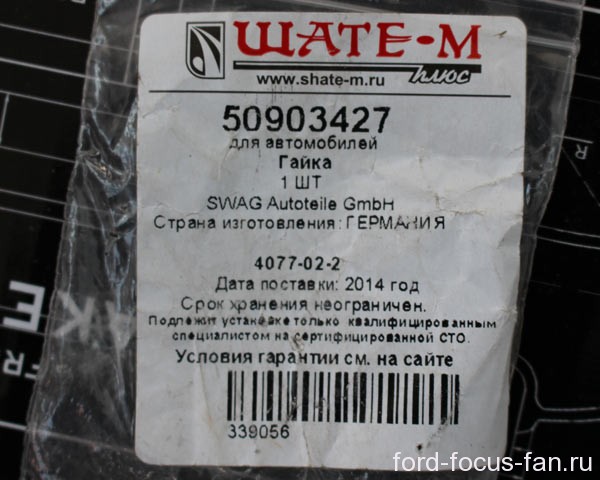
Deoarece știfturile s-au pierdut împreună cu piulițele cu șuruburi ale roții, am comandat știfturi originale cu piulițe (nu ar trebui să riscați cu știfturi neoriginale sau analogice). A adus știfturi de roți germane și piulițe. Prețul unui șurub cu butuc de roată este de doar 80 de ruble, dar o piuliță la prețul de 130 de ruble merge la el. Ca urmare, un știft cu piuliță costă 210 ruble. Butuc butuc ford focus 2
Aici într-un astfel de pachet ... Nucile sunt serioase, verificate, potrivite.
Cum se schimbă știfturile de pe roată? Am pus o întrebare la cea mai apropiată stație de service, chiar specialistul local întreabă un coleg cum să înlocuiască acul de păr de pe roată. Apoi, au răspuns ei, este necesar să scoateți butucul sau să îl înlocuiți complet. Am luat-o singur și am rezolvat problema în jumătate de oră.
Instrument de înlocuire a știftului roții
- Știfturi pe butuc
- Două ciocane (unul mai greu decât celălalt)
- Șurubelniță plată
- Tasta 15
- bulgară
Înlocuirea știfturilor roții din față
Eliberăm piulițele roții, ridicăm mașina, desigur, punând anti-revers.
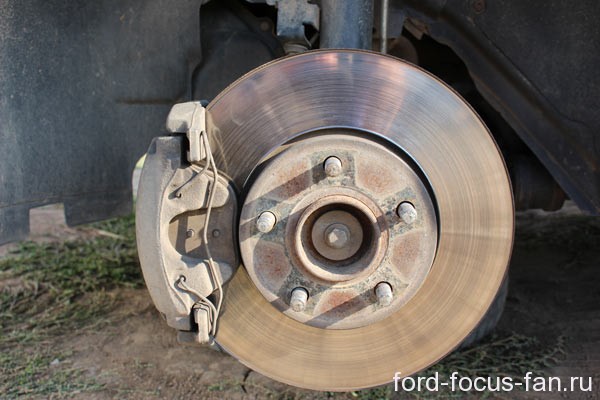
Este necesar să scoateți etrierul de frână. Întoarcem roata. Vedem două șuruburi 15 (pentru Ford Focus 2), deșurubați-le. 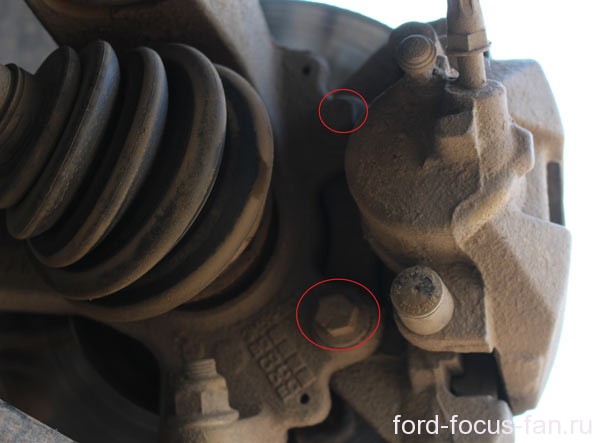 Mai departe, plăcuțe de frână va fi apăsat pe discul de frână. Folosiți o șurubelniță plată pentru a deschide tampoanele. Îndepărtăm suportul (fotografia de mai jos).
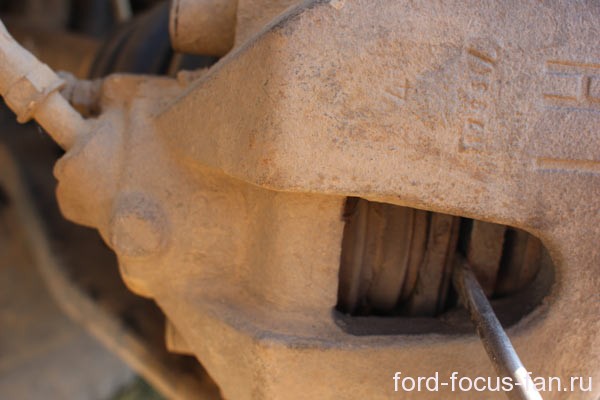
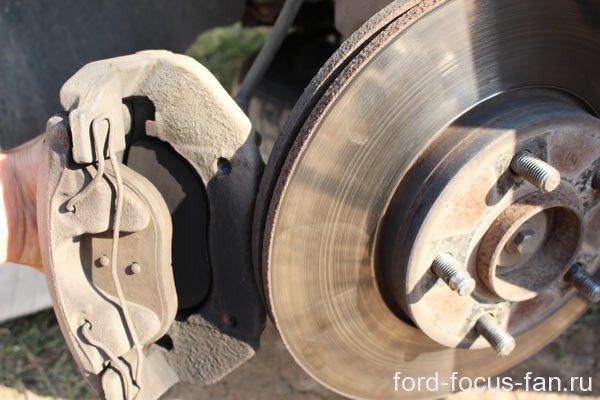
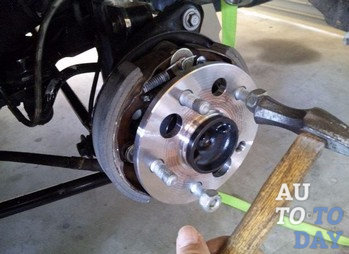
Scoatem etrierul în lateral, dar este mai bine să-l agățăm de arc. Acum, scoateți discul de frână. Dacă s-a atașat, atingem perimetrul discului cu un ciocan și scoatem discul.
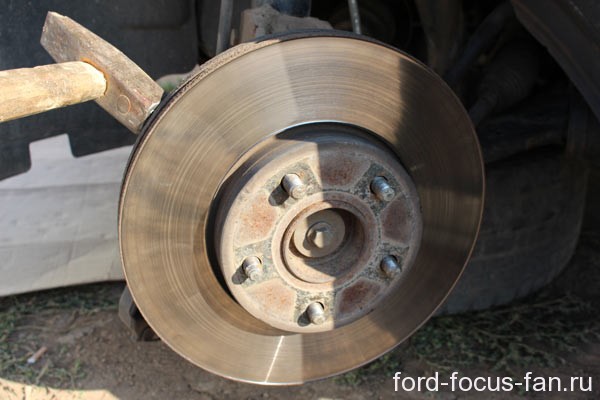
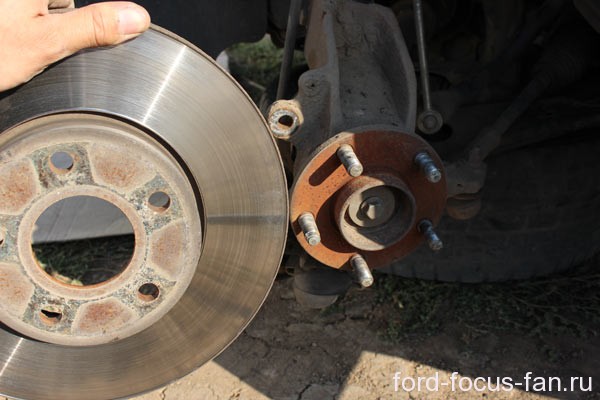
Acum, cu un ciocan, scoateți știftul puțin din șanț, dar nu complet.
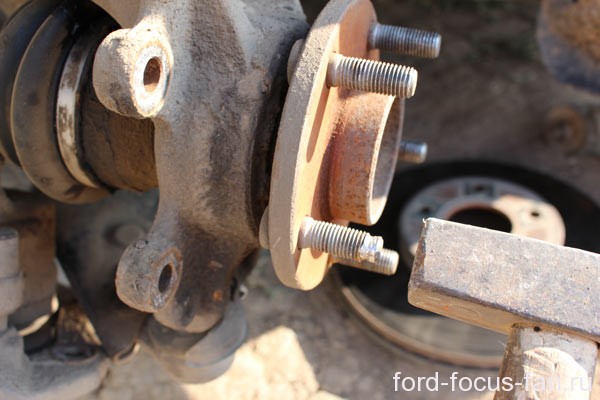
Iată chiar motivul pentru care știftul butucului roții nu va ieși din butuc. o parte a pălăriei se sprijină de articulația direcției.
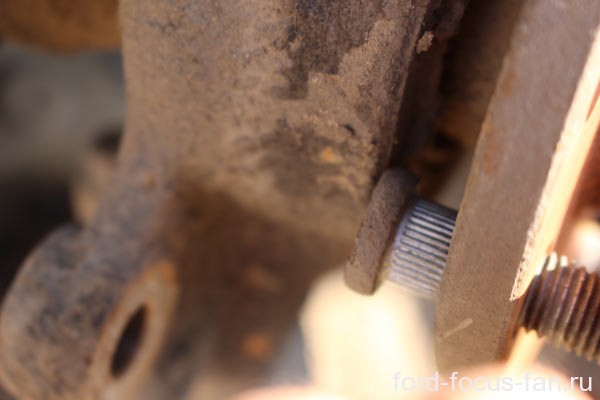
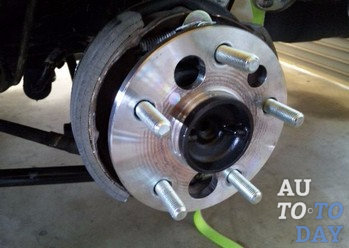
Prin urmare, nu scoatem știftul până la capăt, derulăm butucul astfel încât cel mai mare spațiu posibil să rămână în jurul știftului și să tăiem capul acului de păr pe o parte cu un polizor. Scoatem acul de păr.
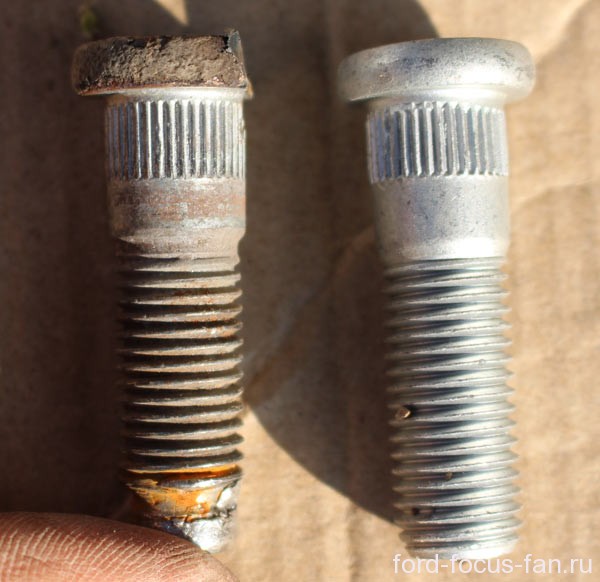
Noul știft butuc frontal (deși nu există nicio diferență) este tăiat în același mod, astfel încât să se potrivească liber, dar și pentru a tăia un minim al capacului.
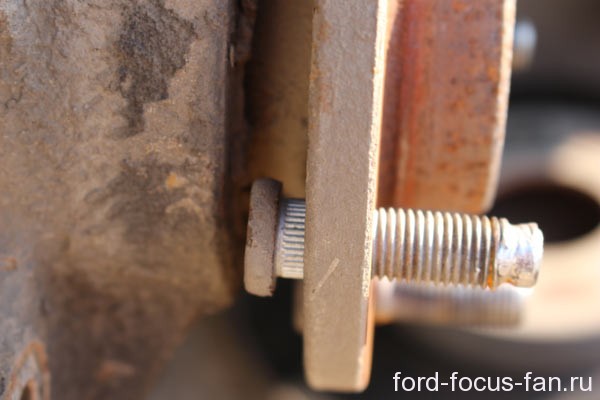
Dar, înainte de a-l ciocni, asigurați-vă că canelurile știftului se potrivesc exact cu canelurile butucului.
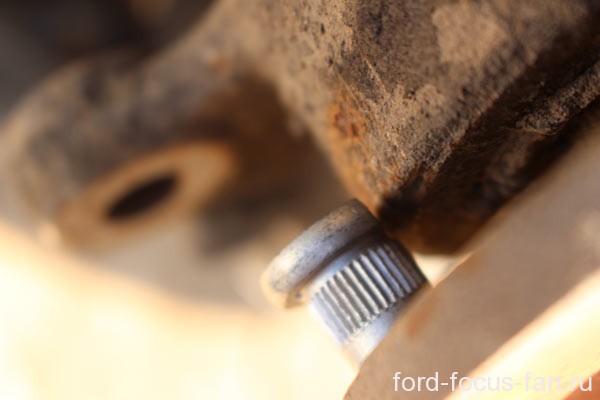
Apoi, ciocăniți ușor știftul. Loviturile de ciocan sunt rele pentru grenadă și rulmentul butucului. Pentru a le stinge, înlocuiți cu partea opusă ciocan sau baros pe butuc. Dar pentru ca instrumentul să nu atingă firul noului știft și al celor adiacente. Acum, ciocănește în ac de păr.

Adunăm mașina.
Înlocuirea știftului roții butucului față Ford Focus 3
Solicitați lucrătorilor de service să strângă piulițele și să le strângă cu mâna. Și astfel încât conductele contorului să nu fie puse pe cheia cilindrului.
Astăzi, este dificil să ne imaginăm omenirea fără transport rutier. Tehnologia auto au inundat această lume de mult timp și nu vor renunța la pozițiile lor. Și vizează crearea celor mai confortabile condiții de funcționare pentru mașini. În acest scop, se realizează modernizarea constantă a celor mai mici piese auto.
În acest articol vom vorbi despre un detaliu atât de important, deși foarte mic, precum butucul butucului. De ce există modernizare? Și, în plus, știfturile butucului au devenit echivalentul perfect al șuruburilor simple. Dar, la fel ca toate părțile unei mașini, acestea sunt supuse uzurii sau a oricărui fel de daune. În acest articol, vom încerca să ne dăm seama ce avantaje au șuruburile butucului asupra șuruburilor, precum și cum să înlocuim corect și rapid știftul folosit cu unul nou.
1. Avantajele butoanelor butucului
De regulă, mulți șoferi trebuie să lucreze din greu atunci când instalează o roată pe o mașină. Așadar, datorită știfturilor butucului, punerea pe roată devine mult mai convenabilă și mai rapidă. De asemenea, este imposibil să nu rețineți modelul excelent al șuruburilor atunci când montați roata pe vehicul.
2. Cum se schimbă corect butoanele butucului
După ce am analizat principalele avantaje ale butucilor butucului, putem trece la regulile pentru înlocuirea corectă a acestei piese. De regulă, știftul butucului este susceptibil la diverse daune, fie că este vorba de o fractură sau oxidare. Dar cel mai adesea șoferii recurg la înlocuirea știftului doar atunci când este complet epuizat.
 Înlocuirea știftului butucului nu necesită mult timp, deci nu este necesar să contactați un specialist centre tehnice sprijin de făcut acest lucru... Înlocuirea poate fi efectuată cu ușurință acasă, este important doar să urmați anumite instrucțiuni.
Deci, pentru început, ridicăm mașina și începem să deșurubăm roata. După scoaterea roții, utilizați cheia 14 și deșurubați cilindru de frână... De asemenea, folosind aceeași cheie, deșurubați etrierul. Când tot ceea ce este inutil este eliminat, preluăm eliminarea disc de frână... Pentru a face acest lucru, îndepărtăm plăcuțele de frână de parcare, folosind găurile șuruburilor cu 8.
Desigur, puteți înlocui știfturile fără a scoate plăcuțele de frână de parcare. Puteți pur și simplu să desprindeți firul știftului utilizând mânerul lung al barei atunci când vehiculul a fost condus suficient și știftul este complet epuizat. După îndepărtarea piuliței vechi, nu uitați de tratarea suprafeței firului. Pentru a face acest lucru, îndepărtați cu atenție murdăria, rugina etc. de pe suprafață. Toate acestea sunt făcute pentru a se asigura că noul ac de păr se potrivește exact în butuc și în niciun caz nu atârnă. După aceea, strângem noul știft, prin distanțier, cu piulița roții. Felicitări! Ai făcut treaba!
 Desigur, după ce ați înlocuit știftul butucului, din motive de siguranță, trebuie să conduceți o mică porțiune a drumului pentru a testa mașina. Dacă observați vibrații, ar trebui să echilibrați roțile.
Abonați-vă la fluxurile noastre din
În timpul funcționării mașinii sau la înlocuirea unei roți, se întâmplă ca butucul butucului să cedeze. De asemenea, daunele sale sunt posibile cu înlocuirea frecventă roți. Există mai multe probleme comune la ac de păr. Firele pot fi dezbrăcate. Fie se poate îndoi ușor, fie se poate rupe complet. Uzura poate apărea în absența întreținerii sau în caz de întreținere a mașinii de calitate slabă. Murdăria sau nisipul pot pătrunde în locul atașamentului. Acest lucru poate acționa ca un puternic abraziv. De asemenea, dacă piulițele roții au fost ușor slăbite, acest lucru va duce la oboseală excesivă a metalului. Firul poate fi smuls dacă piulița de fixare este strânsă prea tare în timpul instalării roții. Dacă această piesă este deteriorată, atunci mișcarea nu mai este sigură. Roata este dezechilibrată și poate apărea o avarie mai gravă sau un accident.
Înlocuirea știftului
Știftul este un șurub obișnuit care are un fir pe el. Numai locul în care se află capacul este de obicei montat în butuc. Dacă apar defecte, știftul butucului roții din față de pe Chevrolet Niva trebuie înlocuit. Este urgent să instalați unul nou. Acest lucru necesită mai multe acțiuni simple pentru a scoate și înlocui piese.