Të dashur ngarje, ju sjell në vëmendjen tuaj përshkrimi në faza procesi i instalimit buton shtesë kontrolli i dritares së energjisë (ESP) te dera. Procesi jo shumë kompleks dhe e mundimshme, për gjithçka për gjithçka do të zgjasë rreth dy orë.
Për të instaluar një buton shtesë të dritares së energjisë në derën e VAZ 2110, na duhet:
1) tela 9 metra (kam përdorur tela të ngjyrave të mëposhtme: e zezë, e verdhë, e bardhë, 3 metra secila) 0.75 mm (seksion kryq)
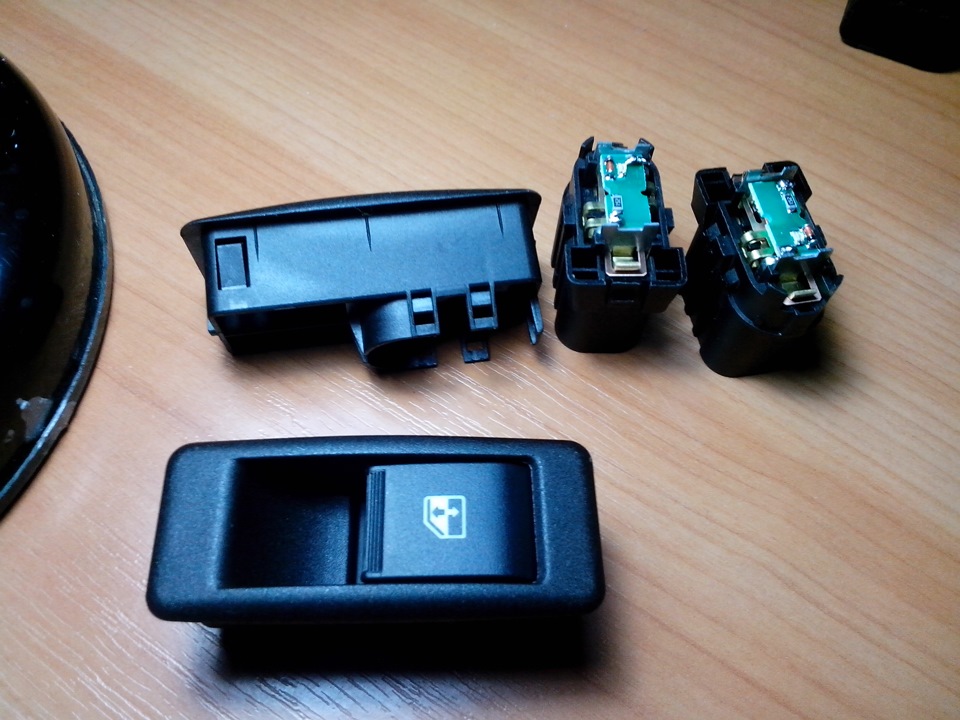
2) butoni për kontrollin ESP (VAZ 2110) *
3) jastëk nën butonin ESP
4) terminalet “nënë” janë të mëdha - 2 **
5) Terminalet e babit janë të mëdha - 2 **
6) terminale "nënë" e vogël - 7 **
7) terminal "tokë" 8 mm - 1
8) jastëk nën terminale "nënë - baba" i madh - 1 (secili lloj)
9) kapëset plastike (të vogla) - 8
10) kapele për spërkatjen e rrobave të derës - 7 ***
* - në parim, në vend të butonit dhjetëfishësh lëkundës, ju mund të vendosni butona të Lartë-PREZIK (fuqia) nga Kalina ose Priora, por kontrolloni me shitësin në mënyrë që ata të godasin me rrymë të lartë, ato që shkaktojnë nuk do të funksionojnë.
** - Unë nuk i bleva këto terminale, ata erdhën me pads.
*** - ata janë të butë me mua, kështu që nuk u prishën \u003d\u003e Unë nuk i bleva ato.

Diagrami i lidhjes së butonit ESP në derë.

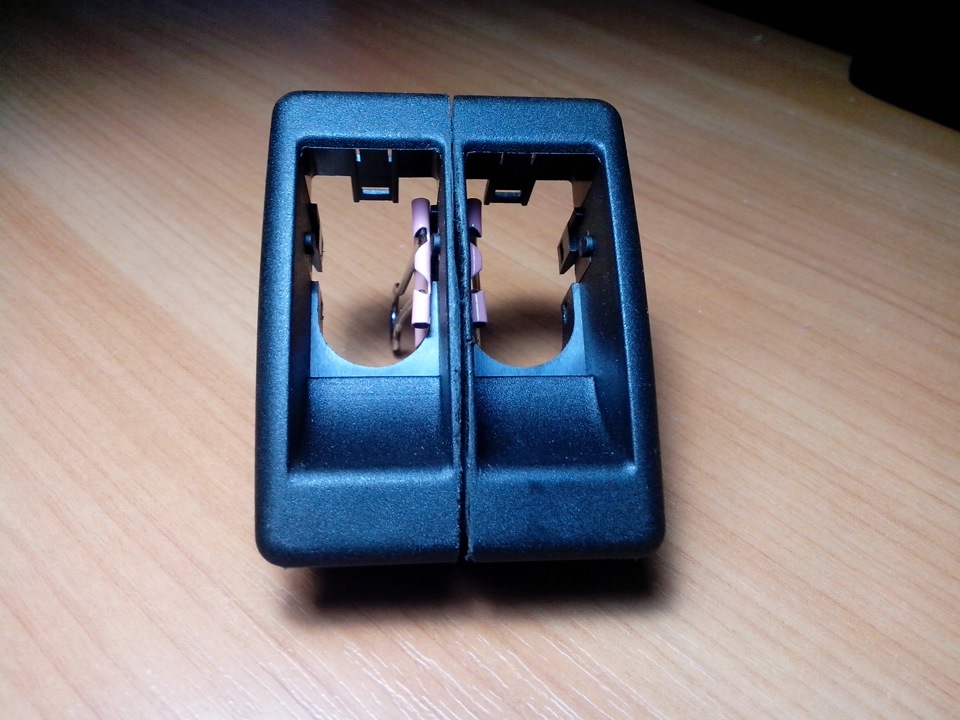
Tani përcaktojmë numrat e kontaktit në butonin dhe bllokun, sipas skemës:


Pra, renditeni. Gjë tjetër, ju duhet të gjeni ESP stafetën. Zakonisht, stafeta është e vendosur në majë të kapakut të bllokut të montimit. Nëse keni të instaluar më shumë se një stafetë, atëherë hiqni ato një nga një dhe kontrolloni nëse ESP-të funksionojnë. Stafetë, pas heqjes së së cilës ESP-të pushuan së punuari, është stafetja ESP.
Këtu është stafeta:

Ne e heqim atë nga priza, dhe heqim terminalin negativ nga bateria.
Pastaj shkëputni stafetë vetë nga shtëpia. Për ta bërë këtë, shtrydhni pak shulin e mbajtësit me një kaçavidë të rrafshit të presës dhe shtypni mbi trupin e tij. Mbajtësi i stafetë është i shkëputur. Shifra tregon shulën:

Ne jemi të interesuar për një tel të bardhë me një shirit të zi (kjo është "+ 12 V" pas ndezjes. Nëse dëshironi që ESP të funksionojë pavarësisht pozicionit të çelësit të ndezjes, atëherë lidhni 30 dhe 87 të kontaktit të stafetë ESP - të bardhë me një shirit të zi dhe blu me një shirit të zi) :

Pastaj i lidhim telit tonë "+12 V" (sipas skemës, ai lidhet me 2 pads kontakti, kam përdorur telin ngjyre e verdhe)
Tani kemi nevojë për një "masë". Mund ta marrësh nga dera, por atje kontakti është shumë i paqëndrueshëm, kështu që unë e thirra masën nga buloni pas bllokut të montimit. Hapni për të parë këtë rrufe në qiell bllok montimi dhe shiko lart dhe pak djathtas).
Mbërthen tela, e cila lë tokën në fund të "tokës" dhe ngjitet në rrufe. (për këto qëllime kam përdorur një tel të zi)
Hapi tjetër është të lidhni plusin me dritën e prapme. Unë u përplas në telin e bardhë të ndriçimit të ashtray (kam përdorur edhe telin e bardhë të blerë për t'u lidhur), është e vendosur prapa mburojës në të majtë, e cila është në këmbët e pasagjerit të përparmë.
Mos i kushtoni vëmendje telit portokalli (+ dritës së prapme të radios).
Këtu, të tre telat që i mbajmë në derën që kemi lidhur me burimet, atëherë do të duhet t'i drejtojmë ato përmes valëzimit në derë. Hiqni rreshtimin e raftit të mesëm (hiqni një vidhos në mes dhe dy në fund). Lëshoni gjithashtu rripin e sigurimit të shoferit në dysheme (buloni 17).

Për ta bërë më të përshtatshëm drejtimin e telave përmes valëzimit, shkëputeni atë nga dera.
Zbuloni dhe hiqni dorezën e derës (dy bulona për një kaçavidë Phillips). Pastaj hiqni rreshtën (kartën) e derës, është mirë ta bëni këtë, duke filluar nga fundi. Mos harroni të hapni karafilët. Ne i gjejmë jastekët (nënë-baba) me motorin ESP, i shkëputim.

Tani fillon argëtimi. Ne shtrydhim tre tela që kemi mbajtur nga nënat e vogla dhe i futim ato në bllok, sipas diagramin më sipër. Prandaj, kontakti "+12 V" - (i verdhë) 2
, plus dritën e prapme (tela e bardhë) - 4
dhe masa është e zezë mbi 5
.
Kanë mbetur 4 kontakte: 1,3,6,7. Teli amtare (jeshile me një shirit të zi) që shkoi në bllokun e motorit ESP është i lidhur 6
kontakti, dhe portokalli - në 3
kontaktit.
Siç e dimë të gjithë, Interneti është plot me informacion se si të ndez tela dhe të bëjë dritaret elektrike të funksionojnë pa një çelës ndezës, por më duket se është e pakuptimtë. Le ta kuptojmë.
0:724Metoda e propozuar në internet është kjo: para së gjithash, ne duhet të hapim bllokun tonë të montimit me siguresa dhe të gjejmë një stafetë përgjegjëse për dritaret e energjisë.
0:1033 1:1538Duke u siguruar nga përvoja, gjegjësisht duke ndezur ndezjen dhe duke nxjerrë stafetën, ne kuptojmë nëse funksionojnë apo jo ashensorët e qelqit.
Nëse kjo është ajo që na duhet ne e heqim stafetën.

Pastaj fillojmë të bëjmë disa manipulime me stafetën duke mbështjellë një tel rreth tij.
2:148
![]()
Unë nuk e di se si ju bëni, por kam një pyetje, por pse na duhet?
4:1286Ne kemi në duar 4x e zakonshme stafetë kontakti, ku parimi i funksionimit të stafetë është i qartë për ne.
4:1430Në internet, thjesht na ofrohet të lidhim lidhjen e shpejtë të ujit me energji elektrike-30 dhe kontaktin dalës në ESP-87. Kjo do të çojë në një kontakt duke anashkaluar spiralen (stafetën), e cila do të funksionojë vetëm nëse merr energji (plus) nga ndërprerësi i ndezjes (kontaktet në Relay-85.86-spirale).
4:1896A nuk është më e lehtë për ne, pa bërë një fermë kolektive, thjesht të bëjmë një bluzë për të dhënë ushqim të drejtpërdrejtë?
4:2075Bëni një tel të trashë me një seksion kryq prej 2.5-4 katrorësh në mënyrë që bluza jonë të mos nxehet.
4:158Dhe lidheni direkt me bllokun. Në terminalin hyrës të tensionit hyrës të kontaktit është 30 dhe dalja 87.
4:351
Pastaj, për të aktivizuar ESP, nuk do të jetë e nevojshme të ktheni çelësin e ndezjes.
Meqenëse Fuqia (plus) do të vijë në ESP duke anashkaluar stafetën, e cila do të funksionojë vetëm kur furnizohet energji (plus) nga ndërprerësi i ndezjes.


Atëherë ferma kolektive nuk do të jetë e nevojshme.
8:568Unë sjell në vëmendjen tuaj një përshkrim faza të procesit të instalimit të një butoni shtesë të kontrollit të dritares (ESP) në derë. Procesi nuk është shumë i ndërlikuar dhe kërkon shumë kohë, gjithçka do të zgjasë rreth dy orë.
8:1085
Për të instaluar një buton shtesë të dritares së energjisë në derën e VAZ 2110, na duhet:
9:18131. Teli 9 metra (kam përdorur tela të ngjyrave të mëposhtme: e zezë, e verdhë, e bardhë, 3 metra secila) 0.75 mm (seksion kryq)
2. Butoni për të kontrolluar ESP (VAZ 2110) *
3. Pad nën butonin ESP
4. Terminalet “nëna” e madhe - 2 **
5. Terminalet "babai" i madh - 2 **
6. Terminalet "nënë" të vogla - 7 **
7. Terminali tokësor 8 mm - 1
8. Tavolina nën terminale "nënë - baba" i madh - 1 (secili lloj)
9. Kllapat plastike (të vogla) - 8
10. Pistona për zbukurimin e dyerve të spërkatura - 7 ***
* - në parim, në vend të butonit dhjetëfishësh lëkundës, ju mund të vendosni butona të Lartë-PREZIK (fuqia) nga Kalina ose Priora, por kontrolloni me shitësin në mënyrë që ato të jenë me rrymë të lartë, ato që shkaktojnë nuk do të funksionojnë.
** - Unë nuk i bleva këto terminale, ata erdhën me pads.
*** - ata janë të butë me mua, kështu që ata nuk u prishën \u003d\u003e Unë nuk i bleva ato.

Diagrami i lidhjes së butonit ESP në derë.
10:1153
Tani përcaktojmë numrat e kontaktit në butonin dhe bllokun, sipas skemës:
11:1793 11:1810
12:18

Pra, renditeni. Gjë tjetër, ju duhet të gjeni ESP stafetën. Zakonisht, stafeta është e vendosur në majë të kapakut të bllokut të montimit. Nëse keni të instaluar më shumë se një stafetë, atëherë hiqni ato një nga një dhe kontrolloni nëse ESP-të funksionojnë. Stafetë, pas heqjes së së cilës ESP-të pushuan së punuari, është stafetja ESP.
13:1050Këtu është stafeta:
13:1077
Ne e heqim atë nga priza dhe heqim terminalin negativ nga bateria.
Pastaj shkëputni stafetë vetë nga shtëpia. Për ta bërë këtë, shtrydhni pak shulin e mbajtësit me një kaçavidë të rrafshit të presës dhe shtypni mbi trupin e tij. Mbajtësi i stafetë është i shkëputur. Shifra tregon shulën:

Ne jemi të interesuar për një tel të bardhë me një shirit të zi (kjo është "+ 12 V" pas ndezjes. Nëse dëshironi që ESP të funksionojë pavarësisht pozicionit të çelësit të ndezjes, atëherë lidhni 30 dhe 87 të kontaktit të stafetë ESP - të bardhë me një shirit të zi dhe blu me një shirit të zi) :
15:953
Pastaj i lidhim telit tonë "+12 V" (sipas skemës, ai lidhet me 2 pads, kam përdorur një tel të verdhë)
Tani kemi nevojë për një "masë". Mund ta marrësh nga dera, por atje kontakti është shumë i paqëndrueshëm, kështu që e mora masën nga buloni pas bllokut të montimit. Për ta parë këtë rrufe në qiell, hapni bllokun në rritje dhe shikoni lart dhe pak djathtas).

Mbërthen tela, e cila lë tokën në fund të "tokës" dhe ngjitet në rrufe. (për këto qëllime kam përdorur një tel të zi)
17:763
Hapi tjetër është të lidhni plusin me dritën e prapme. Unë u përplas në telin e bardhë të ndriçimit të ashtray (kam përdorur edhe telin e bardhë të blerë për t'u lidhur), është e vendosur prapa mburojës në të majtë, e cila është në këmbët e pasagjerit të përparmë.
18:1684
Mos i kushtoni vëmendje telit portokalli (+ dritës së prapme të radios).
19:128Këtu, të tre telat që i mbajmë në derën që kemi lidhur me burimet, atëherë do të duhet t'i drejtojmë ato përmes valëzimit në derë. Hiqni rreshtimin e raftit të mesëm (hiqni një vidhos në mes dhe dy në fund). Lëshoni gjithashtu rripin e sigurimit të shoferit në dysheme (buloni 17).
19:658
Për ta bërë më të përshtatshëm drejtimin e telave përmes valëzimit, shkëputeni atë nga dera.
20:1299
Zbuloni dhe hiqni dorezën e derës (dy bulona për një kaçavidë Phillips). Pastaj hiqni rreshtën (kartën) e derës, është mirë ta bëni këtë, duke filluar nga fundi. Mos harroni të hapni karafilët. Ne i gjejmë jastekët (nënë-baba) me motorin ESP, i shkëputim.
21:2236
Tani fillon argëtimi. Ne shtrydhim tre tela që kemi mbajtur nga nënat e vogla dhe i futim ato në bllok, sipas diagramin më sipër. Prandaj, kontakti "+12 V" - (i verdhë) 2
, plus dritën e prapme (tela e bardhë) - 4
dhe masa është e zezë mbi 5
.
Kanë mbetur 4 kontakte: 1,3,6,7. Teli amtare (jeshile me një shirit të zi) që shkoi në bllokun e motorit ESP është i lidhur 6
kontakti, dhe portokalli - në 3
kontaktit.
Tani blloku që do të lidhet me bllokun e motorit ESP: tela blu - 7 kafe - 1 kontaktit.
22:1452Këtu, në fakt, një foto (të gjithë numrat dhe përcaktimet në përputhje me diagramin e mësipërm):
22:1622
Vendndodhja e telave në bllok:
23:63
E solla këtë poshtërsi pak në rregull:
24:646
Ne lidhim butonin, ne lidhim stafetën ESP dhe minus me baterinë. Ne kontrollojmë ... nëse gjithçka funksiononte, ne i vendosim të gjitha detajet në renditje të kundërt të çmontimit. Nëse xhami funksionon mirë nga butonat ESP, por shkon te butonat e lidhur. drejtim i kundërt, shkëmbimi 3-6, dhe 7-1 (ishte 3 - u bë 6, ishte 6 - u bënë 3, etj.) kontaktet në pads që lidhen me instalime elektrike amtare në derë. Por së pari, kontrolloni që lidhja është e saktë sipas skemës.
25:1944Si rezultat:
25:1972
https://www.drive2.ru/l/6416997/
26:35https://www.drive2.ru/l/8884793/
26:71 38769Përshëndetje!
Për një kohë të gjatë kishte një plan për të transferuar butonat e dritares nga tuneli në kartat e derës, sepse shtrënguesi i këmbës është në këmbë, dhe nuk është i përshtatshëm të arrihet për to. Por meqenëse salloni pasi zëvendësova pragjet u çmontua, vendosa të zbatoja idenë.
Për këtë, shumë kishin nevojë:
1.
Butonat për dritare nga Lada Kalina 3 copë - 441 rubla. 147 rubla për copë. (Dua të vërej se në natyrë ka butona të dyfishtë nga Lada Grant, numri i katalogut 21900-3709810. Por unë nuk i gjeta, kështu që më duhej të merrja 3 butona)
2.
30 metra tel - 450 rubla. 15 rubla për metër.
3.
Një bllok i çelësit të kontrollit të dritares së energjisë VAZ 2110 - 35 rubla.
Unë fillova:
Vetë butonat.
Pamja anësore, në foto dy shulat janë të dukshme të cilat duhet të shtypni në mënyrë që të çmontoni butonin. Ekziston edhe një shul tjetër në pjesën e pasme të butonit (e dukshme në 3 foto)

Të njëjtën shul që duhet të marrësh.
Butoni i grisur. Disa ndryshojnë dritën e prapme në butonat, por unë nuk u mërzita me këtë.
Pasi kam prerë anët në dy butona, përkatësisht, në njërën në anën e majtë në anën tjetër në të djathtë.

Stuko, doli pak e ngathët, nuk kishte letër zmerile të shkëlqyeshme.

Primar dhe pikturuar

Më tej, kartat e dyerve u hoqën gjatë saldimit, ai u tha zejtarëve që të mos i vendosnin përsëri. Gruaja e tyre i lau ato plotësisht me pluhur, pas së cilës ndryshuan ngjyrën nga rëra në gri, me sa duket ngjyra e tyre amtare.)))) Dhe atëherë filloi argëtimi. Meqenëse dritaret e mia ishin shkrirë tashmë, dhe telat ishin nën tunel, nuk i tërhoqa në dyer, por thjesht i rrita. Në secilën buton merren 7 tela, këto janë 3 tela në masë, 1 tela plus, 1 tel për të ndriçuar butonat dhe 2 tela për motorin ESP, ne shumëzojmë me 2 (2 butona) marrim 14 tela që duhet të forcohen në derën e shoferit. Por, përveç këtyre 14 telave, unë kam tashmë 12, 5 për pasqyra, 5 për alarm dhe 2 për folës. U vendos për të ulur numrin e telave në dy.
Kjo është:
1 tel - Pozitiv
1 tel - ndriçim butoni
1 tel - Masa
4 tela - Për motorët ESP (secili motor ka dy tela)
Disi i shova të gjitha telat përmes gërryerjes së derës, lidha butonat, kontrollova, gjithçka funksionon, telat nuk nxehen. Pastaj mata madhësinë e butonit të dyfishtë me një vizor, vura në dukje matjet në hartën e derës dhe e preva me thikë zyre, e ngroha dhe e preva në mënyrë të barabartë me një teh të nxehtë.
Rezultati i përfunduar i derës së shoferit.
Në derën e pasagjerit, zgjasja vetëm 3 tela, kjo është një plus, peshë dhe tela e butonit të dritës së prapme.
Unë bëra gjithçka sipas kësaj skeme, por ...

Diagrami i lidhjes për butonin rezervë ESP VAZ 2110
Kështu që, në kurriz të kësaj POR ... bëra gjithçka sipas këtij udhëzimi # dhe nuk e piva cigaren pak.
Këtu është diagrami i lidhjeve të kontakteve të butonit ESP

Butonat e skemës ESP VAZ 2110
Unë lidha kontaktet 7 dhe 1 me motorin së bashku me kontaktet që ishin të lidhura me të, pas së cilës kur lidh butonin rezervë, dritarja ngrihej ngadalë nga rezerva që ishte kryesore, dhe instalime elektrike u nxehën. Rezulton se duhet të shkëputni telat e vjetër që shkojnë në motorin ESP dhe t'i lidhni ato në pin 3 dhe 6, dhe të lidhni telat nga motori në kontaktet 1 dhe 7. Pas lidhje e duhur gjithçka funksionoi ashtu siç duhej, dhe telat nuk nxehen. Ekziston një tjetër POR, nëse prishet butoni ESP i derës së pasagjerit, atëherë rregullatori i dritares nuk do të ngrihet me butonin e shoferit, rezulton një lloj përcjellësi i butonit.

Dera e pasagjerëve.
Fat të mirë për të gjithë, bëni pyetje!
Unë sjell në vëmendjen tuaj një përshkrim faza të procesit të instalimit të një butoni shtesë të kontrollit të dritares (ESP) në derë. Procesi nuk është shumë i ndërlikuar dhe kërkon shumë kohë, gjithçka do të zgjasë rreth dy orë. Kam instaluar butona në të dy dyert e pasme, por fotkal vetëm e drejta.
Për të instaluar një buton shtesë të dritares së energjisë në derën e VAZ 2110, na duhet:
1) tela 9 metra (kam përdorur tela të ngjyrave të mëposhtme: e zezë, e verdhë, e bardhë, 3 metra secila) 0.75 mm (seksion kryq)
2) butoni për kontrollin ESP (VAZ 2110) *
3) jastëk nën butonin ESP
4) terminalet “nënë” janë të mëdha - 2 **
5) Terminalet e babit janë të mëdha - 2 **
6) terminale "nënë" e vogël - 7 **
7) terminal "tokë" 8 mm - 1
8) jastëk nën terminale "nënë - baba" i madh - 1 (secili lloj)
9) kapëset plastike (të vogla) - 8
10) kapakë për fiksim të rrobave të derës - 7 ***
* - në parim, në vend të butonit dhjetëfishësh lëkundës, mund të vendosni butona të RREZIKUT (të fuqisë) nga Kalina ose Priora, por kontrolloni me shitësin për t'i bërë ato të goditen me rrymë të lartë, shkaktojnë nuk përshtaten.
** - Unë nuk i bleva këto terminale, ata erdhën me pads
*** - ata janë të butë me mua, kështu që ata nuk u prishën \u003d\u003e Unë nuk i bleva ato
Këtu është grupi:

Do ta lidhim butonin sipas skemës së mëposhtme: (skema nuk është e imja, falë autorit)
Tani përcaktojmë numrat e kontaktit në butonin dhe bllokun, sipas skemës:


Pra, renditeni. Gjë tjetër, ju duhet të gjeni ESP stafetën. Zakonisht, stafetë është e vendosur në majë të kapakut të bllokut të montimit. Nëse keni të instaluar më shumë se një stafetë, atëherë hiqni ato një nga një dhe kontrolloni nëse ESP-të funksionojnë. Stafetë, pas heqjes së së cilës ESP-të ndaluan së punuari, është stafetja ESP.
Këtu është stafeta:

Ne e heqim atë nga priza, dhe heqim terminalin negativ nga bateria.
Pastaj ne e shkëpusim stafetë vetë nga çështja e QW. Për ta bërë këtë, shtrydhni pak shulin e mbajtësit me një kaçavidë të rrafshit të presës dhe shtypni në trupin e tij. Mbajtësi i stafetë do të shkëputet nga QW. Shifra tregon shulën:

Ne jemi të interesuar për një tel të bardhë me një shirit të zi (kjo është "+ 12 V" pas ndezjes. Nëse dëshironi që ESP të funksionojë pavarësisht pozicionit të çelësit të ndezjes, atëherë lidhni 30 dhe 87 të kontaktit të stafetë ESP - të bardhë me një shirit të zi dhe blu me një shirit të zi) :

Pastaj i lidhim telit tonë "+12 V" (sipas skemës, ai lidhet me 2 pads, kam përdorur një tel të verdhë)
Tani kemi nevojë për një "masë". Mund ta marrësh nga dera, por atje kontakti është shumë i paqëndrueshëm, kështu që unë e thirra masën nga buloni pas bllokut të montimit. Për ta parë këtë rrufe në qiell, hapni bllokun në rritje dhe shikoni lart dhe pak djathtas).

Mbërthen tela, e cila lë tokën në fund të "tokës" dhe ngjitet në rrufe. (për këto qëllime kam përdorur një tel të zi)
![]()
Hapi tjetër është të lidhni plusin me dritën e prapme. Unë u përplas në telin e bardhë të ndriçimit të ashtray (kam përdorur edhe telin e bardhë të blerë për t'u lidhur), është e vendosur prapa mburojës në të majtë, e cila është në këmbët e pasagjerit të përparmë.

Mos i kushtoni vëmendje telit portokalli (+ dritës së prapme të radios).
Këtu, të tre telat që i mbajmë në derën që kemi lidhur me burimet, atëherë do të duhet t'i drejtojmë ato përmes valëzimit në derë. Hiqni rreshtimin e raftit të mesëm (hiqni një vidhos në mes dhe dy në fund). Lëshoni gjithashtu rripin e sigurimit të shoferit në dysheme (buloni 17).

Për ta bërë më të përshtatshëm drejtimin e telave përmes valëzimit, e shkëputa atë nga dera.

Zbuloni dhe hiqni dorezën e derës (dy bulona për një kaçavidë Phillips). Pastaj hiqni rreshtën (kartën) e derës, është mirë ta bëni këtë, duke filluar nga fundi. Mos harroni të hapni karafilët. Ne i gjejmë jastekët (nënë-baba) me motorin ESP, i shkëputim.

Tani fillon argëtimi. Ne shtrydhim tre tela që kemi mbajtur nga nënat e vogla dhe i futim ato në bllok, sipas diagramin më sipër. Prandaj, kontakti "+12 V" - (i verdhë) 2 , plus dritën e prapme (tela e bardhë) - 4 dhe masa është e zezë mbi 5 .
Kanë mbetur 4 kontakte: 1,3,6,7. Teli amtare (jeshile me një shirit të zi) që shkoi në bllokun e motorit ESP është i lidhur 6 kontakti, dhe portokalli - në 3 kontaktit.
Tani blloku që do të lidhet me bllokun e motorit ESP: tela blu - 7 kafe - 1 kontaktit.
Këtu është vetë fotografia (të gjithë numrat dhe përcaktimet në përputhje me diagramin e mësipërm):
Vendndodhja e telave në bllok:

E solla këtë poshtërsi pak në rregull:

Ne lidhim butonin, ne lidhim stafetën ESP dhe minus me baterinë. Ne kontrollojmë ... nëse gjithçka funksiononte, ne i vendosim të gjitha detajet në renditje të kundërt të çmontimit. Nëse xhami funksionon mirë nga butonat ESP, por nga ato të lidhura shkon në drejtim të kundërt, duke shkëmbyer 3-6 dhe 7-1 (ndërmjet 3 - u bë 6, 6 - u bënë 3, etj.) Kontaktet në pads që lidhen me instalime elektrike në derë. Por së pari, kontrolloni që lidhja është e saktë sipas skemës.
Këtu është rezultati:

Fat të mirë për të gjithë!
Bazuar në materialin my2110.ru