Një herë, pas një mbrëmjeje të gjatë dhe të përgjakshme, duke gërmuar në thellësitë e shnivoforumit në kërkim të të gjitha përmirësimeve të dobishme për makinën time, mendimi u hodh në kokën time - do të përpiqesha të kontrolloj rregullimin dhe rregullimin e çifteve kryesore në kutinë e shpejtësisë. Natyrisht, ka specialistë që e bëjnë këtë, por për informacionin dhe videot më interesante më interesante në këtë temë në faqet e internetit të detit, dhe çështja e kohës me financat nuk është në vendin e fundit. Në të njejtën kohë, do të gatuhet vetë SkRPM, dhe me këtë rast, kutia e marsheve do të fillojë vetë. Në përgjithësi, pyetja ishte vetëm në mjetin e duhur. Çelësat, një sërë kokat, grushta të bëra prej metali të butë, prerja e tubave për montimin e buzës, një zëvendës ishte në magazinë. Çikrik me një shkallë prej 0.05 mm dhe një çift rrotullues të blerë. Mbetet gjëja kryesore - zgjuarsi për të përshtatur hendekun në angazhimin e dhëmbëve të ingranazhet e palës kryesore. Për më tepër, në shumë libra në foto është, dhe në dyqane, rrikë ju do të gjeni)). Më duhej ta bëja vetë. Për ta bërë këtë, për një sasi të vogël parash është blerë një instrument i tillë me një shigjetë))
Rivendosni boshtet, duke aplikuar paraprakisht një lubrifikant premium në buzët e vulave dhe duke futur me kujdes aksat në mënyrë që të mos dëmtojë vulën ose mbajtjen me fundin e shpuar të boshtit. Rrëshqisni boshtet drejt qendrës së diferencialit sa më shumë që të jetë e mundur për të ekspozuar vijën në fundin e brendshëm.
Kjo do të lejojë hapësirë të mjaftueshme për të instaluar boshtin diferencial, duke orientuar atë, siç është treguar kur e heqim atë në fig. Futni kabllon frena e parkimit në vrimë mbajtëse dhe sigurojeni atë duke rrëshqitur unazën C, siç tregohet në fig. Shtrydhni levën e frenave të parkimit së bashku dhe futni fundin e kabllit në qarkun e mbylljes, siç tregohet në fig.
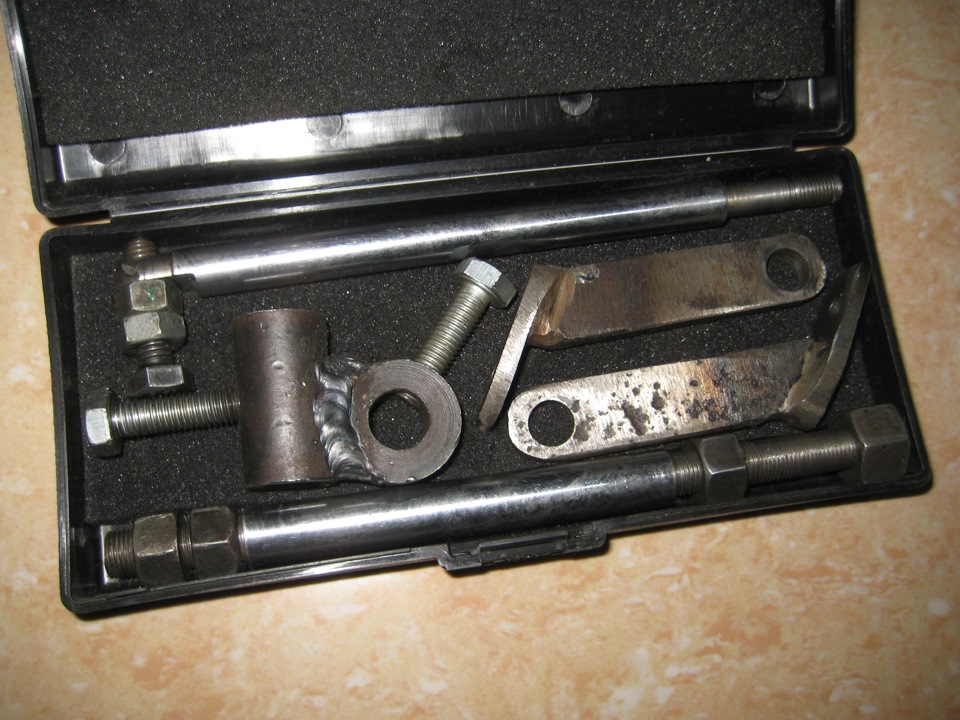
Por një tregues i tillë duhet të jetë disi i fiksuar në kutinë e shpejtësisë. Mbërthyer një trekëmbësh dy shufra nga amortizatorët e vjetër pak modifikohen ato dhe prerë thread. I ngjitur së bashku një rondele të trashë dhe unazë nga 08 amma, shpuar vrima në to dhe prerë thread për bulonave mbyllje
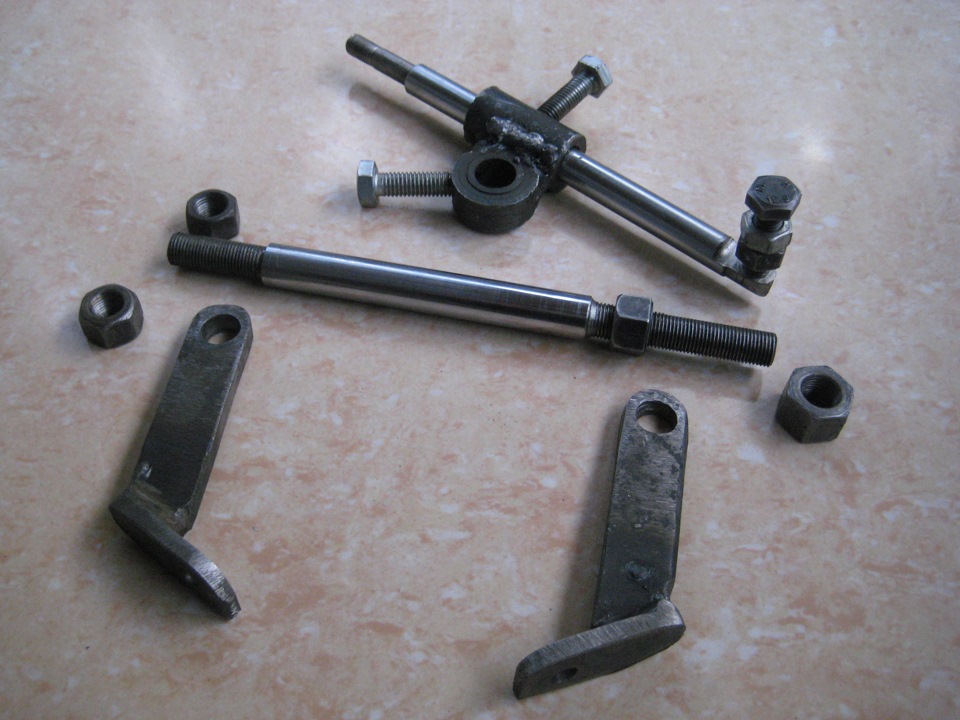
Kam mbledhur një zog)))

Treguesi në anën e pasme ka një sy, të fiksuar në trekëmbësh
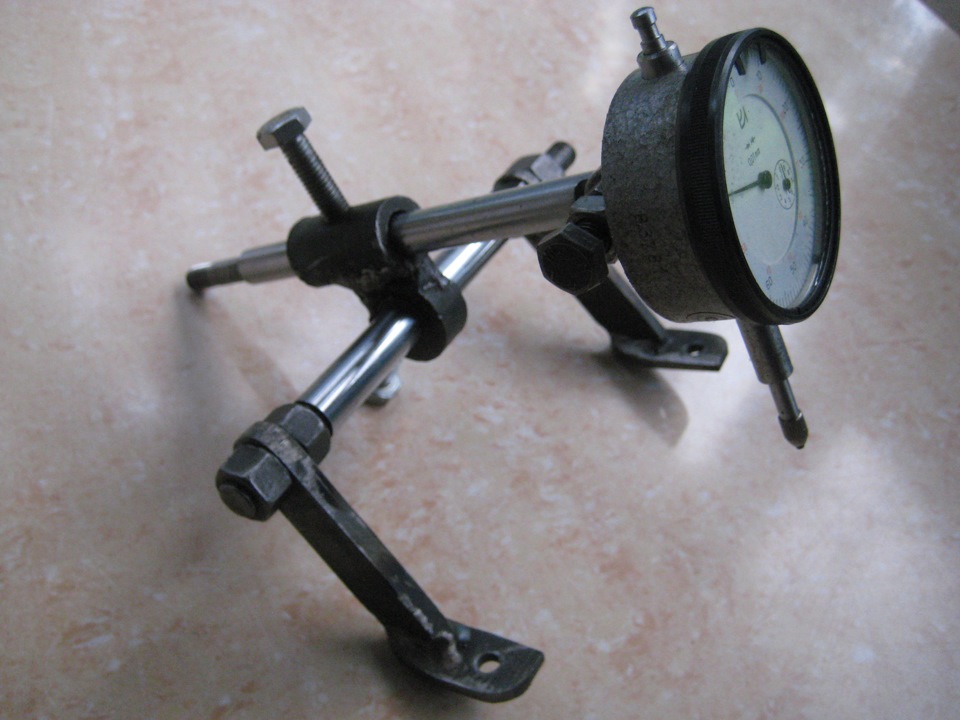
Kam provuar në kutinë e marsheve
Shumë mirë, një kuti nga paneli i radios erdhi nën instrumentin e ri.
Bashkangjisni kabllon e frenave anti-bllokues në brazdën e saj të mbajtjes. Ulni makinën, lidhni kabllon negativ me baterinë dhe test drive. Të gjithë duam që jeta jonë të jetë sa më e vogël që të jetë e mundur. Në biçikletë ka vende ku cilësimet e duhura mund të na sjellin më afër këtij shteti - shpërndarësin.
Rregullimi korrekt i shpërndarësve ndikon në qëndrueshmërinë e tyre dhe rezistencën e rrotullimit. Meqenëse rregullimi i konit është një proces i konsumueshëm, shumica e nyjeve të mbledhura me ngut në fabrikë janë shumë të ngushta, gjë që redukton dobinë e tyre. Përveç kësaj, çdo shpërndarës kërkon pastrim periodik dhe lubrifikim. Popullariteti në mesin e disa prodhuesve të kushinetave të integruar nuk i nënshtrohet rregullimit.
Epo, këtu kam përpiluar informacione për veten time nga forumet për ngritjen e kutisë së shpejtësisë. Bukav do të jetë një shumë njerëz që janë dembelë, nuk lexojnë)
Pra, ne kemi në dispozicion një rast të zbrazët dhe të gjitha përbërësit për kuvendin e gatimit:
1) Ne shtypni cams e veshje kryesore nën veshje në rastin gear (rregullisht!)
2) Ne zgjidhni unazën rregulluese në veshje kryesore (karrota). Si për të zgjedhur, shembujt e llogaritjes së ndryshimeve të marsheve të vjetra dhe zgjedhja e unazës duke përdorur mandrinën e mjetit të vjetër me një pllakë të ngjitur janë përshkruar në detaje në forume. Vura re një gjë për veten time: kur llogaritja e ndryshimit midis pajisjes së re dhe asaj të vjetër, nëse shenja e amendamentit është "+", atëherë vendosim unazën në një unazë të re më të hollë se sa ai i vjetër nga shuma e ndryshimit;
3) Instaloni pajisjen kryesore me kushineta në strehim pa një mëngë të distancës dhe vendosni një fllanxhë në bosht, shtrëngoni arrë me një çift rrotullues 117-255N * m (12-26kgs * m)
! Në të njëjtën kohë, ne kontrollojmë me familjet bezmen momentin e rezistencës ndaj kthimit në kushinetat kryesore të pajisjes: 157-198N * m (16-20kgs * m) - për kushineta të reja
39.2-58.8N * m (4-6kgs * m) - për kushineta me largësi prej 30km.
4) Vidhni ingranazhin e drejtuar në diferencial (ose në bllokim) në 8 bulona, shtrëngimi i çiftit 83.3-102.9 N * m (8.5-10.5 kgf * m) dhe vendosni në kutinë e kutisë së shpejtësisë.
5) Shtrëngoni bulonat e kapakëve të mbajtjes së momentit diferencial 43,3-53,5N * m (4,42-5,46kgs * m)
6) Matni distancën në mes të avionëve të jashtëm të kapakëve të mbajtjes me një çikrik (arrat në kapakët e mbajtjes nuk duhet të shtrëngohen!). Kjo është e domosdoshme për të nxituar kapsulat diferenciale.
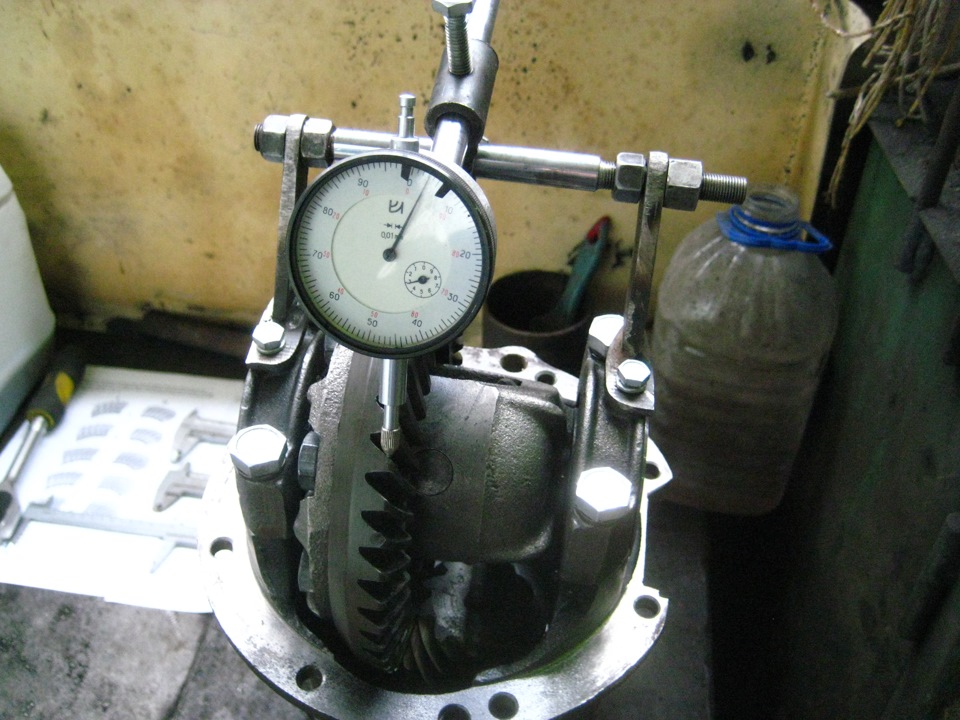
7) Tani rregulloni boshllëkun në dhëmbët e ingranazhet e palës kryesore. Instaloni treguesin në kutinë e ndryshimit, shufra e indikatorit është e përkulur kundrejt buzës së dhëmbit të marsheve të shtyrë. Shkundi gear gear shtyrë përpara dhe mbrapa, treguesi tregoi madhësinë e hendekut midis ingranazhet. Spinning ndikim arrë në timon kurorë, mbledhur deri marshin kryesor i drejtuar për të ndaluar dhe zhdukjen e plotë të tregues i hendekut. Pastaj shtrëngoni arrë të kundërta, të cilën e marrim nga drejtimi, ndërsa kontrollojmë hendekun midis ingranazheve. Hendeku në tregues duhet të jetë nga 0.08 në 0.13mm. (Unë ekspozoj 0.10mm)
8) Pararizo kapakët e mbajtjes. Kur ngritjen hendekun në ingranazhet e treguesit, ndërsa kontrollin kushineta diferenciale shtangetsirkulem kapele preload. Ne kemi regjistruar distancën midis mbulesave me arra të hapura. Rrotullimi i këtyre hurmave të njëjta, ne fillojmë të shtyjmë kapujt e mbajtjes në anët, duke krijuar kështu një preload. Preloadimi i kërkuar do të merret duke rritur matjen fillestare në mes kapakëve të mbajtjes me 0,2 mm.
9) Duke rregulluar pastrimin në meshing e dhëmbëve të dhëmbëzorëve të palë kryesore, dhe kapele preload duke mbajtur diferenciale shikoni modelin e kontaktit të ingranazhet duke përdorur një aerosol mund të bojës. Nëse gear nuk kontaktoni patch pranimin (patch kontaktit në dhëmbit është zhvendosur në qendër të rrethit gear-vendosur trashësi, zhvendosur në buzë të unazës-gear vendosur hollë), të gjithë ne kuptoj, të ndryshuar Thumbwheel në veshje kryesor dhe të rregullojë gearbox përsëri.
! Kur vendosjen marshin para (reverse rotacionit) e shufra tregues të vë në dukje një dhëmb zvarritës e avionit shtyrë gear.
! Kur vendoset veshje e pasme (rrotullim i drejtpërdrejtë), rrjedha e treguesit vendoset në planin e drejtë të dhëmbit të marsheve të shtyrë.
10) Nëse patch kontaktit pranim, heq kapakun arrë gear kryesore fyell, vënë spacer, duke, mos harroni në lidhje me rrjet Slinger, vulë të naftës, një rondele pjesë që del përpara dhe Cullen mbështillni fyell me bllokohet arrë fije çift rrotullues të nevojshme.
Kur instalimi aeroplan fllanxhë, unë kontrolloni nën rondele kuqe të nxehtë, në qoftë se avioni është i përafërt, rondele i ngurtë mund të ia plas.
Arra duhet të jetë vetë-mbyllëse me një insert plastike.
E njëjta praktikë ka treguar se në fakt çiftëzimi i shtrëngimit i arrëve të boshtit kryesor të ingranazhit është shumë më i madh se vlera e shkruar në libra për shkak të faktit se mëngëza e spacerit duhet të mbështetet, prandaj, sa më shpejt që loja në kushinetat kryesore të ingranazhit zhduket, është e rëndësishme të mos klikoni me çift rrotullues këto kushineta (të kontrolluara nga bezmen-p / p3)
11) Kutia e montuar e montuar në urë. Çift rrotullimi i bulonave të strehimit të marsheve në rreze 35-43.2N * m (3.57-4.41 kg * * m)
12) Ashtu si gjithçka.
Hapi i ardhshëm do të jetë të zotëroni kuvendin e kutisë së transmetimit në një mëngë të ndërmjetëm të paqëndrueshëm. Si është bërë kjo është përshkruar në detaje këtu.
udhëzim
Shpëlaj tërësisht. reducerdhe në vajguri dhe të inspektojë. Nëse gjeni një defekt madje edhe në një dhëmb të një ingranazhi (duke shënuar, copëzuar, rreziqet, valët), atëherë zëvendësoni ingranazhet. Fytyrat duhet të jenë të mprehta midis majave dhe sipërfaqeve të punës së dhëmbëve. Në nivelet më të ulëta ose tërmetet, zëvendësoni palën kryesore. Riparoni dëme të vogla me letër zmerile të imët dhe pastaj lustrim. Zëvendësoni arrë, jakë dhe spacer me pjesë të reja kur montoni. Në kuvend reducerdhe në karakteri i vjetër, llogaritni ndryshimin në trashësinë e unazës së rregullimit të ingranazhit të rrotës, si dallimi në devijimet e madhësisë midis rrotullimit të ri dhe atij të vjetër. Është në njëqindtë milimetra të treguar në boshtin e ingranazhit të rrotës me anë të shenjave "-" dhe "+". Për shembull, në veshje të re - 4, dhe në të vjetër 12. Dallimi në mes të dy ndryshimeve është 4 - (- - 12) = 16. Kështu, unaza e re rregulluese duhet të jetë 0.16 mm e trashë më e vogël se ajo e vjetër.
Në rast të veshin, ata thjesht zëvendësohen. Thelbi i rregullimit të shpërndarës është shumë i thjeshtë dhe korrespondon me parimin e funksionimit të tij. Qendra dhe rrota e tërë rrotullohen rreth boshtit fiks. Të dyja artikujt nuk janë kontaktuar drejtpërdrejt. Forcat ndërmjet tyre janë topa çeliku që rrokulliset në treadmills të profilizuara, një në qendër, tjetra në të ashtuquajturat. konik, dmth. element konik i dehur në boshtin e filetuar. Në mënyrë që çdo gjë të funksionojë në mënyrë optimale, tokat duhet të jenë në kontakt të vazhdueshëm me të dy rutine, dhe ato nuk mund të jenë shumë të dendura, pasi kjo rrit në masë të madhe rezistencën e rrotullimit dhe përshpejton veshin e mbajtjes.
Bëni një pajisje të pajisjes së vjetër të vozitjes për të përcaktuar më saktësisht trashësinë e unazës së rregullimit. Për ta bërë këtë, ngjitni pllakën me një gjatësi prej 80 mm dhe përballeni me madhësinë 50-0.02 mm në krahasim me avionin nën mbajtje. Devijimi në madhësi dhe në numrin serial është nxjerrur në pjesën konike. Kthejeni ulëset nën kushinetat (letër zmerile e imët) në një përshtatje rrëshqitëse. Shtypni unazat e jashtme të kushinçeve të pasme dhe të përparme në karikuesin e punës. Në pajisjen, instaloni unazën e brendshme duke mbajtur pas dhe futeni mjetin në strehim. Instaloni unazën e brendshme përpara, pastaj fllanxhë të ingranazhit dhe shtrëngoj arrë në 0.8-1.0 kgf.m.
Vendosja e tërë është të vendosni distancën e saktë midis rrotullit në shpërndarësin, topa dhe kon. Me specifikimin e dizenjimit të shpërndarës dhe boshtit, mund të shihet se distanca është rregulluar duke vidhosur ose gjarpëruar konin e filetuar, ndërsa elementët tjerë mbështetës janë të fiksuar. Pasi kon është instaluar, ajo do të rregullojë pozicionin e saj me ndihmën e një vidhi gërshërë.
Për këto operacione, ne kemi nevojë për çelësa të veçantë - të ngushtë të mjaftueshëm për t'u përshtatur në hapësirën e vogël të lënë për këtë qëllim në sipërfaqen e konit dhe arrë. Për konet e shpërndarëseve të përparme shpesh duhet një çelës i pasmë 13 mm, 15 mm. Zakonisht shtrëngojmë kaçavidën "shtatëmbëdhjetë", ky është trashësia e zakonshme. Kur rregullimi i shpërndarësave me boshtet e zbrazëta të bashkangjitura në kornizë me një pirg, duhet të marrim parasysh efektin e forcës së fiksimit në kompresimin e boshtit dhe në këtë mënyrë të rritet pirgja në kushineta. Këto kushineta janë të vendosura me një hapësirë të vogël, e cila rikthehet kur rrota është mbërthyer në kornizë ose në pirun e përparmë.
Instaloni karikimin në një pozicion horizontal duke përdorur nivelin. Vendoseni një shufër të rrumbullt në shtratin e kushinetave dhe përcaktoni me një sondë të sheshtë madhësinë e hendekut midis saj dhe pllakës së instalimit. Trashësia e unazës së rregullimit do të jetë e barabartë me diferencën midis devijimit të madhësisë së pajisjes së re (duke marrë parasysh shenjën) dhe madhësinë e hendekut. Për shembull, nëse hendeku është i barabartë me 2.8 mm dhe devijimi është 15, atëherë është e nevojshme të vendosni një unazë rregullimi me një trashësi prej 2.8 - (- 0.15) = 2.95 mm. Instaloni unazën e rregullimit në bosht duke përdorur një prerje tubi. Futeni boshtin në mbajtësin e folesë. Instaloni një mëngë të re spacer, pastaj unazën e brendshme të mbajtjes përpara, pastaj pranga dhe pjesë që del përpara gear gear. Gradualisht shtrëngoj arrë me një pikëllim çift rrotullues deri 12 kgf.m.
Për këto operacione, ne kemi nevojë për çelësa të veçantë - të ngushtë të mjaftueshëm për t'u përshtatur në hapësirën e vogël të lënë për këtë qëllim në sipërfaqen e konit dhe arrë. Për konet e shpërndarëseve të përparme shpesh duhet një çelës i pasmë 13 mm, 15 mm. Zakonisht shtrëngojmë kaçavidën "shtatëmbëdhjetë", ky është trashësia e zakonshme. Kur rregullimi i shpërndarësave me boshtet e zbrazëta të bashkangjitura në kornizë me një pirg, duhet të marrim parasysh efektin e forcës së fiksimit në kompresimin e boshtit dhe në këtë mënyrë të rritet pirgja në kushineta. Këto kushineta janë të vendosura me një hapësirë të vogël, e cila rikthehet kur rrota është mbërthyer në kornizë ose në pirun e përparmë.
Përcaktoni momentin e kthimit të boshtit të pendës. Për ta bërë këtë, vërni fije të forta fort rreth qafës së fllanxhës dhe bashkëngjitni një dinamometër në të. Fllanxha duhet të rrotullohet në mënyrë të barabartë me një forcë prej 7.6-9.5 kgf për kushineta të reja. Nëse nuk është e mjaftueshme, shtrëngoni arrë arrë. Çift rrotullues nuk duhet të kalojë 26 kgf.m. Nëse, kur e ktheni forcën tejkalon 9.5 kgf, atëherë zbërtheni reducer dhe të zëvendësojë spacer.
Instaloni kutinë diferenciale me kushineta në mbajtësin e karikimit dhe shtrëngoni bulonat e kapakëve të kapjes. Nëse gjenim luajtje boshtore në ingranazhet e gjysmë-boshteve, instaloni mbështetje të re të trashë kur montoni unazat e rregullimit. Ingranazhet e akseve duhet të futen fort në rastin diferencial, por rrotullohen me dorë. Bëni një çelës për të shtrënguar matet e rregullimit nga fleta çeliku (2.5-3 mm).
Rregulloni pastrimin në palë kryesore dhe kushineta diferenciale preload. Për ta bërë këtë, mbyllni arrë në anën e marsheve të shtyrë, duke eliminuar hapësirat në rrjetë; matni distancën midis mbulesave me një çekiç; përfundoni arrë e dytë aq sa do të shkojë dhe të arrijë për 1-2 dhëmbë të arrë. Në të njëjtën kohë, distanca midis kapakëve duhet të rritet me gati 0.1 mm; rrotulloni arrë e parë dhe vendosni hapësirën e duhur të angazhimit (0.08-0.13 mm). Ajo ndihet nga gishtat si një lojë në angazhim, me një zhurmë të vogël të dhëmbit mbi dhëmb; dora kontrollon qëndrueshmërinë e madhësisë së hendekut në veshje dhe gradualisht shtrëngon të dyja arrat deri sa distanca midis kapakëve të bëhet më shumë se 0.2 mm. Rrotulloni me shpejtësi lëvizjen ngadalë 3 kthesa ndërsa ndjeheni njëkohësisht për të luajtur në angazhimin e secilës palë dhëmbësh. Nëse është uniformë në të gjitha pozicionet, atëherë instaloni pllakat e mbylljes.