În timpul funcționării, aerul de răcire al motorului în patru timpi (astfel de motoare sunt la cele mai multe scutere chinezești și motociclete) cap cilindru (cilindru cap în continuare) pot fi încălzite la 260 de grade. Aceasta nu este cu siguranță temperatura de funcționare, dar temperatura de vârf este deseori aceasta.
Supape care sunt direct în chiulasă sunt încălzite la fel ca și cap, cu singura diferență fiind aceea că supapa de admisie se încălzește ușor mai mică deoarece se răcește amestecul de lucru, și este de un vapori de aer convențional saturate cu benzină, iar supapa de evacuare este încălzită mult mai mult. Deoarece supapa de evacuare trece prin debitul gazului de eșapament, care poate ajunge la 600 de grade.
Problema este că piesele metalice se extind atunci când sunt încălzite. Supapa nu este o excepție: în timp ce valva este încălzită și devine un pic mai mult. Când supapa devine mai lung se reazemă simplu mecanismul cu camă și ușor întredeschisă, sau mai degrabă nu complet închise (clamped) datorită cărora gazele de înaltă presiune se scurge prin scurgeri supapă de operare și modificat aspectul marginii sale scaunului.
Marginile supapelor arse arata asa.
Ardeți nu numai prin vane, ci și cuiburile în care stau
Așa că, după reparație, arătați marginile de lucru ale supapelor și șei.
După cum puteți vedea, reglementarea a ceea ce a fost ars de mult nu are prea mult sens. O supapă arsă nu va menține compresia. Și dacă observați că una dintre supapele a fost fixată, se simt liber pentru a indeparta capul, supapa lepuite altfel nimic nu se va.
distanţe
În fața ta, camera de combustie a unui scooter convențional chinezesc.
În timpul funcționării motorului, supapele sunt încălzite la valori semnificative. Și pentru a compensa coeficientul de dilatare al supapei și întreaga SRM, în general, între mecanismul de supapă și deschiderea acesteia există un decalaj mic. Se numește termică.
În acest caz, un decalaj care vom ajusta situată între supapa și șurubul culbutorului de reglare. Răsucirea șurubul de reglare în intervalul dorit, vom fi în măsură să reglementeze căldura în diferența cât de mult avem nevoie de ea.
Dar nu uitați că diferența nu ar trebui să fie foarte mare - altfel mecanismul va funcționa cu o sarcină de șoc și va eșua rapid. Și foarte mic: supapa se încălzește, se sprijină pe brațul rocker și arde.
Pregătirea
Din cele de mai sus, probabil că ați dat seama că diferența de temperatură există pentru a compensa expansiunea termică a pieselor de distribuție. Din aceasta urmează cea mai importantă regulă: reglați diferența termică numai pe un motor rece. Dacă începeți să reglați căldura la cald, atunci pur și simplu măriți-o, pe măsură ce clearance-ul inițial ajunge la expansiune. Iar când motorul se răcește, diferența ajustată în acest fel se va dubla. Sper că este ușor de înțeles.
instrumente
- Cleste mici sau chei speciale
- Tasta Horn pentru 9
- Cheie cu cheie 14 sau cap
- Cheie imbus pentru 8
- Setul de sonde de măsurare este de dorit în trepte de 0,02 mm
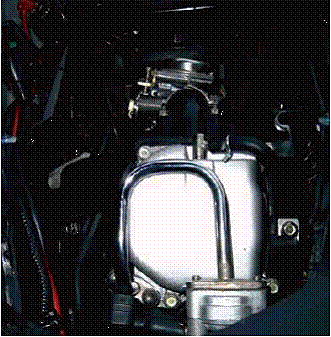
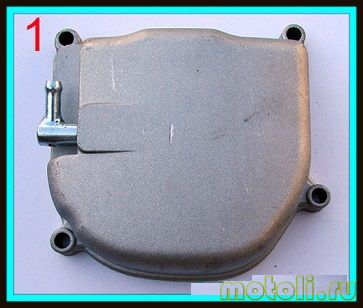
Eliberăm accesul la capul buteliei: în funcție de modelul scuterului, scoatem capota sau scaunul. Vom găsi capacul supapei, rotiți cele patru șuruburi la 8 și scoateți-l din motor.
Capacul supapei arată așa. În cazul meu, pentru a ajunge la ea a fost necesar să scoateți capota, șaua și scaunul scaunului.
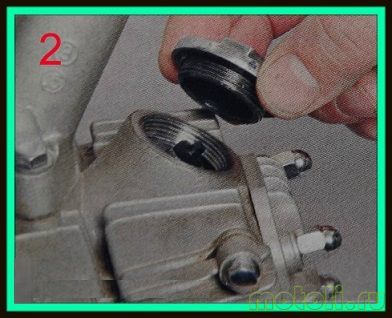
După ce marcajul generatorului coincide cu coroana de pe carterul motorului - verificați poziția în care arborele cu came a devenit. Arborele cu came trebuie să fie în poziția în care ambele valve sunt închise. Și el devine în această poziție la fiecare rotire secundă a arborelui cotit, pe măsură ce se rotește de două ori mai lent.
Poziția corectă a arborelui cu came este determinată de pinionul său. Asteriscul ar trebui să devină o gaură mare spre înălțime, iar găurile mici și riscurile care se află lângă ele trebuie să fie loviți paralel cu planul conectorului capacului supapei.
Acest lucru este ideal dacă, în practică, steaua rar devine așa cum avem nevoie. Și aceasta este adesea vina lanțului - și arborele cu came pornește ușor pentru a prinde arborele cotit. Dacă aveți un asterisc puțin strâmb, apoi în ansamblu - acesta este un nonsens. Dar dacă devine a ta sau înțelege cum, atunci această problemă trebuie rezolvată foarte repede - altfel mai devreme sau mai târziu, supapa se va îndoi.
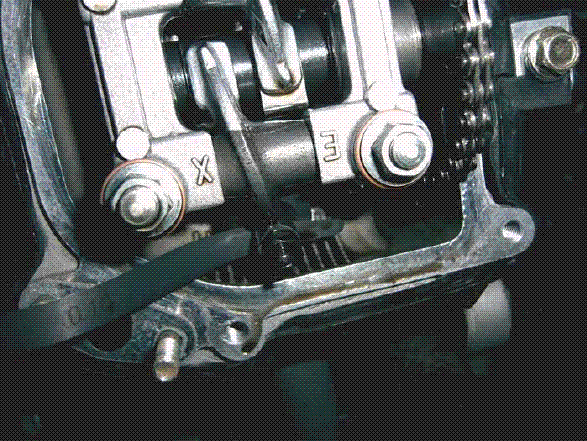
Încă o dată, asigurați-vă că marcajul "T" de pe rotorul generatorului este opus proeminenței, iar pinionul arborelui cu came este în poziția corectă. Rotiți șuruburile de blocare ale șuruburilor de reglare.
Twisted șuruburi de reglare mici, alunecă între supapa și șurubul de reglare și sonda, fără ao scoate - degetele strânge șurubul de reglare, țineți șurubul de reglare cu ajutorul unui clește și fixați-l cu piulița de blocare.
După strângerea piuliței de blocare - verificați cât de ușor se face sonda. În mod ideal, sonda dintre supapă și bolț ar trebui să se miște cu o forță puțin perceptibilă.
- Dacă sonda se deplasează fără efort - slăbiți piulița de blocare și strângeți puțin șurubul.
- Dacă sonda se deplasează cu dificultate sau este fixată, slăbiți șurubul.
Valoarea de lichidare
Ceea ce nu-mi place de scuterele chinezești este că nu au date de ajustare. Pe Internet există informații despre acest lucru, dar nu este întotdeauna de încredere.
Dreptul tău - să crezi în mine sau nu, dar pentru clienții mei reglementez lacunele în astfel de limite:
- La motoarele serie 139QMB (convenționale vosmidesyatki chineză) pune un decalaj de 0,05 mm - atât de admisie și supapa de evacuare - la fel.
- La motoarele seria 157 QMJ (convenționale stopyatidesyatki chineză) pentru a pune în orificiul de intrare de 0,05 mm și 0,07 mm la ieșire
periodicitate
Prima ajustare este de dorit să faceți imediat după cumpărarea unui scooter, atât nou și folosit. Reglajele rămase pot fi efectuate în intervalul 3000 - 4000 km.
Scuterele sunt conduse atât de fanii vehiculelor cu două roți, cât și de cei care economisesc combustibil. Scooterul rămâne un pomposnik indispensabil și unul și celălalt. Dar, ca orice alt transport, uneori necesită atenție. De exemplu, reglarea periodică. Reglarea incorectă a spațiului de degajare a ventilului poate cauza o mulțime de probleme proprietarului. Mai jos luăm în considerare deschiderile robinetului pe scuterul în 4 timpi sau mai degrabă ajustarea acestora.
Spațiul de distribuire al supapei de pe scuter
În ciuda fiabilității scuterelor în patru timpi, ele au nevoie și de îngrijire. Dacă nu primesc serviciul în timp util, atunci cu timpul poți să zbori în sume grave de bani. Dacă vă simțiți huruitul motorului sau sunetul care nu a fost acolo înainte și nu este caracteristic funcționarea normală a motorului, aceasta înseamnă că ceva este greșit. Cel mai probabil e timpul să ne ocupăm de reglementare. Este un păcat că nu toată lumea înțelege acest lucru, unii oameni conduc cu acest lucru și apoi se întreabă de ce reparația unui astfel de transport mic este atât de scump.
Verificați în mod regulat clearance-ul supapei de pe scuter (în special golurile de pe scuterul chinezesc). Aproximativ 3-4 mii kilometri de alergare. Se întâmplă că scuterul poate călători și 10 000 și nu au sunete străine, dar se întâmplă și după 1000 km trebuie să fie ajustate. Se recomandă reglarea chiar dacă nu există zgomote externe la o cursă de 4000 km.
Reglarea supapelor
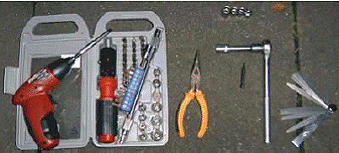
Reglarea degajării supapei de pe scuter nu este o sarcină dificilă, mai ales când există o instrucțiune. Pentru a începe, veți avea nevoie de un set de sonde, chei, chei și un chei cu pătrat (de regulă aceasta este o cheie pentru 3.5). Este tot ce aveți nevoie pentru a vă repara. Dacă nu aveți ceva împrumutat de la un vecin sau cumpărați. Acestea vă vor fi utile în viitorul apropiat, după următoarea fugă în 4 km. Setul de instrumente necesare depinde de scuter în sine și puteți utiliza instrumentele disponibile. Vom folosi cleștile, șurubelnița Phillips, capetele chei pentru 8, 9 și 13. Vom lua de asemenea o jojă pentru a instala clearance-ul supapei, avem nevoie de 0.05 și 0.1 mm. 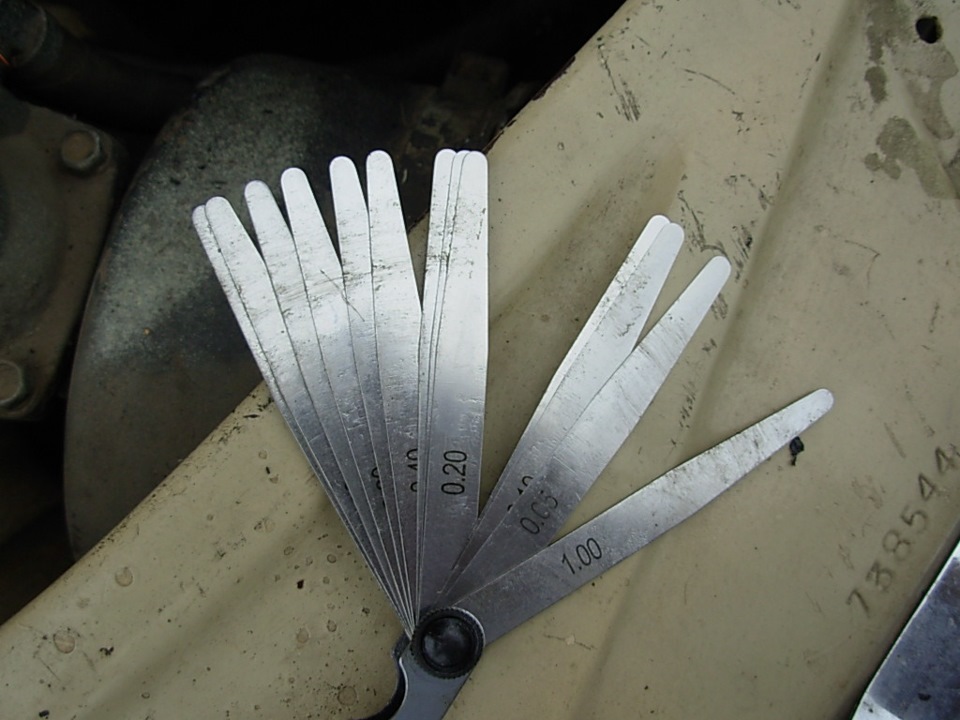
Cel mai bine este să reglați dimensiunile valvei de pe scuter în dimineața, dacă este vară în afara. Deoarece scuterul ar trebui să fie rece. Dar nu ar trebui să fie înghețat, deci este de dorit să-l încălziți iarna.
De regulă, în majoritatea motoretelor, designul sincronizării este foarte simplu și are numai un arbore motor în capul motorului. Cu acest design, supapele sunt reglate cu șuruburi. Pentru ei este necesar cheia cu pătratul. Aceste șuruburi sunt înșurubate la capătul brațelor basculante și presate pe capătul tijei supapei. Aceasta este distanța mică dintre capătul șurubului de reglare și capătul tijei supapei și există o distanță termică în supapă.
Reglarea supapelor este necesară dacă:
- Din regulamentul trecut, moped-ul era de 4000 km sau mai mult.
- Din motor auziți un zgomot ciudat (bateți, sunați).
- Este foarte dificil să câștigi impuls.
- Este dificil să aveți un moped.
- În cazul în care motoreta este încă înfășurată, ea întotdeauna miroase.
Reglarea backlash-urilor de supape
Câteva sfaturi de reținut:
- După reglarea supapelor, se poate întâmpla să aveți și nevoie să reglați carburatorul.
- Motorul scuterului nu tolereaza nimic inutil. Deci, asigurați-vă că nimic nu intră în el.
- Reglarea se poate face numai la ralanti.
Înainte de a începe să lucrați, uitați expresia că un reparator bun are mereu componente suplimentare. Găsiți ceea ce ați pus în toate piulițele și bolțurile.
Prima dată când am descifrat scuterul, am pus șuruburile în ordinea în care au luat off, astfel încât să nu se amestecă și nu uita nimic personal.
Pentru a regla clearance-ul supapei, trebuie mai întâi să ajungeți la ele.
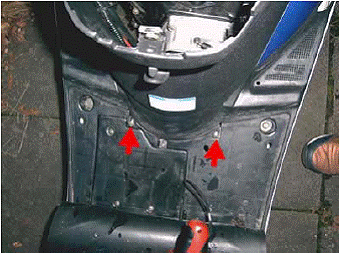
1. Scoateți scaunul. Pentru a scoate scaunul, trebuie să deșurubați șuruburile care îl țineți. Adesea, acest 4 șurub în compartimentul de bagaje sub scaun, care, în plus, există încă 1-2 în spatele șurubul care este atașat lângă trunchi și picioare 2 șuruburi. Când am deșurubat tot ceea ce ține portbagajul, este ușor de înlăturat. Înaintea noastră este un motor care nu este deja tencuit cu plastic.
2. Scoateți capacul ventilatorului. Acum trebuie să scoatem capacul ventilatorului, poate fi atașat la 2 piulițe și 2 șuruburi. Deci puteți găsi un punct mort pentru a ajusta distanțele supapelor.
3. Scoateți capacul cilindrului. Apoi obturați capacul cilindrului. Adesea se fixează la 2 șuruburi și 4 șuruburi. Rotiți și scoateți capacul. 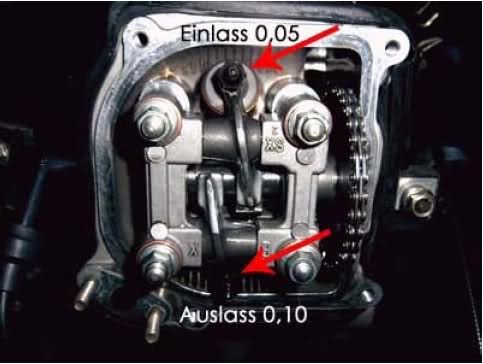
Acum trebuie să determinăm unde avem supape de admisie și evacuare pentru a găsi TDC (centrul mort superior). Intrarea este întotdeauna pe partea de sus, iar ieșirea este în partea de jos.
TDC este un loc în care pistonul din cilindru este fixat permanent de sus. Dar căutarea pentru TDC pare să fie doar înfricoșătoare, de fapt este ușor de găsit. Trebuie să luați o cheie convențională la 13 și să rotiți hexagonul în sensul acelor de ceasornic (hexagonul se află pe rotorul răcirii generatorului). Spin hexagonală necesară, atâta timp cât marca „T“, care nu sunt imprimate în relief pe volanta coincide cu proiecția laterală a roții de mână. 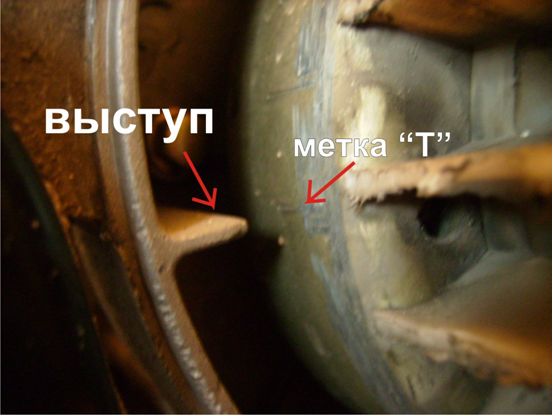
La reglarea degajării valvei de pe scuterul în 4 timpi, puteți vedea imediat 2 TDC.
4. Căutăm un pinion arbore cu came, există 3 găuri și 2 supape (supape închise). Sarcina noastră este de a plasa corect găurile. Pentru a face acest lucru, trebuie să vă asigurați că pistonul a fost în centrul mortului superior. 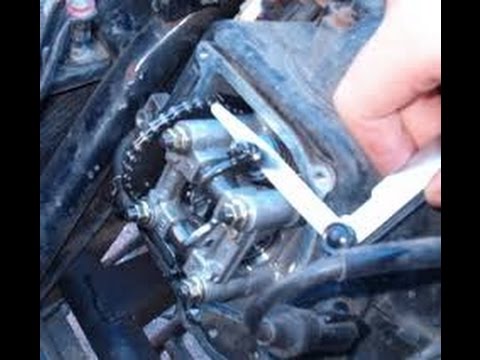
5. Reglarea supapelor. Acum avem nevoie de sonde pentru stabilirea clearance-ului valvei la 0.05 și 0.1 mm. Mai întâi, duceți sonda la 0,05 mm. Trebuie să fie introdusă între șurubul de reglare și supapa de admisie (de sus). Dacă diferența se potrivește strâns (dar nu complet), decalajele sunt setate corect. Dar dacă spărtul este lat sau îngust (spate-înapoi), apoi slăbiți piulița de blocare a șurubului de reglare. Pentru a mări clearance-ul, trebuie să rotiți cheia în sens invers acelor de ceasornic pentru a scădea - în spatele acesteia. Am instalat sonda pentru a se potrivi strâns și strângeți piulița de blocare, după care trebuie să verificați reglarea decalajelor.
Acum, luați sonda la 0,1 mm și efectuați aceeași operațiune cu supapa inferioară (ieșire). 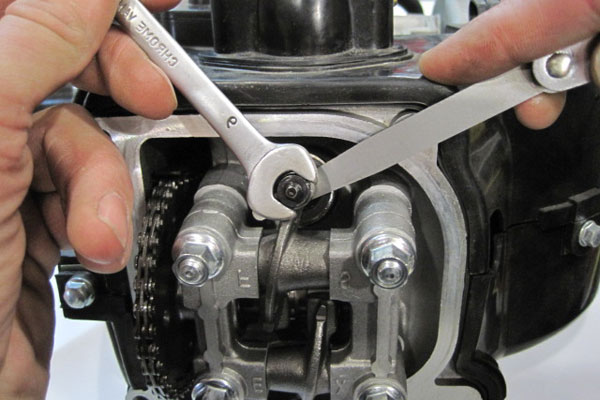
Când trebuie să ajustați.
♦ Scuterul nu pornește sau începe cu dificultate.
♦ Cu dificultate, câștigând impuls.
♦ Întârzierea constantă.
♦ Motorul emite zgomot galben.
Atenție, nu numai că ajustarea necorespunzătoare a supapei poate provoca aceste probleme. O descriere a problemelor comune, posibilelor cauze și soluții va fi publicată pe site-ul nostru.
Atenție:
♦ Reglarea numai a spațiului Pe motorul rece!
♦ Scoateți cu atenție scaunul, plasticul este fragil, în special la temperaturi scăzute!
♦ Poate fi necesar să reglați carburatorul după ajustarea clearance-ului.
♦ Înainte de a scoate capacul cilindrului, se recomandă ștergerea motorului. După îndepărtare, asigurați-vă că obiectele străine nu intră în motor.
♦ Pentru posibilele pagube cauzate de ajustarea necorespunzătoare, autorul articolului nu poartă nici o responsabilitate.
Instrumente necesare:
♦ Clește
♦ Șurubelniță Phillips
♦ Taste de 9 și 8 mm (capete)
♦ Sonda pentru montarea degajării valvei (avem nevoie de 0,05 și 0,1 mm)
Pasul 1. Lucrări pregătitoare.
Pregătiți 3-4 borcane sau alte recipiente pentru șuruburi, piulițe și alte părți mici. Deci nu vom pierde nimic în procesul de lucru.
Scoaterea scaunului. Aici avem nevoie de o cheie de 10 mm și o șurubelniță. În compartimentul pentru bagaje există 4 piulițe care trebuie deșurubate (două pe fiecare parte a blocării scaunului și două pe partea inferioară). Sub covorașul de cauciuc pentru picioare sunt 2 șuruburi, pe care le deșurubăm de asemenea (vezi fotografia).
Pasul 2. Capacul ventilatorului.
Pentru a regla supapele, trebuie să găsim punctul mort superior.
Pentru a face acest lucru, scoateți garnitura ventilatorului din plastic pentru generator:

Deșurubați 2 piulițe (M8) și două șuruburi și scoateți căptușeala:

Pasul 3. Acoperiți capul cilindrului.
Scoateți capacul cilindrului:
Pentru aceasta, deșurubați 4 șuruburi M10 și 2 piulițe (tubul metalic este înșurubat cu piulițe). Acum scoateți capacul și vedeți următoarea imagine:
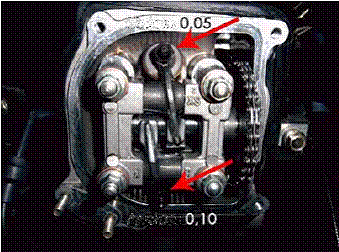
Săgețile indică supapele: intrarea în partea superioară, ieșirea din partea inferioară. Înainte de a începe să stabilim un decalaj, este necesar să găsim TDC (centrul mort superior).
Pasul 4. Centrul mort superior (TDC)
TDC este punctul în care pistonul din cilindru ocupă poziția de sus. În acest articol dau metoda de căutare a TDC cu utilizarea riscurilor pe rotorul generatorului. Desigur, puteți determina TDC într-un mod diferit, de exemplu, pe poziția brațului rocker. Notă: scuterele în patru timpi au 2 TDC-uri!
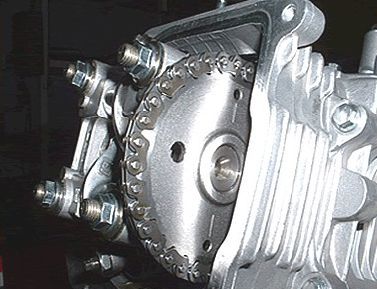
Sunt trei găuri pe pinionul arborelui cu came. Poziția lor prezentată în fotografie corespunde cu TDC a pistonului, la care ambele valve sunt închise (ceea ce avem nevoie).
La volantul generatorului, riscurile de vibrație sunt: T (TDC) și F (momentul de aprindere):

Riscul lui T trebuie să fie în fața proeminenței marcate cu numărul 1.
Pentru a alinia proiecția și riscul de TDC, utilizați cheia din priză și rotiți ventilatorul în sensul acelor de ceasornic până ajungeți la TDC. Pentru a afla că acesta este într-adevăr TDC, mișcați ușor cheia, în timp ce brațele rocker nu ar trebui să se miște. Dacă se mișcă, atunci nu este TDC, întoarcem ventilatorul în continuare, în sensul acelor de ceasornic până când riscul și proeminența sunt combinate.
Ei bine, am găsit punctul mort superior, acum puteți începe ajustarea supapelor.
Pasul 5. Clearance-ul reglajului / verificării supapei.
Pentru a verifica distanța, trageți sonda de 0,05 mm și încercați să o introduceți între supapa de admisie și șurubul de reglare.
În cazul în care acest lucru nu reușește (din cauza lipsei de sau mic decalaj) sau prea mult clearance-ul, atunci vom slăbi locknut M9 și răsucite, cu un clește sau un șurub setare cheie adecvată. În sens orar - diferența este redusă, în sens invers acelor de ceasornic - crește. În același timp, țineți sonda între supapă și șurubul de reglare.
Stiloul ar trebui să stea strâns între ele, astfel încât sonda să poată fi mișcată, dar când se deplasează pe ea, nu trebuie să existe zgârieturi. Strângem un contrainut, ținând un bolț de setare cu o cheie sau clești. După strângere, controlam din nou decalajul.
Așa că am instalat supapa de admisie.
Același lucru îl facem și cu supapa de eliberare. Accesul la sonde este dificil, dar este posibil. Eliberarea trebuie să fie de 0,1 mm.
Odată cu ajustarea supapelor se termină. Asamblam în ordine inversă, punem toate piesele în poziție. (capacul capului, căptușeala ventilatorului, scaunul).
Uite, nu am uitat nimic. Toate șuruburile, șuruburile, piulițele sunt strânse corespunzător. Cu lucrul de plastic cu atenție! Poate fi spart, mai ales la temperaturi scăzute.
Ei bine, totul este gata, vânt!
Reglarea supapelor de pe scuter este o operație foarte importantă, care poate fi necesară după o anumită rulare. La urma urmei, în ciuda faptului că motoarele în patru timpi sunt economice și fiabile, au nevoie de întreținere periodică, cu prematură care ar putea necesita reparații costisitoare. În acest articol vom analiza cum să ajustăm corect supapele de pe motorul scuterului și ceea ce este necesar pentru aceasta.
Multe scutere încep să se gândească la reglarea supapelor numai atunci când o capcană puternică începe să emană din capul motorului. Și unii chiar călătoresc cu o astfel de defecțiune pentru o vreme. Dar este mai bine să nu o aducem la asta, ci să facem ajustarea la prima apariție a unui clovn abia audibil. Apoi se va evita uzura mecanismului supapei.
În general, când trebuie verificate distanțele supapelor? Prima dată le sfătuiesc să verifice după primele mii de kilometri, iar următoarele verificări pot fi efectuate după fiecare patru mii de kilometri. Dar se întâmplă ca supapele să înceapă să facă clic și înainte și, desigur, așteptați până când scuterul trece prin cele patru mii regulate nu merită. În plus, verificarea și reglarea supapelor scuterului este necesară după schimbarea lanțului de distribuție sau după dezasamblarea (sau scoaterea) capului motorului.
Unele scutere novice, cu apariția supapelor de lovire, întârzie ajustarea, deoarece nu sunt siguri de abilitățile lor. Cu cât conduc mai mult cu supape neregulate, cu atât este mai mare uzura mecanismului de supapă și cu atât mai rău începe motorul. În plus, activitatea de verificare și ajustare a supapelor nu este deloc complicată, iar un instrument suplimentar va necesita doar un set de sonde, care nu este deloc costisitor. Este necesar cel mai comun set standard de încuietori și chei, precum și un chei cu pătrat de 3,5 (pentru șurubul de reglare).
Reglarea supapelor de pe scuter - sfaturi practice.
Înainte de a începe verificarea și reglarea, ar trebui să așteptați până când motorul sa răcit complet (la o temperatură de cel mult 20 °). Și pentru a nu aștepta, este mai bine să conduci toate lucrările dimineața, înainte de călătorie, și nu după ea. Dar dacă decideți să ajustați supapele după călătorie, atunci motorul se va răci mai repede, scoateți scaunul și capacul supapei capului motorului. Dacă motorul scuterului dvs. a fost reparat, atunci, desigur, este mult mai convenabil să faceți ajustarea înainte ca motorul să fie montat pe scuter.
Practic, toate motor de 50 cc sau ambele scutere chinezești și japoneze și mokikov (cu excepția replica biciclete de sport) au o structură destul de simplu, cu un singur arbore cu came de sincronizare în capul motorului (SOHC). Și un spațiu liber supapă într-o astfel de construcție este controlată cu ajutorul unor șuruburi (cap pătrat), care sunt înșurubate în capetele brațelor oscilante și presate pe capătul tijei supapei. Și este această distanță mică între capătul șurubului de reglare și capătul tijei supapei, iar supapa este un decalaj termic.
Cu toate acestea, două modele de bază ale motoarelor distribuite: unul dintre ele este utilizat pe motoarele cu transmisie, montate pe motorete (de tip alfa), minibike, Quadric sau skuteretty și al doilea de proiectare a motorului instalat pe toate scuter cu CVT în transmisie (vezi imaginea A pe stânga.) (vezi fotografia B de mai jos). Dar mecanismul de sincronizare în ambele de proiectare a motorului este aproape la fel, doar dimensiunile de chei sunt ușor diferite, și de a face motoarele de cap sunt ușor diferite în aparență.

În plus față de motoarele cu transmisie manuala, pentru a regla supapele sunt hașuri rotunde speciale pe cap, care poate fi dovedit înainte de a regla. Și cu un CVT nu exista motoare hașuri, ci pur și simplu scoateți capacul supapei înainte de a regla.
1. Prin urmare, prima operație la robinetul de reglare, se va acoperi șuruburile de fixare slăbirea și demontarea capacului valvei pentru motor cu viteză variabilă (vezi. Figura 1), sau un dop filetat răsucire specială (sau mai degrabă două capace pentru fiecare supapă), pe motor, cu o cutie de viteze ( vezi foto 2).
2. Următorul pas - este expunerea pistonului motorului în punctul mort superior. În această poziție, ambele supape sunt închise pistonul și trebuie să aibă un anumit joc între tija supapei și șurubul de reglare (un jug să aibă o cursă mică liberă). Pentru a instala pistonul în poziția dorită (TDC) de pe lanțul de distribuție pinion sunt etichete speciale, și încă mai au un urme reciproce pe chiulasă (în planul unui cap).
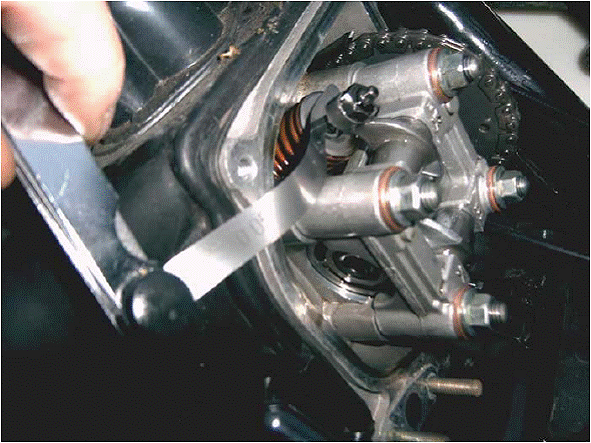
La motoarele cu cutie de viteze pentru a vedea urme pe lanțul pinion, aveți nevoie pentru a deschide o trapă specială (a se vedea. Foto 3). Și pentru a combina etichetele de pe pinion și carcasa motorului, este necesar pentru a transforma un valturi Kickstarter, bine sau cu capul de unire, îmbrăcat în fixarea piuliței generatorului de ancorare (pentru a pune un cap pe ancore de nuci ar trebui să deșurubați șurubelnița mare, o mufă specială filetată specificată săgeată roșie pe foto 4 - aceasta este pentru motoarele cu CP).
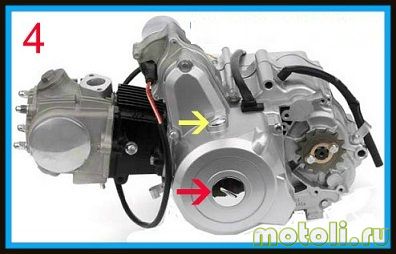
Doar au motoare cu cutie de viteze motorete Alffa, Delta și altele asemenea, există încă un dop (care este indicat pe o săgeată galbenă fotografie 4), atunci când deșurubare unde puteți vedea litera T, care atunci când sunt combinate cu risc prea confirmă faptul că pistonul este în punctul mort superior .
Și pentru a porni arborele cotit în motor cu CVT nu lovi cu piciorul și capul pivotant, capacul ventilatorului poate fi îndepărtat pentru aceasta. Dar pentru ca arborele cotit să fie ușor derulat, este de dorit să deșurubați bujia din cap.
![]()
Aliniați marcajele de pe pinion și carterul (vezi foto 3 -. Este pe motor cu cutie de viteze) sau prin alinierea mărcii, indicată prin săgeți roșii la planul conectorului capului și capacul acestuia (vezi foto 5 -. Este, de pe motor cu CVT), puteți începe să reglați vanele scuter .
3. Măsurarea exactă a decalajelor. Când pinioanele sunt expuse pe etichete, este posibil să se preia vârfurile brațului basculant și legănându-se pot simți Wheeling liber - aceasta este clearance-ul comun, care se resimte pe motorul rece și motorul cald, acest spațiu liber dispare (prin dilatarea termică a metalului). Așadar, acum trebuie să măsurați acest gol pe ambele supape utilizând un ecartament.
În cazul în care diferența este mai mică decât cea dorită, apoi încălzirea a șurubului de reglare a motorului este prea odihnă pe tija supapei și supapa nu se închide complet da. acest lucru va duce la pierderea compresiei (și puterea motorului) și la arderea plăcilor și scaunelor supapelor.
Și dacă diferența dintre șurubul și tija supapei este mai mult decât este necesar, chiar și în cazul în care încălzirea motorului, acest decalaj nu dispare complet, iar capătul șurubului de reglare se bate pe tija supapei, iar mecanismul va purta rapid. În plus, puterea motorului va scădea, de asemenea, deoarece supapa se va deschide și se va închide la viteze mari cu întârziere.
Prin urmare, trebuie să obținem o diferență termică exactă, care să indice producătorul motorului (în funcție de dilatarea termică a pieselor capului). În cele mai multe cincizeci de dolari skuternyh autorizările supape sunt de 0,05 mm (unele motoare mai krupnokubaturnyh clearance-ul supapei de evacuare poate fi puțin mai mare, cu toate acestea specifica distanțele exacte în manualul motorului dvs.). Și dacă pe motorul dvs. spațiul nu este de 0,05 mm, atunci ele trebuie ajustate. Pentru a măsura cu precizie clearance-ul cu un calibru, se introduce sonda, o grosime de 0,05 mm între capătul supapei și șurubul de reglare, înșurubate la jug.
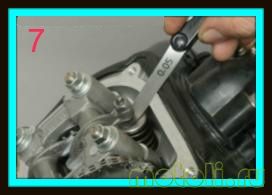
În cazul în care gabaritul, 0,05 mm grosime inclusă între șurubul de reglare și capătul tijei valvei cu frecare redusă (vezi. Foto 7), iar sonda este de 0,06 mm grosime. nu se poate introduce, atunci decalajul dintre supapă și șurub este de 0,05 mm, ceea ce este necesar. Adică diferența termică este considerată egală cu grosimea sondei, introdusă cu frecare redusă.
Dacă sonda, o grosime de 0,05 mm, se introduce liber (și este posibil să se introducă sonda mai groase), atunci este depășită limita. Dar dacă sonda 0,05 mm grosime imposibilă miere pentru a introduce capătul supapei și șurubul de reglare (o sondă subțire poate fi inserat), diferența este mai mică decât admisibilă. În aceste cazuri, diferența ar trebui ajustată.

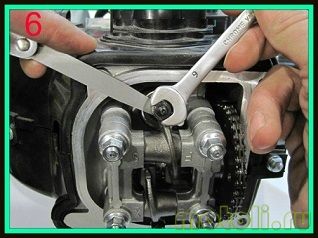
4. Pentru ajustarea diferenței, păstrând capul pătrat al șurubului de reglare printr-un pătrat cheie la 3,5, slăbiți cheie piuliță de blocare a șurubului 9 (vezi fig. 8 fotografii). începători suplimentare consiliază se concentreze și inserarea unei sonde de 0,05 mm (poate fi ușor îndoit, în special la motoarele cu CP) între șurub și suprafața frontală a supapei, în mod constant deplasa ușor sonda și, astfel, rotiți șurubul de reglare până când prindeți ușor sonda.
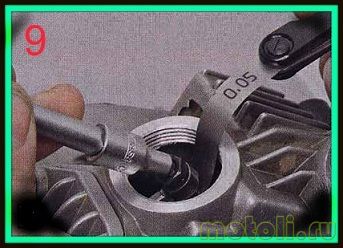
Adică învârtiți șurubul de reglare (vezi imaginea 9), până când sonda se deplasează cu efort (frecare).
Apoi, îndepărtați cu grijă joja și țineți șurubul de reglare de la rotirea cheie pătrat, de blocare cu șurub piuliță de blocare (care este, strângeți piulița de blocare - vezi foto 8). După ce strângeți piulița de blocare, verificați clearance-ul reglat cu o manometru de 0,05 mm. Dacă se deplasează cu un efort fără efort, atunci clearance-ul este setat corect.
Apropo, unele reparatori strângeți piulița de blocare fără a scoate sonda și nu deține șurubul de reglare-cheie, așa cum se arată în figura 6 de mai sus. Deci, nu să fie, pentru că nu numai că greșești sonda (și scoateți-ar fi dificil), cu atât mai mult și decalajul float departe de norma.
Reglarea decalajului și strângerea piuliței de blocare în mod corespunzător, se repetă exact același control și reglați diferența pe a doua supapă a motorului. După ajustarea clearance-ul ambelor supape (admisie și evacuare) capacului chiulasei rămâne înapoi în locul (sau strângeți șurubul de închidere de pe motor cu cutie de viteze), care este de a returna toate elementele în loc.
Și dacă ați făcut supapele de reglare de pe scuter în mod corespunzător, așa cum este descris mai devreme în acest articol, puterea motorului este restabilită, sunetul mecanismului de sincronizare supapa va fi plecat, și nu se va uza, iar motorul va dura o lungă perioadă de timp, fără o pauză, noroc tuturor.
Autor: Oleg Suvorov
Motorul a fost tăiat sau doar timpul pentru a verifica supapa?
Reglarea degajării supapei
Introducere.
Asigurați-vă setarea dvs. sau în atelier, toată lumea decide pentru sine. Aș dori să remarcăm că ajustarea clearance-ului supapei nu este o afacere atât de complicată, căci oricine știe să răsucească nucile se va descurca. Numai atenția și precizia sunt necesare. Acest articol vă va ajuta.
Când trebuie să ajustați.
Scuterele nu pornesc sau încep cu dificultate.
Cu dificultate, câștigând impuls.
Încetează constant.
Motorul face un zgomot de apel.
Atenție, nu numai că ajustarea necorespunzătoare a supapei poate provoca aceste probleme. O descriere a problemelor comune, posibilelor cauze și soluții va fi publicată pe site-ul nostru.
Atenție:
Reglarea decalajului numai pe un motor COOL!
Îndepărtați scaunul cu atenție, plasticul este fragil, în special la temperaturi scăzute!
Poate fi necesar să reglați carburatorul după ajustarea clearance-ului.
Înainte de a scoate capacul cilindrului, se recomandă ștergerea motorului. După îndepărtare, asigurați-vă că obiectele străine nu intră în motor.
Pentru posibilele pagube cauzate de ajustarea necorespunzătoare, autorul articolului nu poartă nici o responsabilitate.
Instrumente necesare:
clește
Șurubelniță Phillips
Taste de 9 și 8 mm (capete)
Stylus pentru montarea clearance-ului supapei (avem nevoie de 0,05 și 0,1 mm)
Pasul 1. Lucrări pregătitoare.
Pregătiți 3-4 borcane sau alte recipiente pentru șuruburi, piulițe și alte părți mici. Deci nu vom pierde nimic în procesul de lucru.
Scoaterea scaunului. Aici avem nevoie de o cheie de 10 mm și o șurubelniță. În compartimentul pentru bagaje există 4 piulițe care trebuie deșurubate (două pe fiecare parte a blocării scaunului și două pe partea inferioară). Sub covorașul de cauciuc pentru picioare sunt 2 șuruburi, pe care le deșurubăm de asemenea (vezi fotografia).
Pasul 2. Capacul ventilatorului.
Pentru a regla supapele, trebuie să găsim punctul mort superior.
Pentru a face acest lucru, scoateți garnitura ventilatorului din plastic pentru generator:
Deșurubați 2 piulițe (M8) și două șuruburi și scoateți căptușeala:
Pasul 3. Acoperiți capul cilindrului.
Scoateți capacul cilindrului:
Pentru aceasta, deșurubați 4 șuruburi M10 și 2 piulițe (tubul metalic este înșurubat cu piulițe). Acum scoateți capacul și vedeți următoarea imagine:
Săgețile indică supapele: intrarea în partea superioară, ieșirea din partea inferioară. Înainte de a începe să stabilim un decalaj, este necesar să găsim TDC (centrul mort superior).
Pasul 4. Centrul mort superior (TDC)
TDC este punctul în care pistonul din cilindru ocupă poziția de sus. În acest articol dau metoda de căutare a TDC cu utilizarea riscurilor pe rotorul generatorului. Desigur, puteți determina TDC într-un mod diferit, de exemplu, pe poziția brațului rocker. Notă: scuterele în patru timpi au 2 TDC-uri!
Sunt trei găuri pe pinionul arborelui cu came. Poziția lor prezentată în fotografie corespunde cu TDC a pistonului, la care ambele valve sunt închise (ceea ce avem nevoie).
La volantul generatorului, riscurile de vibrație sunt: T (TDC) și F (momentul de aprindere):
Riscul lui T trebuie să fie în fața proeminenței marcate cu numărul 1.
Pentru a alinia proiecția și riscul de TDC, utilizați cheia din priză și rotiți ventilatorul în sensul acelor de ceasornic până ajungeți la TDC. Pentru a afla că acesta este într-adevăr TDC, mișcați ușor cheia, în timp ce brațele rocker nu ar trebui să se miște. Dacă se mișcă, atunci nu este TDC, întoarcem ventilatorul în continuare, în sensul acelor de ceasornic până când riscul și proeminența sunt combinate.
Ei bine, am găsit punctul mort superior, acum puteți începe ajustarea supapelor.
Pasul 5. Clearance-ul reglajului / verificării supapei.
Pentru a verifica distanța, trageți sonda de 0,05 mm și încercați să o introduceți între supapa de admisie și șurubul de reglare.
Dacă acest lucru nu este posibil (din cauza lipsei sau a unei mici deschideri) sau dacă spațiul este prea mare, slăbiți manșonul de blocare M9 și răsuciți cleștii sau cheia corespunzătoare cu șurubul de reglare. În sens orar - diferența este redusă, în sens invers acelor de ceasornic - crește. În același timp, țineți sonda între supapă și șurubul de reglare.
Stiloul ar trebui să stea strâns între ele, astfel încât sonda să poată fi mișcată, dar când se deplasează pe ea, nu trebuie să existe zgârieturi. Strângem un contrainut, ținând un bolț de setare cu o cheie sau clești. După strângere, controlam din nou decalajul.
Așa că am instalat supapa de admisie.
Același lucru îl facem și cu supapa de eliberare. Accesul la sonde este dificil, dar este posibil. Eliberarea trebuie să fie de 0,1 mm.
Odată cu ajustarea supapelor se termină. Asamblam în ordine inversă, punem toate piesele în poziție. (capacul capului, căptușeala ventilatorului, scaunul).
Uite, nu am uitat nimic. Toate șuruburile, șuruburile, piulițele sunt strânse corespunzător. Cu lucrul de plastic cu atenție! Poate fi spart, mai ales la temperaturi scăzute.
Ei bine, totul este gata, vânt!
Atunci când copiați și postați informații de pe site-ul nostru, este necesară desemnarea autorului, notificarea administrației și un link către site-ul nostru.