udhëzim
Hiqni rrotën dhe më pas përdorni çelësat për të zhvidhosur bulonat e udhëzuesit të frenave të frenave. Përdorni rastin dhe inspektoni anët e udhëzuesve dhe pistoni i frenave, si dhe kontrolloni gjendjen dhe prezencën e lubrifikantit në udhëzuesit. Hiqeni lidhësin nga pllakat e frenave dhe varni me një tela të trashë. Vëreni çikrikun në mbështjellësin e pranverës në mënyrë që të mos ndërhyjë me veprimin tuaj të mëtejshëm.
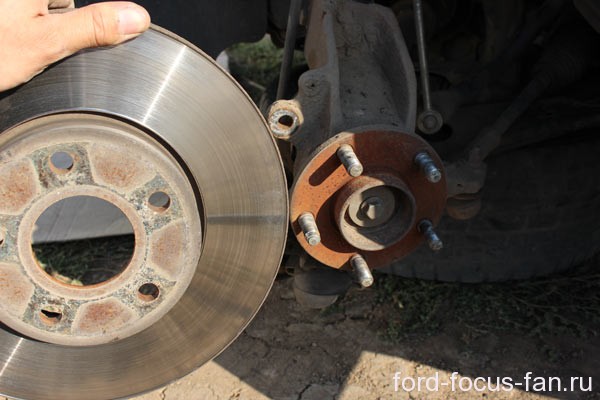
Hiqni pads frenave. Shqyrtoni ato, vlerësoni uniformitetin dhe shkallën e veshin. Hiqni mbajtësin e frenave të frenave në mënyrë që disku i frenimit të hiqet. Për ta bërë këtë, zhvidhni 2 bulonat e fiksimit duke përdorur një pikëllim fole dhe korda zgjatuese të përshtatshme.
Hiqni diskun e frenave. Zakonisht është e lehtë të largohet nga shpërndarja, duke e goditur me lehtësi buzë me një çekiç druri dhe duke tërhequr dorën. Për disa modele të makinave, për shembull, Nissan "Wingroad", është e nevojshme të heqni dy bulona fiksimi me kokë të ulur. Këto bulona shërbejnë për të rregulluar diskun e frenave në qendër gjatë ndërrimit të timonit dhe mbrojtjes së asamblesë nga papastërtitë ndërmjet disqeve dhe qendërd. Merrni një kaçavidë me goditje të fuqishme, vendoseni në kokën e pastruar të poshtër të rrufe dhe aplikoni disa grushta të forta me çekiç në fund të kaçavidit. Pas kësaj, bulonat zakonisht kthehen lehtë. Ju gjithashtu mund të aplikoni një yndyror depërtues në rrufe në qiell. Kjo do të lehtësojë lirimin e temave nga papastërtia dhe ndryshku.
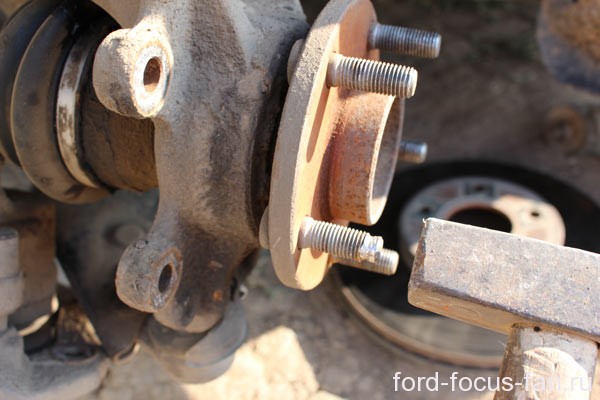
Aplikoni disa goditje me një çekiç në fund të pendës së dëmtuar. Ajo do të dalë nga selia e saj me disa rezistencë. Kthejeni shpërndarësin me dorë derisa kreu i kunjit të jetë i përafruar me foleën në platformën e diskut të frenave. Nëse ky vend i caktuar nuk është i pranishëm, hiqeni platformën. Zakonisht është i fiksuar në 3 ose 4 bulona, të cilat kthehen pa probleme.
Hiqni dëmtimin gjilpërë dhe vendosni një të re në vendin e vet. Align splines e kunj me splines në vrimë qendër. Vidhni arratën e rrotës mbi fijen e kunjit derisa të ndaloni, pastaj tërhiqeni me çelësin. zapressuyte gjilpërë sa më shumë të jetë e mundur. Nëse është e nevojshme, zgjidhni unazën e gjatësisë së dëshiruar dhe vendoseni atë midis arrë dhe qendërd. Për një rezistencë më të ulët, lubrifikoni temat me mbajtëse yndyre.
burimet:
- si të ndryshoni kunjat në rrota e pasme
Nëse nuk e ndërroni padsin e frenave në kohë, ato mund të dëmtojnë frenën drives, duke lënë sipërfaqen gërvishtjet e fundit, që do të thotë riparime të shtrenjta. Ndonjëherë veshur disk ende mund të lëmuar dhe të vënë në mënyrë që, por në qoftë se scratches janë shumë të thellë, prodhimi nuk mbetet: disk frenave duhet të zëvendësohen. Nëse ky problem ka prekur ju, ka të ngjarë që disqet e frenave do të duhet të ndryshohen në të dyja anët, prandaj mblidhni mëngët dhe shkoni deri në pikën!
Do t'ju duhet
- - disqet e frenave
- - Set i pikëllimesh
- - litar ose tel
- - lëngun e frenimit
- - letër zmerile me gjobë
- - Riparimi i stendave ose i prizave
udhëzim
Përgatitni një disk të ri të frenave. Kjo pjesë nuk mund të vihet në makinë vetëm duke u larguar nga kuti . Në fabrikë disqet e frenave mbuluar me një yndyror mbrojtës për të mbrojtur metalin nga korrozioni. Detyra jonë do të jetë heqja e këtij veshja. Përdorni letrën gërryes gërryese, me të cilën dhe lani yndyrat nga disku në një lëvizje të lëmuar rrethore.
Instaloni një disk të ri të frenave në qendër . Tani që disku i ri i frenave është në vendin e duhur, është koha për të vendosur këmbanat në vend. Së pari, instaloni mbajtëset e çipave në diskun e frenave, më pas futni pads të ri të frenave në çelsat dhe sigurojini çelsat në disqet e frenave.
Vendos rrota. Pasi të keni përfunduar duke punuar me frenimin drivesdhe thjesht ktheni rrotat në vendin e tyre origjinale dhe siguroni ato me bulona.Përdorni lëngun e frenave në sistem dhe rikyçni terminalet e baterisë Tani keni nevojë pompë lëngun e frenave në të gjithë sistemin, në mënyrë që të mos mbeten flluska të ajrit: vetëm rri pas timonit dhe shtypni pedalin e frenave derisa të ndihet i fortë në ndjesitë.
Video të ngjashme
Kushtoj vëmendje
Para fillimit të një riparim të tillë të madh, ajo është e mirë për të marrë udhëzime për makinën tuaj: në përgjithësi procesi i zëvendësuar disqet e frenave është e njëjtë për të gjitha makinat, por secili markave të veçanta dhe modele mund të jenë karakteristika të veçanta.
Këshilla të dobishme
Në disa makina, frenat e diskut janë si para dhe prapa, të cilat, megjithatë, do të thotë që tani ju mund t'i ndryshoni ato gjithashtu, sepse rendi i veprimeve është përafërsisht i njëjtë.
burimet:
- si të ndryshoni disqet e frenave në 2017 vetë
- Ndërrimi i një disk frenimi në VAZ 2108
Ndoshta çdo motorist duhet të përballet me problemin e një gomove të sheshtë, pavarësisht gjinisë, moshës dhe përvojës së ngasjes. Për këtë arsye, duke ditur se si ta ndryshoni timonin me duart tuaja do të ndihmoni për të kursyer nervat, kohën dhe paratë, nëse një problem i tillë ju ka ndodhur diku në rrugë.
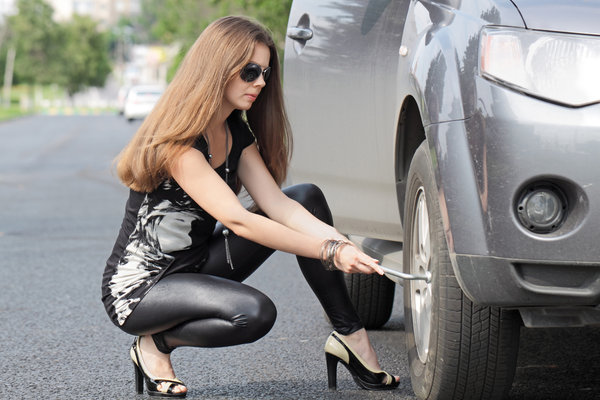
Zëvendësimi i një rrotë me një gomë të dëmtuar nuk do të kërkojë që pronari i makinës të ketë aftësi specifike, por qasja ndaj këtij procesi duhet të jetë e plotë dhe përgjegjëse. Për të siguruar që situata me timonin e shpuar nuk ju kap papritur, gjithmonë duhet të keni një fole në bagazhin e makinës, një pikëllim me balon që korrespondon me dimensionet e timonit dhe, natyrisht, rrota rezervë.
masat parandaluese
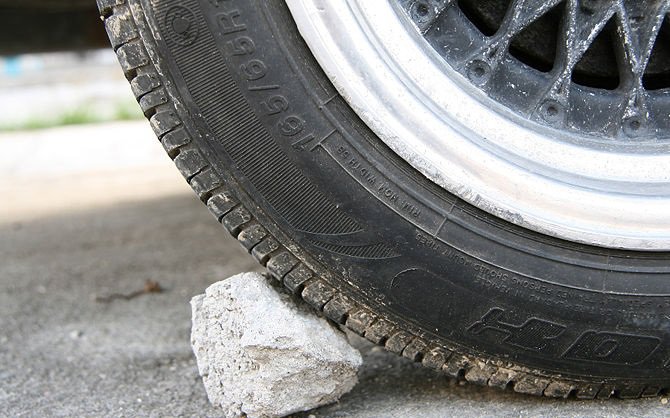
Para kësaj, si të ndryshohet është e nevojshme të zgjidhni sa më shumë të jetë e mundur një vend i sigurt, i pastër dhe i thatë për të ndaluar makinën. Pas mbytjes së motorit, makina vendoset në frenat e dorës dhe pajisja e parë ose selektori zhvendoset në pozicionin e parkimit. Rrotat rregullohen çdo lloj pllakash, të cilat mund të gjenden: gurë të mëdhenj, tulla ose pllaka të veçanta. Kur zëvendëson rrota e përparme, ndalesat vendosen në rrotat e pasme dhe anasjelltas.
Puna përgatitore
Duke u kthyer në "emergjencën" dhe duke shënuar vendin e punës me shenjën e ndalimit, çelësi i tullumbaceve lehtëson pakëzat e rrotave që duhet të zëvendësojnë. Nëse nuk e bëni këtë dhe menjëherë ngrini makinën me një fole, nuk mund të heqni rrotën që varet në ajër. Foleja është instaluar në vende të posaçme të shënuara në pjesën e poshtme të trupit të makinës me rreziqe të vogla; Në rast të ndalimit të një makine në një terren të butë, duhet të vendoset një objekt i ngurtë, nën nivelin e kutisë.

Ndërrimi i rrotave
Ngadalë hiqni makinën me një fole dhe sigurohuni që të fiksoheni në këtë pozicion, hiqni tërësisht të gjitha arrat dhe hiqni timonin e dëmtuar, duke e vendosur atë për të siguruar nën trupin e veturës. Pas kësaj, instaloni rrotë rezervë dhe butësisht shtrëngoni së pari pjesën e sipërme, dhe pastaj të gjitha arra të mbetura. Makina është ulur dhe pasi rrota prek tokën, me një çelës tullumbace, shtrëngoni të gjitha arra deri në fund, kontrolloni presionin e gomave dhe i pastër në vend të të gjithë aksesorëve të riparimit.

Video të ngjashme
Ngasja e rehatshme dhe e sigurt varet nga shumë faktorë. Dhe gjendja e elementeve të pezullimit është një nga gjërat kryesore. Dhe një rol të rëndësishëm luhet nga amortizuesit, të cilët shuajnë të gjitha luhatjet në trupin e makinës. Ata janë gjithmonë në lëvizje, prandaj, përkundër kualitetit të lartë, ata kanë nevojë për zëvendësim të shpeshtë.
Do t'ju duhet
- - një sërë çelësish;
- - jack;
- - mbështetës të sigurisë;
- - shtresa e shtyllave të pasme;
- - tërheqës për burime.
udhëzim
Kryeni heqjen e shtyllave të pasme në VAZ-2115 me rrota të fiksuara në boshtin e përparëm me ndalesa anti-skid. Zëvendësimi bëhet në një sipërfaqe të sheshtë, edhe pse në prani të një grope është shumë më e lehtë. Së pari një punë pak përgatitore. Gjëja e parë që duhet të instaloni një puller në pranverë. Pajisja standarde ka një çelës për 13 çelësa dhe ata duhet të prodhojnë një masë. Opsioni më i mirë do të ishte instalimi i një tërheqës në pranverë kur pezullimi të jetë i ngarkuar, kur makina është në rrota. Në këtë pikë, shkopi i amortizimit nuk shtrihet deri në gjatësinë e plotë.
Ngrini anën e riparuar të makinës në fole. Opsioni më i mirë është që të varni pjesën e pasme të makinës. Për ta bërë këtë, përdorni mbështetje. Në mungesë të atyre, disa blloqe të gjera druri të vendosura në majë të njëri-tjetrit do të përshtaten. Dhe opsioni ideal është një copë trungu pemësh me lartësi të përshtatshme. Gjëja kryesore është se pjesa e sipërme nuk ka zgjatura të mprehta, të cilat mund të dëmtojnë pjesën e poshtme të makinës.
Lëreni bulonat e rrotave para se të varni pjesën e pasme të veturës. Kjo do t'ju lejojë të largoni rrotat nga shpërndarës pa shumë përpjekje. Pas varjes së makinës, hiqni të gjitha bulonat dhe hiqni rrotat. Hapeni trungun dhe hiqni prizat e gomës nga vrimat në gota. Me një çelës të lakuar në 17, hiqni arrë, duke mbajtur rrjedhin me një karabiner për 6 ose me pincë.
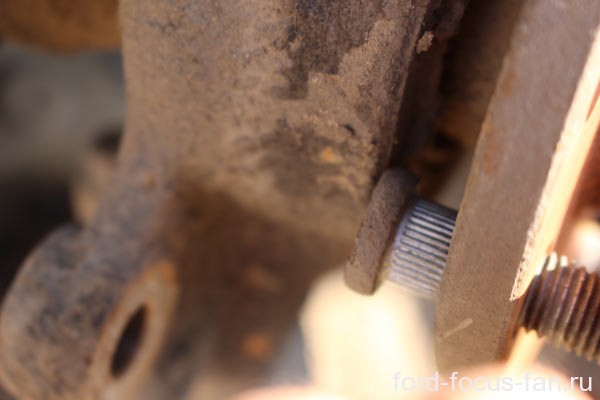
Mbajeni një çelës në shtyllën 17 të pjesës së poshtme të amortizuesit, së dyti shesh arrë nga ana tjetër. Nëse lidhjet e filetuara janë fort të ndryshkur, dhe kjo është kështu në shumicën e makinave, atëherë i vini ato me një lubrifikant që depërton. Pastaj le të qëndrojë për 10-30 minuta, në mënyrë që të gjithë të fëlliqur është grabitur. Në rastin më ekstrem, përdorni ngrohjen e fijeve, meqenëse rezervuari është pranë tij dhe mundësia e ndezjes është e lartë.
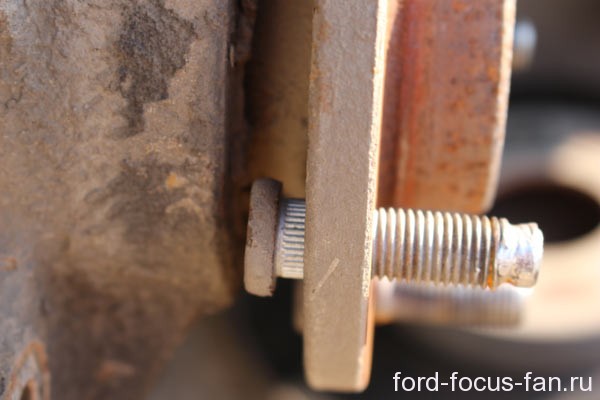
Hiqni kunjat pas heqjes së një arre. Nëse nuk jep hua, atëherë me një çekiç dhe një rrufe në qiell, diametri i së cilës është më i vogël se vrima, hidheni. Largimi i mëtejshëm i rafteve nuk shkakton vështirësi. Pas fillimit të mbledhjes së një të reje. Në të është e domosdoshme të instaloni një anthuri të ri dhe një përplasje. Këto janë elementët më të rëndësishëm të amortizuesit. Anther mbron rrjedhin nga papastërtia dhe uji.
Shtrydhni pranverën më shumë me një tërheqës, pastaj vendoseni vetëm në një amortizues të ri. Shufra e raftit duhet të zgjatet në gjatësinë e saj të plotë gjatë montimit dhe instalimit. Përndryshe, fundi i saj nuk do të shkojë në ndarjen e bagazheve. Gjëja e parë që ju duhet për të rregulluar amortizues në trup. Për ta bërë këtë, vendoseni stendën, duke drejtuar rrjedhin në vrimë të qelqit. Një partner bën një arrë në të, nuk e kthen atë deri në fund. Tjetra, pjesa e poshtme e amortizuesit është montuar në rreze dhe fiksohet me një kunj dhe dy bulona.
Nëse, gjatë ngarjes në makinën tuaj, një zhurmë e papritur dëgjohet në zonën e rrotave të përparme, kjo do të thotë se mbajtja e rrotave të përparme ka dështuar dhe është koha për ta zëvendësuar atë. Ju nuk do të bëni shumë përpjekje, për të bërë një zëvendësim veten, nëse vetëm mjetet ishin në dorë.
Do t'ju duhet
- - jack
- - çelësi i kryqëzuar (balonnik)
- - makina me dy rrota
- - kokat përfundojnë më 12, 17, 19, 30.
- - çelësat për 10, 17, 19
- - pincë të rrumbullakëta
- - Vise
- - çekiç dhe çakëll druri
udhëzim
Ulni timonin derisa të futet në kontakt me tokën dhe së pari shuaj arrë qendrore (në 30 qendër) duke përdorur kokën e fytyrës. Tjetra, hiqni bulonat e rrotave me një çelës kryq (tullumbace). Ngrini përsëri makinën dorezën, dhe plotësisht të mbyllur bulonat e fiksimit të një rrotë, hiqni atë.
Fikni bulonat e fiksimit të mbështetjes së frenave dhe top mbeshtetje tek grumbullari rrotullues, nje kyç ne 17 dhe 19. Shenjo rrufe kryesore te montimit trungjet e amortizimit në grushtin pivoting. Hiqni dy bulonat me çelësat më 17 dhe 19.
Zhvidhosni kurrizin e rrotës së kokës në krye të kokës 12. Gërini të qetë diskun e frenave me një çekiç dhe një braktisje druri. Hiqni tri bulonet me 10 dhe hiqeni kallajin tjetër me . Hiq qendër , heqjen e arrë me 30.
Rrumbullakët heqin dy unaza mbajtëse të mbajtjes nga shpërndarja. Me një mandrinë dhe një çekiç, hiqni daljen e vjetër nga shpërndarja. Kontrolloni vendin e mbështetjes, ai duhet të jetë i pastër nga dëmtimet e dukshme.
Zëvendësoni unazën e jashtme mbajtëse. Vise shtypi rripin e ri në qendër. Instaloni unazën e dytë të parakohshme.
Bashkohuni në mënyrë të kundërt.
burimet:
- si të ndryshohet kushineta e mbështetjes në vitin 2017
Përmirësimi i dizajnit të brendshëm të makinës mund të jetë, duke ndryshuar drejtimin e makinës në një tjetër, më elegant. Disa shoferë preferojnë të instalojnë një timon sportiv, i cili jo vetëm që duket tërheqës, por gjithashtu siguron kontroll shtesë gjatë makinës.

Do t'ju duhet
- - Timon i ri drejtues;
- - pikëllim kokë ose fole;
- - Kaçavidë;
- - një laps.
udhëzim
Drejtoni rrotat e para të makinës, me timon drejtues të instaluar drejt. Hiqni terminalin negativ nga bateria. Shkëputni lidhësin e sinjalit të makinës.
Hiqni vidhat që sigurojnë mbulesën e shtyllës drejtuese. Hiqni mbulesën e shtyllës së shtyllës drejtuese. Hape levën e rregullimit të kolonës drejtuese dhe uleni poshtë, pastaj hiqni mbulesën e shtyllës së sipërme të shtyllës drejtuese.
Hiq mbulesën dekorative në sinjal duke përdorur një kaçavidë. Hiqni vidhat e butonit të sinjalit dhe hiqni atë.
Zhvidhosni (jo plotësisht) arinën e montimit të timonit, duke përdorur kokën ose çelësin e foleës. Bëni një laps që shënon pozicionin e timonit në krahasim me boshtin dhe pozitën e kaloni të sinjalit të kthesës.
Aplikoni disa goditje në timon në drejtim të "vetes", ndërsa drejtuesi duhet të dalë nga rrotullat. Nëse ka një tërheqës, përdorni këto mjete për t'i hequr ato. Pastaj tërhiqni arrë dhe hiqni timonin drejtues nga kolona drejtuese e boshtit.
Vendoseni kaloni në shtyllën drejtuese në pozicionin neutral dhe vendosni timonin e ri drejtues në mënyrë që rripat e saj të jenë në një pozicion horizontal.
Sigurohuni që ta ktheni unazën e kalimit të sinjalit të kthesës në mënyrë që nyja në shpërndarësin e timonit të drejtimit të rrëshqasë në brazhën e unazës. Shtrëngoj arrë. Lidhni elektricistin.
Lidhni tela "negative" me baterinë dhe kontrolloni funksionimin e sinjalit audio dhe kaloni në shkop. Kontrolloni pozicionin e timonit të ri drejtues në makinë testuese - rrotat e saj kur lëvizni në vijë të drejtë duhet të jenë në një pozicion horizontal.
Video të ngjashme
Kushtoj vëmendje
Nëse keni nevojë për të vënë një timon sportiv, ju do të duhet gjithashtu të blini dhe instaloni një përshtatës.
Kur ngasni një timon sportiv ju duhet të ktheheni me një përpjekje pak më të madhe, por kur ngni makinën në të kundërt, ngasja me makinë do të jetë më e lehtë.
Këshilla të dobishme
Kur hiqni timonin, mos e ktheni arratin në fund për të mos dëmtuar veten, pasi ulja e timonit është mjaft e ngurtë.
Kushinetat e ballit janë elemente të rëndësishme të pezullimit të makinës. Ato sigurojnë një lidhje të palëvizshme të litarëve të pezullimit përpara me një grusht rrotullues dhe transmetojnë lloje të ndryshme të ngarkesave nga rrotat në trupin e makinës gjatë vozitjes me kthesë të njëkohshme dhe një goditje vertikale të rrotave. Shumica e tullumbaceve "fluturojnë" në gunga. Prandaj, ne duhet të monitorojmë me kujdes gjendjen e tyre dhe, nëse është e nevojshme, të ndryshojmë.
Do t'ju duhet
- Një kunj, një çelës "për 22", një çekiç (ose një tërheqës special).
udhëzim
Pas kësaj, duke përdorur një çelës "13", ju duhet të heqni tri arra mbylli sigurimin e mbajtjes së topit në levë. Pastaj ju mund të merrni top mbështetje. Por gjëja kryesore nuk është që të harrojmë të hiqni pllakën, dhe kur montoni - për ta vënë atë në vend.
Instalimi i një lidhës të ri të topit kryhet në mënyrë të kundërt.
Kushtoj vëmendje
Duhet të mbahet mend se kushineta e poshtme dhe e sipërme ndryshojnë nga njëri-tjetri.
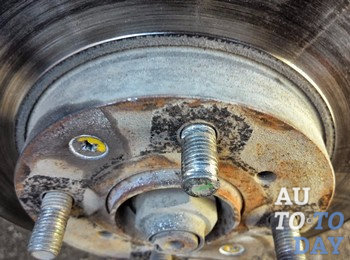
Qafe me rrota mbi rrota theu.
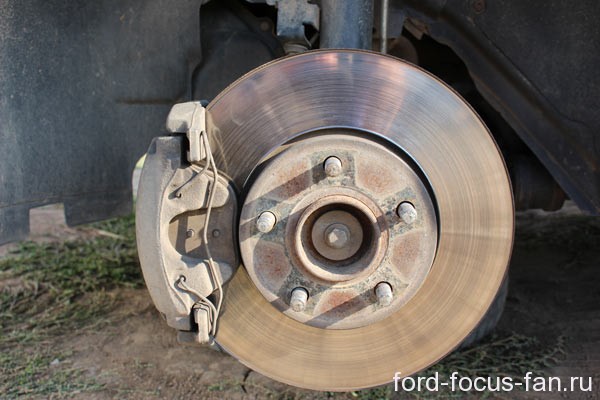
Shkova në dhomën e larjes së makinave. Ata më vunë një rrotë dhe më vidhnin me një armë pneumatike. Gjatë ditëve dhe javëve të mëvonshme, arra u nisën të zhdukeshin nga kjo rrotë. Rezulton se ata ranë së bashku me studs. Gjatë një jave, fokusi im ishte një kunj i vetëm i rrotave të para, e dyta ra në oborr, me fat.
Fotografia më sipër është tashmë rrota e majtë e përparme. Qafe nuk ishte prerë, por ata e shtrënguan arrë, paraprakisht, pa e bërë atë manual, por menjëherë me një pistoletë. Hoqi shkopin e gdhendjes së shpërndarëses së rrotave. Faleminderit punëtor në punëtori.
Arra e rrotave të pasme janë në vend (mirë, se ai punëtor nuk i ka prekur ato), kështu që "zëvendësimi i kunjit të pasmë të rrotave mbetet prapa skenave".
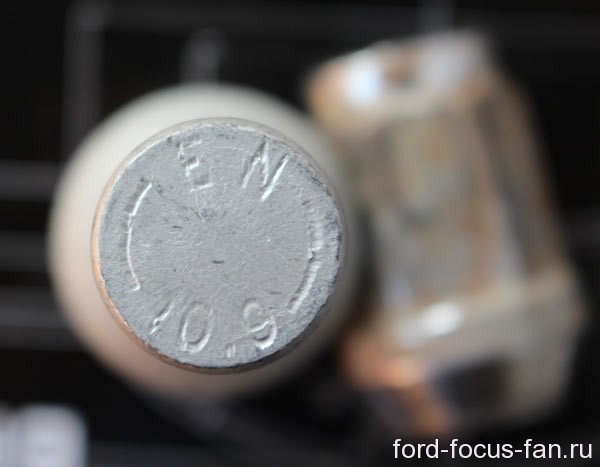
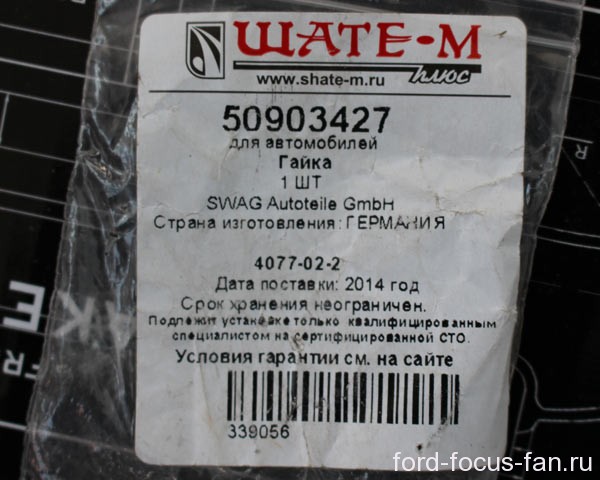
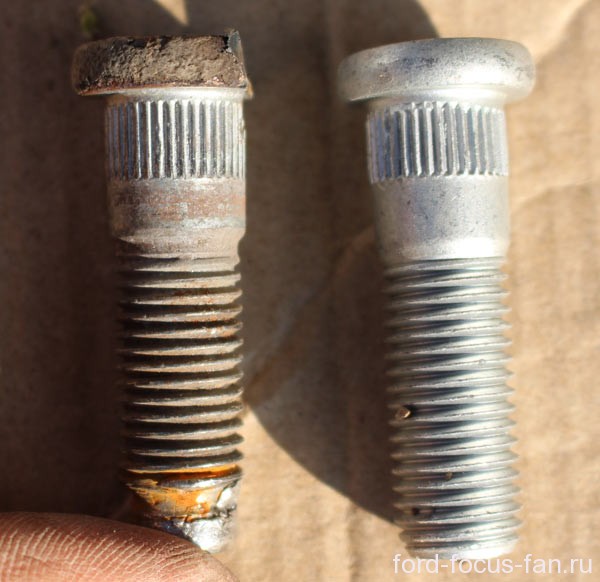
Meqë kunjat u humbën së bashku me kunjat e rrotave, unë kam urdhëruar studs origjinale me arra (mos merrni rreziqe me studs jo origjinale ose analoge). Sollën rrota dhe arra me rrota gjermane. Çmimi i kunjit të kunjit të rrotave është vetëm 80 rubla, por një arrë kushton 130 rubla. Si rezultat, një unazë me një arrë - 210 rubla. Qendra e fijeve, Ford Focus 2
Këtu në një paketë të tillë ... Arra janë serioze, të kontrolluara.
Dhe si të ndryshoni kunjat në timon? I pyetur në një pikëpyetje në stacionin më të afërt të shërbimit, vetë specialisti i skuqur kërkon kolegun e tij se si ta zëvendësojë pinin në timon. Pastaj, ata u përgjigjën, është e nevojshme të largohet shpërndarja ose edhe ta zëvendësojë atë. E mora vetveten dhe zgjidhja problemin për gjysmë ore.
Mjet për zëvendësimin e kunjave të një shpërndarës të rrotave
- Studs në qendër
- Dy hammers (një më i rëndë se tjetri)
- Kaçavidë e sheshtë
- Çelësi është 15
- bullgare
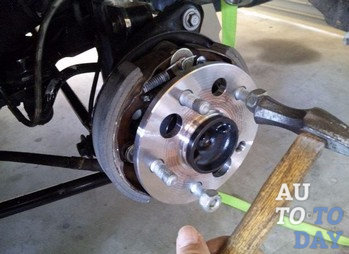
Zëvendësimi i kunjve të rrotave të përparme
Ne lirimin e arra rrota, ne ngre lart makinën, natyrisht, duke vënë rollers jashtë.
Është e domosdoshme të hiqni shkopin e frenimit. Ne e kthejmë timonin jashtë. Ne shohim dy bulona në 15 (në Ford Focus 2), hiqni ato. 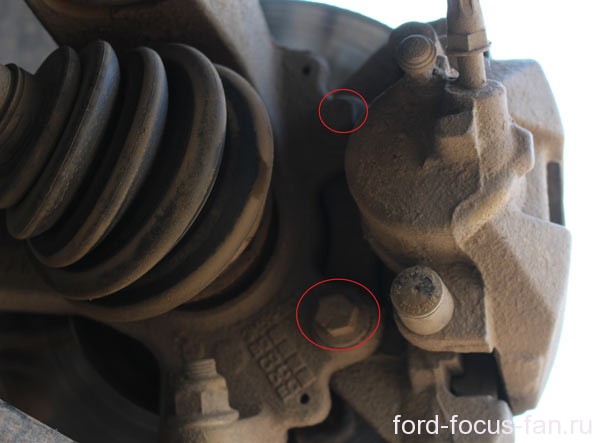 Tjetra, pads frenave do të shtypet kundër disk frenave. Përdorni një kaçavidë të sheshtë për të çaktivizuar pads. Heqni kapësin (foto më poshtë).
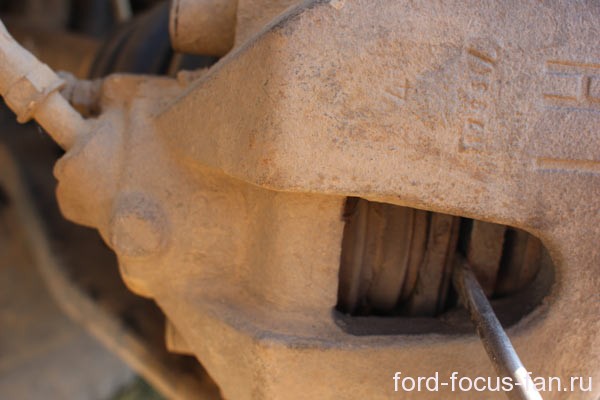
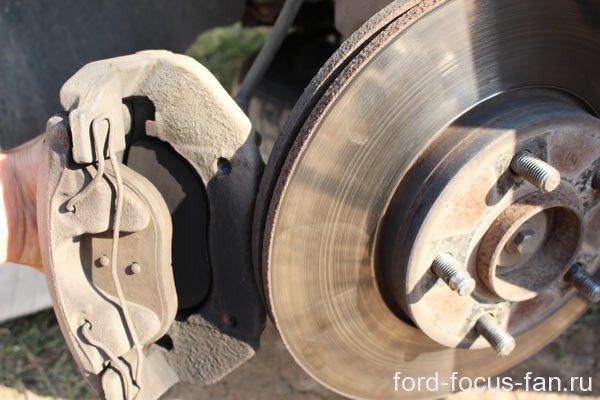
Ne heqim mbështetjen nga ana, dhe është më mirë të varim në pranverë. Tani, hiqeni diskun e frenave. Nëse është e mbërthyer, prekni perimetrin e diskut me një çekiç dhe hiqeni diskun.
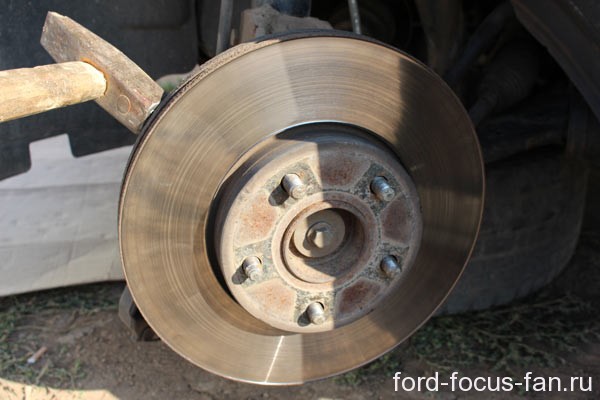
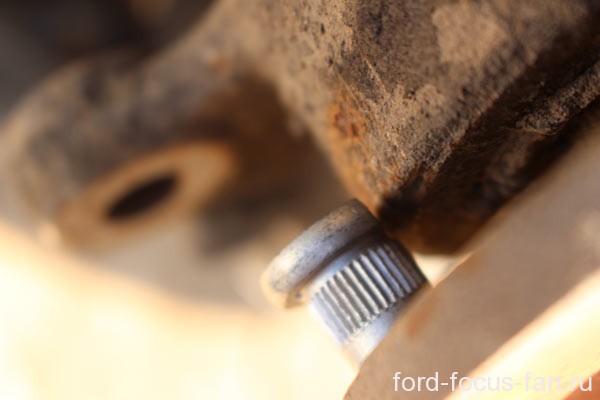
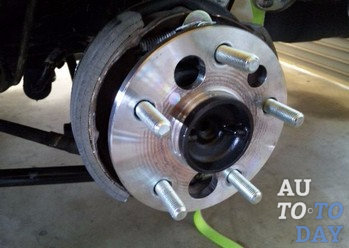
Tani, me një çekiç, ne e heqim pak nyjë nga brazda, por jo deri në fund.
Por arsyeja pse edhe kunja e shpërndarës së rrotave nuk del nga shpërndarja. ajo në njërën anë të kapakut qëndron kundër një grushti të kthyeshëm.
Prandaj, ne nuk e hedhim jashtë deri në fund, ne rrotullojmë shpërndarësin, në mënyrë që të ketë sa më shumë hapësirë rreth rrethit të flokëve dhe ne e prenë kapakun e formës së prerë në njërën anë të kunjin. Trokisni shufrën.
Një kunj i ri i shpërndarëses së përparme (megjithëse, pa dallim) është prerë në të njëjtën mënyrë që ka hyrë lirisht, por edhe në mënyrë që të ulë një minimum të kapakut.
Por, përpara se të kryeni një çekiç, sigurohuni që rrotullat e kunjve përputhen pikërisht me shpinën e shpërndarës.
Pastaj, me lehtësi fusni pendën. Goditje me çekan janë të këqija për mbajtjen e një granate dhe shpërndarës. Për t'i shuar ato, zëvendësoni një çekiç ose çekiç nga ana e kundërt në qendër. Por në mënyrë që mjet të mos prekë fijen e modelit të ri dhe ato fqinje. Tani, çeki pinin.

Marrja e makinës.
Ndërrimi i Ford Focus 3 i rrotave të rrotave të përparmë
Punonjësit e shërbimit të forcës të gozhdojnë me dorë dhe t'i arrijnë ato me dorë. Dhe mos vendosni tubat e njehsorëve në çelës.
Ndodh që kurthi i fiksuar në timon nuk dështon dhe sigurimi i sigurt në shpërndarësin nuk është e mundur. Shpesh kjo ndodh me heqjen e shpeshtë të timonit. Dëmtimi mund të jetë i ndryshëm - është një thyerje e pjesës së filetuar, një shami e thyer ose lakimi i saj. Zhvlerësimi ndodh për shkak të kujdesit të pamjaftueshëm për këtë. Nuk është e poshtër dhe rërë, e cila nga ana luan rolin e gërryes. Shkaku i veshjes është gjithashtu një arrë e fortë. Detajet Bummer mund të jenë për shkak të një impakti të fortë dhe nga momenti i shtrëngimit të matësave të rrotave. Si rezultat, lëvizja në makinë bëhet e pasigurt. Ky fakt mund të shkaktojë dëme më serioze dhe aksidente trafiku.
Zgjidhja e këtij problemi
Kur ndodh kjo lloj dështimi, duhet të zëvendësohet kunja e rrotave të përparme. Në këtë rast është e dëshirueshme të ndryshohet jo vetëm pjesa e thyer, por e tërë seti. Kjo karakterizohet nga fakti se me thyerjen e një, pjesa tjetër e kunjve mund të dëmtohet, edhe pse mund të mos jetë e dukshme në mënyrë vizuale.
Duke marrë parasysh markën e automjetit tuaj, procesi i zëvendësimit mund të ndodhë si në shpërndarësin e hequr dhe drejtpërdrejt në makinë. Kjo është për shkak të karakteristikave të projektimit të makinës. Por, si rregull, mund të bëni riparime pa hequr qendrën. Pothuajse çdo motorist mund ta instalojë vetë studentin. Mjafton të keni mjetet e nevojshme dhe një përvojë të vogël në punën e riparimit.
Por, ç'të themi nëse nofullja u ndërpre në rrugë? Në këtë rast, është pothuajse e pamundur të eliminohet ky mosfunksionim. Duke pasur parasysh faktin që rrota është e lidhur në qendër me një numër të caktuar studsish (nga katër në gjashtë, përjashtim i "OKA" është tre), mund të merrni në shtëpi ose në SRT për ato të mbetura. Fillimisht, është e nevojshme të kontrolloni ngushtësinë e arra të rrotave dhe të lëvizni me shumë kujdes, duke iu shmangur gungave të mëdha dhe jo duke fituar shpejtësi të lartë. Zëvendësimi i kunjit të shpërndarëses së rrotave të përparme nuk është një proces shumë i mundimshëm, por kërkon aftësi dhe durim të caktuar.
Si të çmontoni një pjesë të papërdorshme
Më poshtë janë mënyrat e eliminimit të këtij problemi në shembullin e disa markave "popullore" të makinave, si vendore ashtu edhe të importuara. Në parim, puna e riparimit nuk ndryshon ndjeshëm në teknologjinë e saj, por ka disa dallime në lidhje me pajisjen auto.
Zëvendësimi i kunjit të përparëm të rrotave - Toyota
Në këtë rast, objekti i riparimit do të jetë një Toyota Corolla. 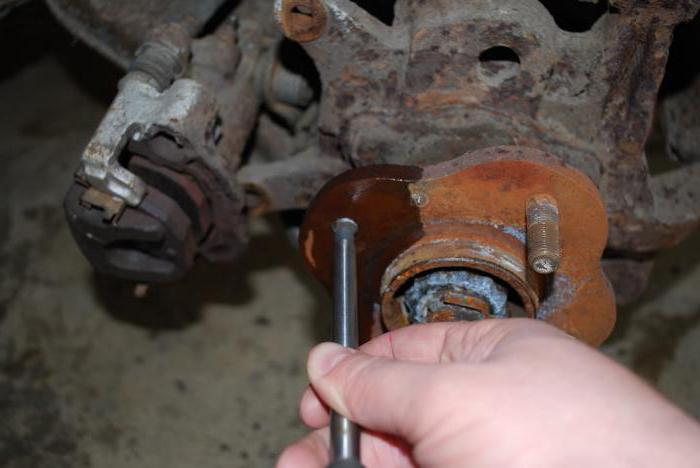 Pak para zëvendësimit ju duhet të vendosni për blerjen e një seti këmbësh rezervë. Opsioni më i mirë është blerja e pjesëve origjinale, cilësia e së cilës është pa dyshim. Përndryshe, ekziston rreziku i blerjes së kunjave të cilësisë së ulët që mund të ndërpresin shpejt, ose pjesa e tyre e ndërprerë së shpejti do të prishen. Gjithashtu, nuk duhet të bëni një gabim me vendin e instalimit. Front dhe kanë studs të ndryshme. Kjo këshillë zbatohet për të gjitha makinat në të cilat kërkohet zëvendësimi i timonit të rrotave.
Procesi i zëvendësimit hap pas hapi
Për punë, do t'ju duhet një set standard i pikëllimit të foleës, çekanit, futjes, pikëllimit të tullumbaceve dhe foleat. Makina është e montuar në një sipërfaqe të sheshtë dhe është vënë mbi. Pastaj, lirimin e arra rrota dhe, nën makinë, hiqni timon.
Pas punimeve përgatitore, duhet të hiqet mbajtësja e frenave të frenave. 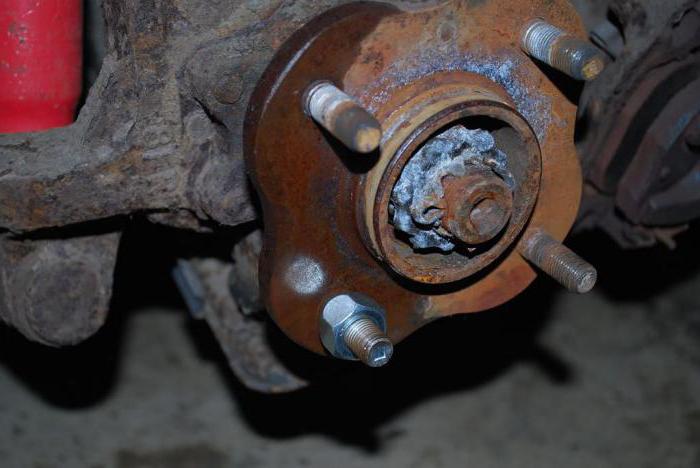 Kreu në 17 çvidhosni bulonat e fiksimit të një mbështetjeje dhe e largojmë atë nga një disk. Nuk është e nevojshme të shkëputni zorrën e furnizimit me lëngje frenimi, thjesht hiqni pakëzin e frenave në anën.
Në brendësi të shpërndarësit është siguruar një lidhës teknologjik për çmontimin dhe montimin e kunjit. Ne rrotullohemi shpërndarësin në mënyrë që nyja e dëmtuar të jetë e vendosur përballë këtij lidhësi. Pastaj, duke përdorur një çekiç, ne trokisim formën e flokëve. Nëse është mbajtur në mënyrë të sigurt në vendin e saj, atëherë duhet të trajtohet me WD-40 ose naftë dhe lejohet pak acidifikimi. Pas kësaj, çmontimi do të jetë më i lehtë, nëse është e nevojshme, ju mund të përdorni tutorialin.
Pas heqjes së pjesës rezervë të dëmtuar në vendin e saj, instaloni një të re. Instalimi është i njëjtë me heqjen. Kur vija e flokëve të ketë marrë vendin e saj, ju duhet ta mbani atë me gishtin e rrotave në mënyrë që ajo të jetë e vendosur në diskun e frenave. Ndërrimi i kunjit të përparëm të rrotave (Toyota Camry, ndër të tjera) përfundoi me sukses. Nëse është e nevojshme të zëvendësohen flokët e mbetura, operacioni kryhet në të njëjtën mënyrë.
Vlen të përmendet se nuk është e këshillueshme të përdoren arra të reja me bulona, të cilat janë instaluar në kunjat e vjetra, pasi që ekziston mundësia e dëmtimit të temave të tyre. Kjo mund të çojë përfundimisht në veshin e shpejtë të paketës së produktit të ri.
Procesi i riparimit në VAZ
Ndërrimi i kunjit të rrotave të përparme ("Niva" përfshirë) kryhet pothuajse i njëjtë me makinën e mëparshme.
Makina është e varur nga një çikrik, rrota, një mbështetje dhe një mbulesë mbrojtëse e mekanizmit të frenimit është hequr. Pastaj rrufe në qiell është rrëzuar me një çekiç, duke e krahasuar paraprakisht atë me një prerje për çmontimin. Për shpërndarësin e rrotave nuk rrotullohet, duhet të aktivizoni pajisjen e parë. Vendi është pastruar nga papastërtia dhe ndryshku dhe pastaj një rrufe në qiell të re është instaluar në të. Në trupin e kunjit dhe në montimin e saj ka lojëraza gjatësore. 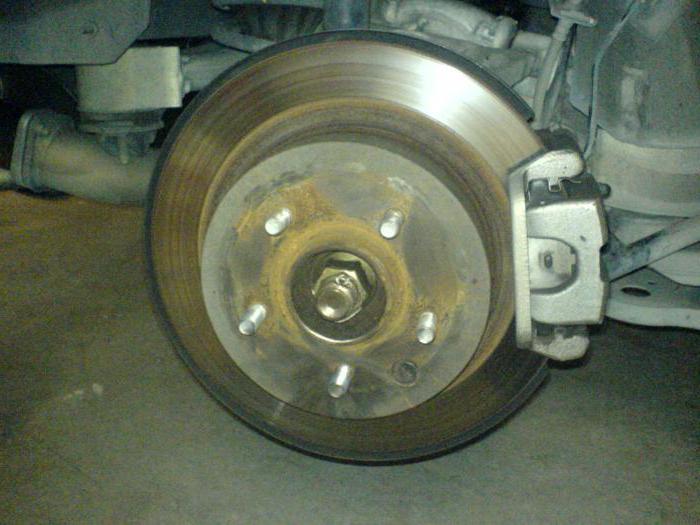 Prandaj, duhet të siguroheni që përputhen. Duke vepruar nga ana e motorit, përzgjedhni me një çekiç, pastaj tërhiqni arrë derisa të ulet plotësisht. Sasia e tërë e punës zgjat rreth një orë e gjysmë.
Zëvendësimi i kunjit të përparmë me heqjen e shpërndarëses
Le të shqyrtojmë një shembull të zëvendësimit të një detaji mbi makinat "Matiz". Nuk është e mundur të hiqni pjesën e dëmtuar në këtë makinë pa hequr hubin, pasi ajo pengon
Hapi i parë është heqja e kuvendit të frenave të frenave me pads dhe marrja e tyre mënjanë. Nga drafti i pare i drejtimit untwist. Pastaj centrali i shpërndarjes është çmontuar në stendë, mbështetja e topit është zhvendosur dhe është rrëzuar. Çaktivizoni arratisjen e shpërndarës, hiqni shpërndarësin dhe boshtet e makinës janë të fiksuara në mënyrë që SHRUS të mos dalë nga kutia e shpejtësisë.
Në të ardhmen, shpërndarja shpërndahet dhe qasja në kunjat shfaqet. 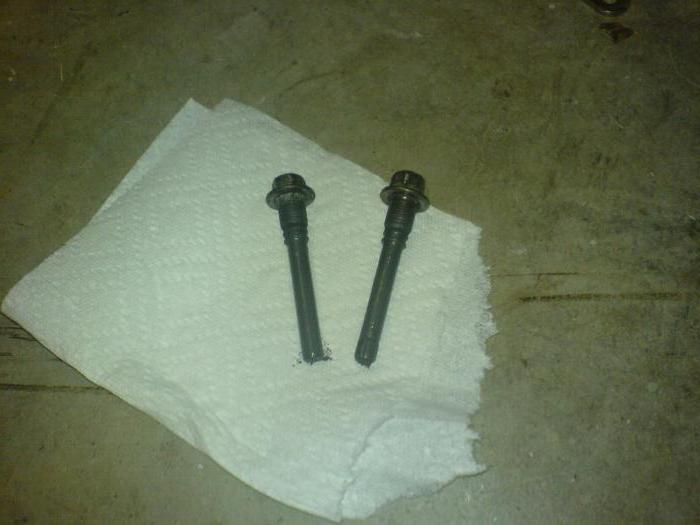 Ndërrimi i kunjit të përparëm të rrotave është standard. I dëmtuari është nxjerrur, dhe një i ri është instaluar në vend të tij. Pas kësaj, mund të filloni montimin e mekanizmit të pezullimit.
Heqja dhe instalimi i kunjave në "Chevrolet"
Para së gjithash, të gjitha punimet përgatitore kryhen për qasje të papenguar në pjesët e dëmtuara. Rrota, qepja dhe disku i frenimit janë shpërbërë nga shpërndarja e rrotave. Për lehtësimin e qasjes në vida të parafundit, është e nevojshme të ndryshohet pozicioni i rrotullimit të shpërndarësit nga timoni. Ndërrimi i kunjit të përparëm të rrotave ("Aveo 1.6" duke përfshirë) është si më poshtë. Pjesa e papërshtatshme shtypet me një çekiç duke përdorur një spacer druri dhe një kunj i ri është ngritur në vendin e tij. Tjetra, i gjithë asambleja është mbledhur në mënyrë të kundërt për heqjen.
Siç mund ta shikoni, çmontimi dhe instalimi i një seti të ri të bulonave të shpërndarëses së rrotave të përparme janë mjaft të realizueshme në shtëpi. Ndërrimi i kunjit të rrotave të përparme (përfshirë Lacetti) është i njëjtë, me përjashtim të një - për shkak të dizajnit të shpërndarës, disku i frenave nuk hiqet.
Riparimi i kunjve
Shpesh, shoferët nuk rekomandojnë riparimin e bulonave. Së pari, nuk është gjithmonë e mundur për të bërë (bummer dhe lakim). Së dyti, siguria e ngasjes së një automjeti është zvogëluar. Por ende mund të restaurohen. 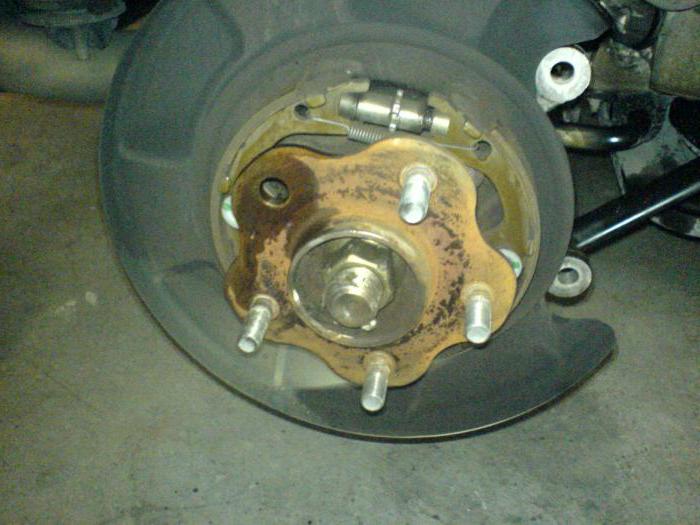 Ka të bëjë me dëmtimin e fijeve. Ndërrimi i kunjit të fiksimit të rrotave të përparme nuk mund të kryhet nëse fijes është restauruar. Për këtë, furqësi është larguar nga shpërndarja. Pastaj ajo është e mbërthyer në një ves dhe një shamfer është hequr nga pjesa e fundit e dosjes. Pastaj, duke përdorur madhësinë e kërkuar të vdesin, përzini zonën e dëmtuar. Nëse pjesa nuk ka çarje dhe çips në bazën, mund të përdoret më vonë.
kujdes
Për të mos u përballur me një problem të tillë si prishja dhe zëvendësimi i kunjit të rrotave të përparme, është e nevojshme të monitorohet ngushtësia e arra. Kur të lëshohet, disku rrihet kundër shiritit të sipërm. Kjo çon në thyerjen dhe veshin e fijeve. Para se të heqni timonin nga makina, duhet të pastroni me kujdes rubinet nga papastërtitë, në mënyrë që të mos goditni fijet e nyjeve të filetuara. E njëjta operacion duhet të kryhet dhe para se të mbështillni arrë. 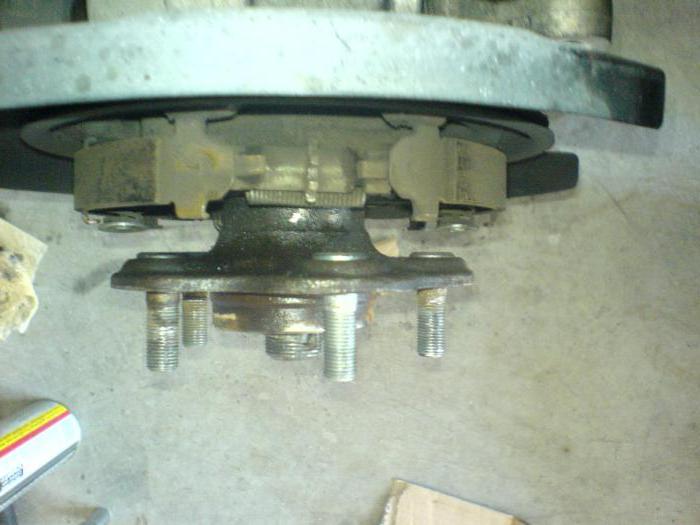 Është e dëshirueshme, pas heqjes së rrotave, temat para-lagur duke përdorur çdo lloj të produkteve të naftës. Kështu që ju do të lehtësoni rrjedhën e arrë. Këto manipulime të thjeshta kontribuojnë në sigurinë e pjesës dhe marrin shumë më pak kohë se sa zëvendësimi dhe riparimi i kunjve.
Përveç kësaj, gjithmonë kontrolloni shtrëngimin e arra dhe bulonave pas vizitës së montimit të gomave. Ekziston një probabilitet i lartë që në një nxitim punëtori i shërbimit nuk mund të arrijë në timon dhe kjo do të dëmtojë flokët në të mirë.
Për sot, është e vështirë të imagjinohet njerëzimi pa transportin motorik. Teknologjitë e automobilave e kanë përmbytur këtë botë për një kohë të gjatë dhe nuk do të dorëzohen. Dhe kanë për qëllim krijimin e kushteve më të rehatshme për funksionimin e makinave. Për këtë qëllim, dhe janë duke përmirësuar vazhdimisht edhe detajet më të vogla të makinës.
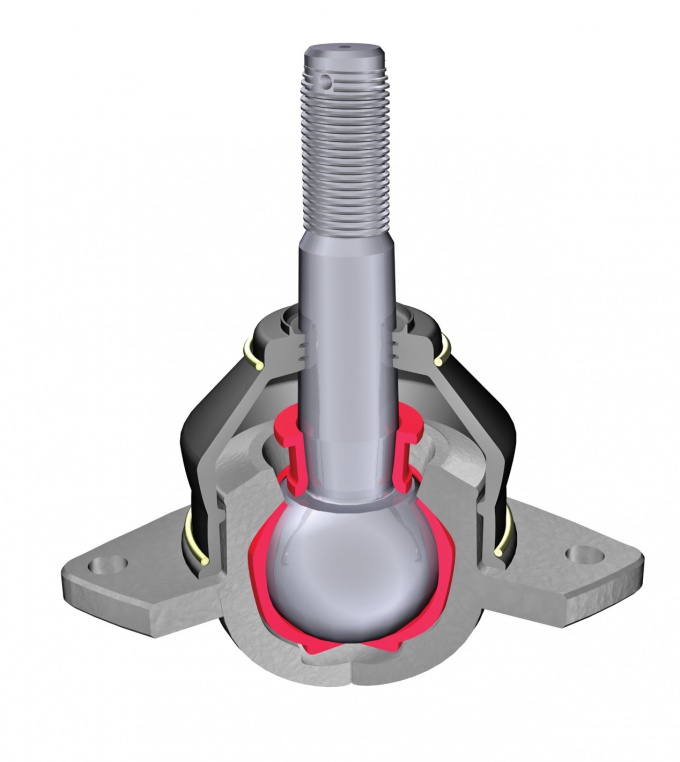
Në këtë artikull, ne do të flasim për një detaj të tillë të rëndësishëm, megjithëse mjaft të vogël, si qendër shpërndarësesh. Pse ka modernizim? Po për faktin se kunjat e shpërndarës janë bërë ekuivalente perfekte me bulona të thjeshta. Por, ashtu si të gjitha detajet e makinës, ata janë të detyruar të veshin ose të dëmtojnë. Në këtë artikull ne do të përpiqemi të kuptojmë se cilat avantazhe kanë kunjat e shpërndarës përpara bulonave dhe gjithashtu si ta zëvendësojnë korrigjimin e saktë dhe të shpejtë me një unazë të re.
1. Avantazhet e kunjat e shpërndarës
Si rregull, shumë shoferë kanë një "djersë" të mirë kur vendosni timonin në makinë. Pra, në sajë të kunjat e shpërndarës për të vënë në rrota bëhet shumë më i përshtatshëm dhe më i shpejtë. Gjithashtu është e pamundur të mos përmendësh përhapjen e shkëlqyer gjatë instalimit të timonit në automjet.
2. Si të ndryshoni siç duhet kunjat e shpërndarëses
Pasi të kemi konsideruar avantazhet kryesore të kunjave të shpërndarës, mund të vazhdojmë me rregullat për zëvendësimin korrekt të kësaj pjese. Si rregull, gripi i shpërndarës është i ndjeshëm ndaj dëmeve të ndryshme, qofshin thyerje ose oksidim. Por më shpesh shoferët përdorin për zëvendësimin e një unazë të vetëshprehur vetëm në shpenzimet e saj të plota.
 Zëvendësimi i kurrizit nuk është një proces shumë i mundimshëm, kështu që ju nuk duhet të kontaktoni qendrat e specializuara të mbështetjes teknike për ta bërë këtë punë. Zëvendësimi mund të kryhet lehtësisht në shtëpi, është e rëndësishme vetëm të ndiqni një udhëzim specifik.
Pra, për starters, ne heqim makinën dhe të fillojnë të heq kapakun timon. Pas heqjes së rrotave, përdorni çelësin për 14 dhe hiqni cilindrin e frenimit. Gjithashtu, duke përdorur të njëjtin çelës, hiqni kapësin. Kur të gjitha të panevojshme do të hiqen, marrim përsipër të heqim diskun e frenave. Për këtë, ne zgjasim pads e levë dore, duke përdorur vrima për rrufe në 8.
Natyrisht, ju mund të bëni një kunj zëvendësimi dhe pa hequr bllokun vozis. Ju thjesht mund të thyejnë kunjat e fijeve, duke përdorur një dorezë me një shirit të gjatë në rastin kur kilometrazhin e makinës është mjaft i madh dhe shirita e kokës konsumohet plotësisht. Pas heqjes së arrëve të vjetër, mos harroni për trajtimin sipërfaqësor të fijes. Për ta bërë këtë, hiqni me kujdes sipërfaqen e papastërtisë, ndryshkut, etj. E gjithë kjo është bërë për të siguruar që pirg i ri qëndron saktësisht në qendër dhe në asnjë rast nuk varet. Pas kësaj, shtrëngoni kunjat e ri, përmes spacerit, me arrë. Urime! Ju keni bërë punën tuaj!
 Natyrisht, pasi të keni zëvendësuar kurthin e shpërndarës, për arsye sigurie ju duhet të përzënë një pjesë të vogël të rrugës për të provuar makinën. Nëse vini re ndonjë luhatje, duhet të balanconi rrota.
Regjistrohu për burimet tona në
Gjatë operimit të veturës ose kur të zëvendësohet rrota, ndodh që kurthi i shpërndarësit të jetë i prishur. Gjithashtu, dëmtimi i tij është i mundur me zëvendësimin e shpeshtë të rrotave. Ka disa probleme të përbashkëta që lidhen me kunjin. Tema mund të thyhet. Ose ajo mund të përkulem pak ose tërësisht pushim. Veshja mund të shfaqet në mungesë të kujdesit ose me mirëmbajtjen e makinave me cilësi të dobët. Është e mundur për të goditur vendin e fiksimit të papastërtisë ose rërës. Kjo mund të luajë rolin e një gërryese të fortë. Në mënyrë të ngjashme, nëse gjethet e rrotave janë pak të liruara, kjo do të çojë në lodhje të tepruar metalike. Fije mund të shkëputet nëse, gjatë instalimit të timonit, shtrëngoni arrën e fiksimit. Nëse kjo pjesë është e dëmtuar, lëvizja pushon së qeni e sigurt. Bilanci i timonit është i prishur dhe mund të ndodhë dëmtimi më serioz ose aksidenti.
Zevendesimi i nje qafore
Qafe është një rrufe në qiell tradicionale që është i ndërprerë. Vetëm vendi ku kapela zakonisht gjendet është montuar në qendër. Nëse ndodhin defekte, rrota e rrotave të përparme duhet të zëvendësohet në Chevrolet Niva. Është urgjente të vendosni një të re. Për ta bërë këtë, disa hapa të thjeshtë janë të nevojshme për të hequr dhe zëvendësuar pjesën.