În acest articol voi încerca să descriu procesul de instalare a geamurilor electrice pe Lanos. De ce să încercați? Pentru că a fost cu mult timp în urmă, au trecut 5 ani și cum am instalat toate echipamentele suplimentare, așa încât am putut uita câteva lucruri mici, dar încă mai am înregistrări și poze cu acest proces, deoarece întregul proces de instalare nu a fost chiar iar gândul de a publica un astfel de ghid a încercat totuși să capteze procesul cât mai precis posibil.
Deci, să începem.
Mi-am cumpărat aceste geamuri:
stânga:
dreapta:

Că au fost deja colectate, ele sunt vândute separat, motoarele separate, trapezoid separat. Am pus doar pe partea din față, așa că procesul de instalare va fi numai pentru ascensoarele din față, deși principiul este același în mod natural.
Deci, să începem. Scoateți cartea ușii și scoateți geamul. Din păcate, aceste fotografii nu sunt, dar nu este nimic special pentru a arăta acolo. Coborâm un mic pahar astfel încât să se poată ajunge la șuruburile de montare, deșurubați trapezoidul - 2 șuruburi pe partea de sus și două pe partea inferioară, + două șuruburi - lângă mânerul de ridicare / coborâre și deșurubați sticla însăși de la ridicarea manuală. Și scoateți mânerul. "Noi aruncăm" geamul de putere pe care-l strângem totul în locul ei - totul se ridică perfect, ceea ce, bineînțeles, nu trebuie să ajustați singur. În principiu, odată cu înlăturarea / instalarea ascensoarelor, ar trebui să apară probleme, totul este simplu și clar.
Apoi du-te la mai interesant - conexiunea de cabluri electrice.
Din ascensoarele de motoare, ieșesc sârma albastră și roșie.
Pentru a vă deplasa:
- Redhead +
- Albastru -
Pentru a vă deplasa în jos:
tot drumul
- Redhead -
- Albastru +
Firește, butonul în sine va fi responsabil pentru polaritate, deci nu este nevoie să vă deranjez aici. Am scris acest lucru pentru dezvoltarea generală ca să spun așa. Ne agățăm de aceste fire și ne întindem prin talpa albă din ușă, forați găurile de dimensiuni dorite în interiorul mașinii. Am luat o secțiune undeva 1.5-2 mm.kv. În orice caz, mai puțin de 1,5 secțiunea transversală a firelor nu ar trebui luată, mai bine.
Plus 12V, am luat o constantă, astfel încât geamurile electrice nu depindea de faptul dacă cheia de contact a fost rotită în poziția "ON". Dacă memoria mea mă servește corect sau mai degrabă înregistrările mele de fotografii, atunci acesta este un + 12V permanent, dar, în orice caz, MANDATELY CHECK din nou (roșu cu dungă neagră):
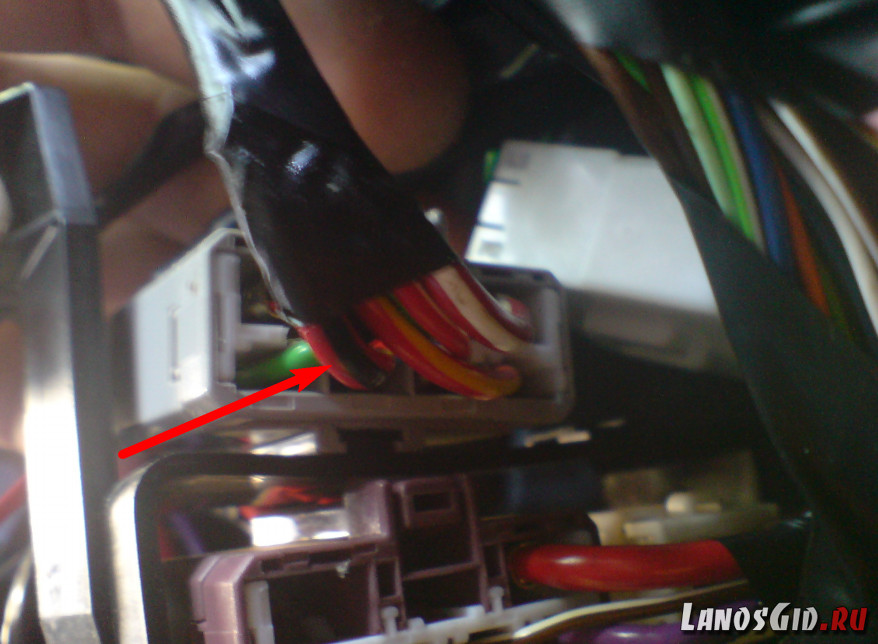
Îl căutăm lângă cutia de siguranțe. Dacă doriți ca ascensoarele să funcționeze numai atunci când contactul este cuplat, atunci, respectiv, conectăm + 12V la firul pe care apare tensiunea atunci când cheia este în poziția "ON". Din nou, dacă nu confundăm nimic, firul este roșu:

Asigurați-vă că sunați înainte de a conecta dacă firele sunt corecte.
M-am agățat foarte simplu - iau puțin de pe bobină în jurul întregii circumferințe a firului, în timp ce nu taie firul în sine și cu răsucirea obișnuită pe care o strâng.
Am pus butoanele de comandă a geamului de putere în apropierea frânei de mână. Puneți butoane vazovskie. Iată cum arată:

În consecință, toate firele necesare și trageți aici.
Dimensiuni buton:


În plus, am instalat și Sheriff PWM-200 mai aproape. De asemenea, l-am împins în aceeași cutie cu frâna de parcare. Ușa este mai mică, deci totul este bine acolo.
În principiu, probabil că nu este logic să descrii întreaga schemă de conectare prin apropierea. Ca închizători, fiecare poate avea diferite, respectiv, iar schema de conectare poate diferi. Da, și pentru fiecare modul de control al ferestrelor electrice (el este mai aproape) există o instrucțiune vizuală detaliată și o schemă în care totul este scris în mod clar și dacă ați luat-o deja asupra dvs. pentru a instala ascensoare electrice, atunci nu ar trebui să existe probleme. Dar dacă se întreabă ceva în comentarii, pot ajuta. Poate cineva să vină la îndemână aici este schema de conectare pentru modulul Sheriff PWM-200 (faceți clic pe imagine pentru a mări):

Pe scanare, unele dintre notele mele despre conexiune :).
Dacă instalați fără o apropiere, atunci va trebui să o instalați suplimentar, în cazul meu nu am instalat nimic. Da, apropo, firul pozitiv, asigurați-vă că vă conectați printr-o siguranță, amperi la 20-25.
Dar schema de conectare efectivă a geamurilor electrice:
 Firește, această schemă pentru conectarea la butoanele standard Lanos. În principiu, nu există nimic deosebit de conectat. Uită-te la schemă și totul se va întoarce.
Și nu vă grăbiți să colectați totul - puneți cărțile de ușă etc. Conectați-vă mai întâi, verificați dacă totul funcționează și dacă funcționează corect, izolați-vă totul în mod corespunzător și apoi începeți să colectați totul până la grămadă, ca să spunem așa.
Instalare reușită. Vor fi întrebări - întrebați în comentarii. Sunt bucuros să răspund!
Asta e tot. Ne vedem pe site.
Pentru mașinile moderne, geamurile electrice au devenit normele. Dar proprietarii modelelor interne vechi sunt mai puțin norocoși. De exemplu, la VAZ 2109 nu există ferestre electrice. Pentru că în acele vremuri îndepărtate, când au început să producă "nouă", astfel de dispozitive erau considerate încă un lux. Este posibil să corectăm această situație? Bineînțeles. Astăzi vom spune cititorilor despre cum să punem în mod independent pe "nouă" geamuri electrice.
Opțiuni pentru lifturi pentru ferestre
În conformitate cu dispozitivul geamurile electrice (ESP) sunt împărțite în trei tipuri principale:
- ferestrele de ridicare. Dispozitivele nu sunt foarte puternice, plus necesită o lubrifiere sistematică. Dacă acest lucru nu se face, durata lor de viață este semnificativ redusă;
- ferestrele șinelor. Principalul lor avantaj este prețul scăzut. În plus, pentru a schimba motorul pe un astfel de lifturi de ferestre nu este dificil (deoarece este ușor de găsit în vânzare). La putere, ele sunt inferioare ascensoarelor cu rack-pinion, ceea ce se observă în special atunci când în timpul iernii paharul îngheață la ușă;
- în cele din urmă, ferestrele cu pârghie. Printre motoare sunt considerate cea mai bună opțiune: puternic, rapid și aproape fără zgomot în timpul funcționării. Este vorba despre ei și va fi discutată mai jos.
Cele mai populare printre pârghiile ESP sunt ascensoarele "Granat". Popularitatea lor se datorează doi factori: un preț destul de accesibil și un pachet bun. Împreună cu șoferul ESP primește cabluri, dispozitive de fixare, manșete și prize.
Mecanisme ferestre "Rodie"
Procesul de înlocuire a ferestrelor standard VAZ 2109 electric
Înainte de a începe să lucrați, trebuie să stocați tot ce aveți nevoie.
Instrumente și consumabile
- Un set de pârghii ESP "Granat".
- Set de capete de priză.
- Un set de chei deschise.
- Șurubelnița este plată.
- Șurubelniță cu cruce.
- Lubrifierea CV-urilor 4.
Secvența de operații la instalarea sistemului ESP "Granat"
- se deschide capota mașinii, ambele terminale sunt scoase din baterie;
- folosind o șurubelniță plană, scoateți garnitura din plastic a ușii din față;

Decuparea ușilor este eliminată cu ajutorul unei șurubelnițe
- ușa din sticlă este fixată în cea mai înaltă poziție cu bandă adezivă;
- cu ajutorul capului soclu, șuruburile sunt fixate cu 10, cu care se înșurubează geamul la geamul de ridicare;

Deșurubați piulițele care ține sticla în mecanismul dispozitivului de ridicare a ferestrelor
- acum este necesar să scoateți ghidajele de ridicare a ferestrelor. Mai întâi, deșurubați piulița inferioară;

Piulița inferioară a ghidajului este deșurubată de capul de capăt
- apoi se scoate o pereche de piulițe, care ține mijlocul ghidajului;

Piulițele centrale ale unei direcții sunt oprite de un cap de față
- după care se înșurubează piulița superioară a ghidajului;

Deșurubați piulița superioară de pe șină
- apoi, folosind capul de capăt, deșurubați 3 piulițe pe mânerul de ridicare a ferestrei cu 8;

Capul 8 deșurubați piulițele cu mânerul mânerului de ridicare a geamului
- acum mânerul și ghidajul regulatorului de ferestre sunt complet libere. Se îndepărtează cu grijă de ușă printr-o gaură mare;

Sistemul de ridicare VAZ 2109 este scos prin orificiul din ușă
- următoarea etapă este instalarea sistemului ESP. Mecanismul ESP "Rodia" este plasat în ușă (iar mecanismul trebuie asamblat complet, altfel pur și simplu nu se va încadra în deschiderea ușii);

ESP "Granat" este instalat în ușa modelului VAZ 2109
- mecanismul de ridicare a ferestrelor instalat este fixat în ușă cu ajutorul a două știfturi scurte care sunt incluse în kitul ESP. Șuruburile sunt înșurubate în locul unde au fost amplasate cele două șuruburi de ghidare;

ESP securizat cu două știfturi centrale
- este necesar să se garanteze că orificiile pentru geamul mecanismului ESP coincid cu găurile de pe geamul ușii. Pentru a le combina, motorul ESP trebuie să fie alimentat de la baterie;

Tensiunea pe motorul ESP este furnizată de la bateria VAZ 2109
- de îndată ce mecanismul se ridică la nivelul sticlei și al orificiilor de montare, clemele de sticlă sunt înșurubate la mecanismul de ridicare a ferestrei cu ajutorul a două șuruburi pentru 10 din setul ESP;

Prin intermediul unui cap pe 8 sticlă este atașat la mecanismul ESP
- toate suprafețele de frecare din mecanismul ESP sunt lubrifiate cu compoziția îmbinărilor CV-4;

Suprafețele de frecare ale ESP sunt lubrifiate cu compoziția îmbinărilor CV
- pasul următor: instalarea cablurilor și instalarea butoanelor de ridicare a ferestrelor. Pe tabloul de bord al VAZ 2109, o nișă pentru butoane este situată în partea stângă a brichetei. Există butoane pentru activarea lifturilor de ferestre (nu vor fi necesare găuri suplimentare în tabloul de bord);

Butoanele de activare ESP sunt instalate în nișa din apropierea brichetei
- cablarea de la motorul ESP este afișată prin orificiile tehnologice din ușă, apoi plasată în rackul din față (care are și o grosime de găuri), este pusă sub tabloul de bord;
- motoarele ESP vor primi energie electrică de la o brichetă standard. Racordarea motoarelor se face în conformitate cu schema prezentată mai jos;

Cea mai simplă modalitate de conectare a ESP la brichetă
- după montarea completă a circuitului, bornele bateriei sunt readuse la locul lor și se verifică funcționarea butoanelor ESP, precum și iluminarea din spate a acestor butoane. Dacă luminile de fundal nu se aprind, trebuie să schimbați firele în prizele marcate pe diagrama cu numerele 6 și 3;
- în plus, este verificată funcționarea motoarelor ESP. Sticla trebuie să se miște ușor. Jertfele nu sunt permise. Atunci când verificați mișcarea sticlei, este necesar să vă asigurați că nu iese din ghidaj;
- dacă sticla este extrasă cu bruiaj sau când se mișcă, se aude un șuier caracteristic, apoi garnitura din cauciuc din care se extinde este lubrifiată cu grăsime siliconică;
- după aceea, ornamentele de ușă revin la locația lor normală;
Puncte importante

Deci, puteți pune ESP pe VAZ 2109 independent. Pentru a asambla cele mai simple circuite, nu sunt necesare abilități speciale de inginerie electrică. Este suficient și cunoașterea cursului fizicii școlare. Dar în stadiul de alegere a ferestrei de ridicare ar trebui să fie deosebit de atent. Se recomandă cu insistență abandonarea atât a dispozitivelor rack, cât și a cablurilor, chiar dacă prețul acestora pare incredibil de atractiv. Trebuie să instalați numai geamurile pentru pârghii, deoarece acestea garantează numai că geamul nu îngheață ușa pe o zi de iarnă înghețată.
Prima mașină pe care ți-ai cumpărat-o pare perfect doar pentru o vreme. Având în vedere că pentru majoritatea șoferilor o astfel de mașină devine nepretențioasă, există șanse mari să nu fiți primul proprietar al unei astfel de mașini. Ei bine, dacă proprietarii anteriori îi îngrijeau în mod corespunzător, atunci pentru dvs. o astfel de mașină nu ar deveni o durere de cap. Dacă sunteți foarte norocoși, niște "clopote și fluiere" vă vor primi ca și cum ar fi implicit.
Cu toate acestea, ele nu sunt întotdeauna necesare. Este puțin probabil ca cineva să investească în mod serios în modelul vechi Zhiguli 2107, 2106 sau 2109. Același lucru se aplică și în cazul discurilor turnate, al interiorului din piele și al altor excese. Cu toate acestea, unele îmbunătățiri merită efortul. De exemplu, este mult mai plăcut să inserați o unitate flash USB într-un aparat de înregistrare cu bandă radio și să nu mers în jurul cu discuri sau casete. Și cu siguranță în această categorie include instalarea de ferestre.
Jocul merită lumânarea
Pe de o parte, conectarea dispozitivului de ridicare a ferestrei pe VAZ-2109 sau "clasicul" pare ciudat. Dar dacă te gândești la asta, atunci, pe de altă parte, "butonul" nu este doar mai convenabil decât "răsucirea" depășită, dar și mai sigur. Judeca pentru tine: nu trebuie sa te distrezi prin ridicarea sau coborarea sticlei, nu trebuie sa controlati neteda mișcărilor. Acest lucru este evident în special dacă conduceți la viteză mare. Cu toate acestea, în oraș, întorcându-vă departe de drum pentru o secundă secundă, puteți găsi, de exemplu, o altă mașină în apropierea neplăcută de tine. În timp ce veți fi distras, chiar și inconștient, prin rotirea butonului în același plan, orice se poate întâmpla pe drum. Și dacă trebuie să faci ceva cu ușa de pasageri de sticlă? Sau închideți fereastra din spate a copilului? Conectarea unui lifturi electrice de ferestre are o mulțime de fețe bune, deci ar trebui să vă gândiți la ele.
Dacă vă gândiți acum la aceste neajunsuri, atunci viziunea voastră asupra lumii este foarte critică. E frumos. Desigur, medalia este întotdeauna 2 laturi. Încărcarea rețelei de la bord a autovehiculului crește, ceea ce poate duce la consecințe imprevizibile dacă cablajul este defect. Deoarece panoul de siguranțe nu este proiectat, nu vă puteți proteja și mecanismul de tensiunile de tensiune și poate arde cornișorul. Dacă încercați să economisiți bani și să instalați echipamente care nu sunt de cea mai bună calitate la un preț scăzut, este posibil să vă obțineți în lateral. Contactul cu elementele corpului dacă este instalat necorespunzător va duce la coroziune și dacă partea mecanismului se va deplasa, atunci partea se va sparge. În general, ca întotdeauna, există nuanțe. Dar, în același timp, după cum puteți vedea, aproape toate sunt legate de problema instalării adecvate și a factorului uman. Aceasta înseamnă că, dacă nu vă salvați pe voi înșivă și siguranța dvs. atunci când cumpărați echipament și faceți totul conform instrucțiunilor, nu ar trebui să apară probleme. La VAZ-2106, VAZ-2107 și VAZ-2109, generatorul are o rezervă, deci nu este necesar să-l schimbi la unul mai puternic pentru a instala ferestre. Majoritatea modelelor care sunt mai mult sau mai puțin adecvate din punctul de vedere al prețului și calității sunt dotate cu siguranțe proprii, iar în toate instrucțiunile este foarte clar și clar că piesele în mișcare nu trebuie să se sprijine pe elementele corpului.

Pregătirea la locul de muncă
Mai întâi, după ce ați decis această procedură, trebuie să pregătiți mașina pentru a funcționa. Pentru a porni ușa. Aveți grijă: în plus față de șuruburi și șuruburi, clemele îl țineți. Ele sunt foarte fragile și, de fapt, ar fi mai bine pentru voi să le faceți o rezervă înainte de a continua eliminarea, deoarece îndepărtarea ornamentei fără a rupe un singur clip este un alt Jedi. Pentru a elimina mânerul de ridicare a ferestrei, va trebui să faceți clic pe ceva plat și un inel ascuțit de reținere. De obicei, pentru aceasta utilizare o șurubelniță. După îndepărtarea inelului, trageți mânerul de pe roată și continuați să îndepărtați ornamentele. Când ați terminat, veți vedea așa-numita gaură tehnologică prin care se va face toată munca. Oferă acces la toate detaliile la care trebuie să ajungem.
Uită-te la mecanismul de ridicare a ferestrei. Înainte de a conecta dispozitivul de ridicare a ferestrei la VAZ-2109, VAZ-2107 sau VAZ-2106, vechea va trebui să fie îndepărtată, dar pentru aceasta trebuie mai întâi să înțelegeți cum funcționează. Mânerul rotește "steaua", care prin rolele de pe cablu transmite forța la geam, fixată în paranteze. Există patru role în mecanism: două superioare, una mai joasă și tensiunea. El, apropo, este situat la același nivel cu partea de jos. Toate rolele sunt atașate la ușă cu șuruburi, iar geamul este fixat în plăci speciale din marginea inferioară.
Pentru a scoate mecanismul de la modelele VAZ-2106, VAZ-2107 și VAZ-2109, coborâm sticla până la oprire. Dacă ați eliminat deja ornamentul, puneți mânerul înapoi, apoi scoateți-l din nou. După aceea, utilizați o cheie pentru 10 pentru a slăbi piulița de pe placă cu rola de tensionare, glisați-o și scoateți cablul. Astfel, dezactivați imediat toate videoclipurile din circuit, ceea ce va simplifica în mod semnificativ lucrarea. Apoi, luați cheia pentru 8 și deșurubați cele trei piulițe care dețin mecanismul de ridicare propriu-zis. Ei bine, acum trageți-l prin gaura tehnologică. Și nu uitați să opriți terminalul negativ, deoarece acum vom lucra cu echipamente electrice.
Noțiuni de bază
Înainte de a începe conectarea lifterului la VAZ-2106 sau VAZ-2107 și VAZ-2109, țineți cont de un lucru. De fapt, ar fi trebuit să vă întâlniți când ați cumpărat o fereastră electrică. Faptul este că pe aceste modele nu există "aerisire", iar sticla este coborâtă pe întreaga sa lățime. Din acest motiv, cele mai comune modele de lifturi de ferestre nu sunt potrivite: pur și simplu nu există suficient spațiu. Deci schema de conectare a dispozitivului de ridicare a ferestrelor pe modelul VAZ-2106 și alte două modele este puțin diferită de cea standard și presupune un hardware diferit. Din fericire, vânzătorii sunt conștienți de acest lucru și oferă, de regulă, o soluție adecvată.
Citiți mai întâi instrucțiunile. Este foarte clar și în mod clar scris cum să instalați un motor electric și la ce trebuie atașat. De-a lungul găurilor, placa de atașare coincide cu cele trei șuruburi pe care le-am deșurubat în timpul dezasamblării, astfel încât să nu existe dificultăți. După ce ați instalat mecanismul de ridicare a ferestrei, conectați-l la brațele de pe geam. Acum, din nou, în conformitate cu instrucțiunile, conduceți cablajul la baterie. În ușă există un tunel tehnologic special pentru acest lucru, deci lăsați firul înăuntru. Acest lucru îl va proteja de șoc și îl va proteja de umiditatea atmosferică. Asta nu contrazice necesitatea unei izolații întregi solide! Firele sunt conectate folosind chips-uri cu patru pini, dar dacă aveți probleme cu acest lucru, puteți utiliza metoda veche de modă veche: benzi, cârlig și roll-up cu bandă. Dar nu este încă recomandat.
Apoi continuăm să găsim un loc pentru un buton. După cum arată practica, nu este foarte convenabil să-l pui pe ușă în 2106 sau 2107, este optim să-l instalezi pe tabloul de bord. Există un loc, și acolo este relativ ușor de a conduce firele. După efectuarea unei găuri (sau dacă aveți cele libere, pur și simplu scoateți capacul), introduceți sigiliul și paharul însuși, conectați cablajul. De fapt, rămâne doar asamblarea ușii în spate și conectarea rack-ului la VAZ-2107, VAZ-2106, VAZ-2109. Dacă nu reușiți înainte de a pune carcasa, conectați terminalul negativ și verificați performanța sistemului asamblat.
concluzie
După cum puteți vedea, instalarea și conectarea dispozitivelor de ridicare a ferestrelor nu cauzează dificultăți particulare. Procedura este "run-in", nuanțele au fost cunoscute de mult timp și pentru cea mai mare parte rezolvate, și puteți trece cu ușurință la ea fără nici o ezitare. Ca întotdeauna, vă recomandăm să nu urmăriți profitul pe termen scurt, să nu încercați să câștigați un ban pe propria siguranță, ci să cumpărați echipamente de bună calitate și să le conectați strict conform instrucțiunilor. Dacă faci totul în felul ăsta, atunci nu vor exista probleme în funcționarea dispozitivului de ridicare a ferestrelor.
Cele mai bune prețuri și condiții pentru achiziționarea de mașini noi
Credit 4.5% / Rambursări / Trade-in / 95% din aprobări / Cadouri în salonMașinile motoare
selecție
Geamuri electrice (ESP) Am folosit o perioadă lungă de timp. În dalta anterioară (de asemenea 09) a pus "Kirov" ESP. I-am exploatat timp de aproape trei ani și nu pot spune că nu aveau probleme cu ei.
Pentru a instala Kirov ESP a trebuit să taie grav ușa; au lucrat destul de zgomotoși, dar silischea avea o sălbăticie. Acestea au fost primele modele fără siguranțe de curent (limitatoare), astfel încât atunci când paharul a atins punctul de sus, ușa era chiar ușor deformată ... Dar, în ciuda puterii motoarelor sovietice, au înghețat bine în timpul iernii. Pentru întreaga perioadă de funcționare, dinții de pe cele două trepte de viteză s-au rupt și cablul sa stricat.
Când am schimbat mașina, instalarea lui ESP a devenit din nou relevantă. Podiumurile implică aproape întotdeauna instalarea ESP - ca regulă, nu există nici un loc pentru a întoarce mânerul. A rămas doar pentru a alege unități de încredere.
Am ales o companie bine-cunoscută și de încredere SPAL. Setul cu două uși "Spal de LUX" se caracterizează printr-o instalare universală, o putere crescută a motorului (Bosh, așa cum a pretins vânzătorii) și prezența limitatoarelor de curent bimetalice. Design-ul în sine și calitatea performanțelor mi-au plăcut și trusa a fost achiziționată pentru 75 de dolari pe piața Mitinsky. Butoanele nu erau incluse, dar nu le-aș plăti niciodată 18 dolari. Și corect, pentru că apoi achiziționate în mod regulat de la 2110 cu iluminare verde pentru 37r.
instalare
Kitul este echipat cu instrucțiuni "detaliate" cu imagini, există o opțiune pentru instalarea pe ambele daltă - 2108 și 2109. Din masa plasticului dat, sunt necesare numai cele ale căror numere sunt indicate în manual. Mecanismul va fi extrem de simplu, chiar dacă nu are sens să îl descriem.
Fotografia prezintă opțiunea de instalare, care mi-a fost recomandată de către vânzători (și de instalatori). El la motivat astfel: În daltă, geamul se mișcă cu o rezistență sporită, mai ales la 08. De aceea, este mai bine să poziționați unitatea în așa fel încât cablurile să nu se îndoaie. Conform manualului, motorul trebuie amplasat diferit, în colțul inferior al tăieturii, dar cablurile sunt răsucite și îndoite.
Opțiunea non-standard de instalare are avantajele sale, dar trebuie îmbunătățită pe piele. Fragmente de izolare fonică sunt vizibile.
Opțiunea mea de instalare are un minus: cablul superior se află între șuruburile care fixează mânerul ușii și se presează pe carcasă. Am observat acest lucru nu imediat sau, mai degrabă, când era prea târziu să-l refacem. A trebuit să taie un canal mic în carcasă, să lipesc benzile vizierului. Situația sa îndreptat - iar panoul sa ridicat fără distorsiuni, iar cablurile se mișcă fără să se blocheze.
În scopul de a îneca ușor coapsa proeminentă a asociației în comun (în cazul în care mânerul este atașat), a trebuit să pun garnituri sub trei gadget-uri cu 10. Am găsit garniturile din kit, selectând grosimea de 2-3 mm. Întregul mecanism este atașat la ușă folosind patru șuruburi cu bucșe din cauciuc și metal. De asemenea, nu există complicații.
plasare
Firele din ESP (și nu numai) se întind prin guma ondulată, care sunt vândute pe piețe ca fiind "obișnuite". Nu vă sfătuiesc să cumpărați benzi elastice subțiri - practic nu există nici un fel de cauciuc în ele și putrezesc într-un an și jumătate.

"Nativ" guma devyatochnye stand "ca rudele"
Butoanele nu au fost plasate în locuri regulate pe tabloul de bord, deși locul este bun acolo. Faptul este că mișc puternic scaunul înapoi și ajunge la torpilă este foarte incomod. Ca urmare, butoanele sunt plasate pe căptușeala tunelului lângă frâna de parcare. Puteți folosi butoanele fără căptușeală, dar ele nu arată prea bine.

Un loc foarte convenabil pentru butoane - mereu la îndemână!
Cadrele butoanelor sunt în continuă cădere - trebuia să le lipesc cu superglue.
conexiune
Schema este destul de simplă, firele de la ușă ținute sub covor și atașate la plăcuțele de butoane. A acceptat această logică a muncii: o săgeată contură concavă deschide o fereastră, convex umbrită - se închide. Înșurubați masa la montarea remorcii frânei de mână, iluminarea butonului - la iluminarea din spate a brichetei și + 12V alimentate prin intermediul unei siguranțe de pavilion 20A direct de la baterie.
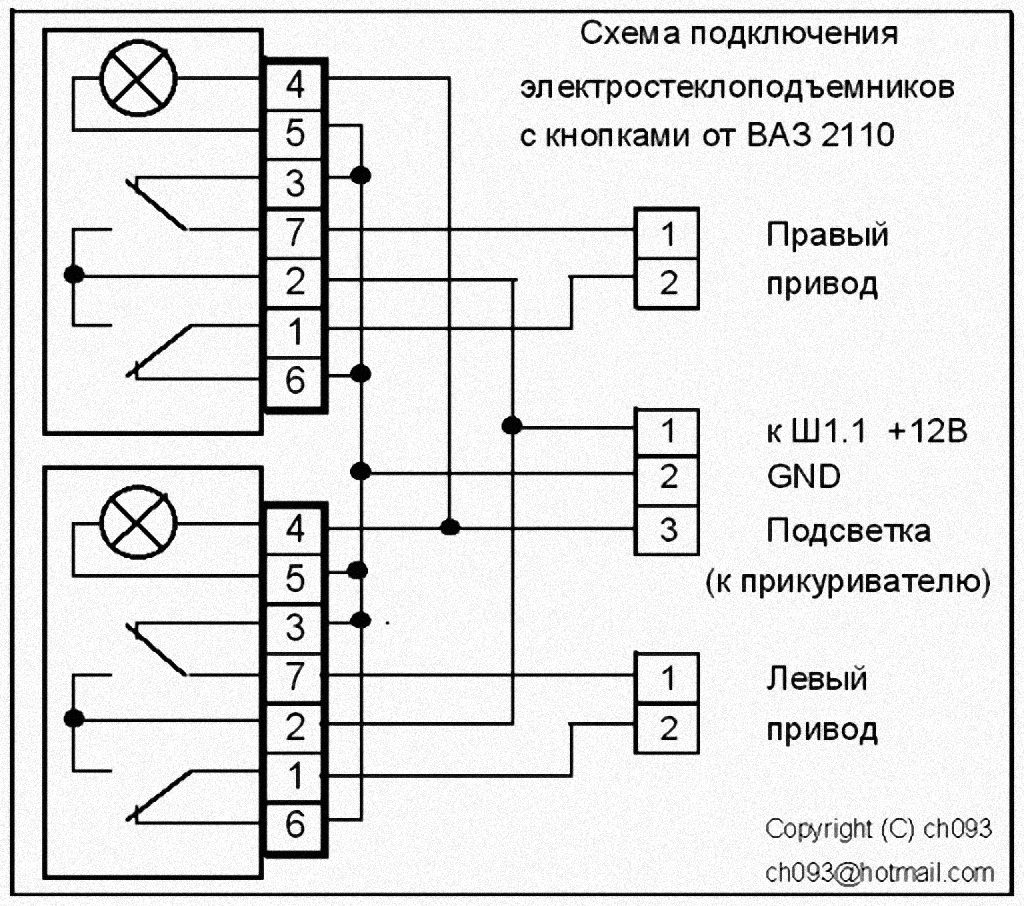
Un mod mai corect de a conecta firul pozitiv este ștecherul W1.1 la noul circuit celular.
Diagrama prezintă versiunea standard a sursei de alimentare ESP. În acest caz, releul nr. 5 este activat în cutia de siguranțe (CLL), iar acționările funcționează numai cu aprinderea aprinsă. Pentru a evita acest inconvenient, în loc de releu, puneți un jumper între contactele nr. 87 și nr. 30. Un astfel de sistem este valabil pentru CIO-urile noi.
ajustare
La sfârșitul lucrării ar trebui să reglați poziția tuturor părților ferestrei, astfel încât geamul să se deplaseze în sus și în jos fără înclinare și blocare. Acest lucru este valabil mai ales în 2108. De asemenea, observați că sticla este situată în centru în raport cu sigiliile. Și totuși, după toate procedurile făcute, un pahar se mișcă puțin mai încet decât altul.
Toate acestea se datorează designului învechit al mecanismului de ridicare a sticlei cu un singur ghidaj. Rezistența imensă la mișcarea ochelarilor are guma de etanșare. Imediat le-am schimbat la altele noi, pentru că cele vechi au fost împrăștiate cu un compus anticorosiv și, în general, au fost șterse firele de catifea.
Pare totul ... exploatez o astfel de construcție deja într-o jumătate de an, impresiile sunt strict pozitive - funcționează destul de repede și aproape tăcut, se tăieau în poziții extreme. Nu există nicio plângere cu privire la butoane fie: presare excelentă, doar un singur lucru: se încălzesc decent cu dimensiunile pornite ... Ei bine, această problemă este ușor de rezolvat, dar într-un fel este reluctant.
PS: Și cum funcționează aceste unități pe "Felicia" - nici o comparație: mai rapidă, mai clară, mai silențioasă, mai ușoară!
Ferestre electrice:
opțiunea numărul doi ...
Destul de ciudat, dar în set complet nu a existat nici un manual de instalare ESP. Poate că producătorul subtil indică o instalație exclusiv autorizată? 🙂 Cu toate acestea, am continuat fără teamă să implantăm ...
instalare
În primul rând, au scos carcasa și și-au dat seama dacă motorul ar sta în cotieră. Montat, dar înapoi în spate în lățime. Prin urmare, locul de instalare marcat cu mare precizie.

Acesta este modul în care motorul trebuie să fie amplasat în interiorul cotierei. Rămâne să o punem în aplicare ...
Pentru a face acest lucru, pe o bucată de SHI suplimentare tăiați o fereastră sub cotieră. Pentru model va merge și o bucată de hârtie groasă - tapet, hârtie de desen. Deja pe ușa ei au estimat locația suportului motorului, după ce la achiziționat pe un șurub.
Motorul este înfășurat în jurul unui jug semicircular, care este atașat la un capăt la placă utilizând 2 șuruburi autoportante. Alte două șuruburi fixează celălalt capăt al clemei prin placă la ușă.

Încercând deja pe ușă. Designul este ținut pe un șurub, iar manșonul de pe mânerul asociației în comun nu este încă uzat.
Secțiunea ușii în care șuruburile inferioare trebuie înșurubate are o suprafață destul de ridicată - banda nu va fi presată strâns pe ușă. Aceasta nu este optimă pentru o fixare puternică și am forat câteva găuri puțin mai înalte, aproape de îndoirea clemei. Acolo și fixați șuruburile, cu siguranță au înșurubat în găurile perforate cu un burghiu de 4 mm.

Pentru ca motorul să se potrivească în cotieră, acesta trebuie orientat în acest fel. În caz contrar, șuruburile care fixează părțile carcasei motorului vor interfera.
Manșonul cu șase fețe este așezat pe tija regulatorului de fereastră cu tensiune, era necesar să-l asocieze ușor cu un ciocan. Șaiba cu roți dințate este din material plastic, corpul său este atașat la ușă cu două șuruburi cu piulițe M6 prin bucșe. La prima vedere, cel de-al treilea punct de atașament este cerut în mod clar aici, deși se află bine în două ...

În această fotografie conexiunile sunt desfigurate de materialul de etanșare. Aproape oricine va face, am folosit Hermesil.
Înainte de a fixa toate conexiunile și a le pune pe etanșantul, puneți-le pe loc. Motorul aproape se potrivește în cotieră, dar un spațiu de 2-3 mm avea încă loc. Dar ar trebui să dispară după instalarea podiumurilor sub difuzoarele frontale.
![]()
În cele din urmă instalat ESP. Înainte de a instala placarea, trebuie să o conduceți corespunzător. Decupajele termice trebuie să funcționeze! Și este mai bine să porniți motorul în avans ...
De asemenea, este necesar să fixați o bandă de spumă din kit între motor și guler - ceea ce va reduce zgomotul și vibrațiile. Unde să adaptați restul pieselor SHI - rămâne un mister ...
conexiune
Schema de conectare este complet analogă celei anterioare, doar butoanele regulate au fost utilizate pentru butoane. Cele mai lungi fire (roșu și negru) sunt alimentate la motoarele ESP prin benzi de cauciuc din ușă. Există trei perechi mai scurte: negru, roșu și verde cu o bandă.
- Două negri se duc la sol - pentru a vă conecta, îmi place să folosesc cel mai îndepărtat șurub pentru fixarea jumătății inferioare a carcasei volanului. Și e mai bine să nu-ți cureți capătul, ci să dai terminalul sub piuliță.
- Două verde se duc la fir de la becul brichetei. Este acolo singură. Prea ușor ...
- Două fire roșii sunt conectate la pinul # 1 al conectorului Ш1 în QW. Aici veți avea nevoie de un terminal "mare" suplimentar cu o mânere - pentru a păstra în mufa conectorului.

Acest conector este ușor de recunoscut - cele mai groase fire vin la el. Este bine scos din cabină - nu este necesar să eliminați WHD.
Firele din kit au ajuns, în mod normal, la ESP numai în partea dreaptă, iar cea din stânga a trebuit să fie mărită. Capetele sunt conectate numai în funcție de tubul de răsucire, lipire, căldură.
În EIR pentru ESP se oferă un releu (simbol pictat pe capac). Dacă ați pus-o, atunci fereastra poate fi deschisă numai când contactul este cuplat.

Jumperul a fost tăiat de pe o piesă a plăcii de montare de la ușile electrice de acționare. Deși este protejat de o siguranță, nu trebuie să-l scurtați pe teren.
Pentru a evita acest lucru, este suficient să faceți un jumper și să-l conectați în locul releului (contactele 87 și 30). Este complet sigur, deoarece circuitul va fi în continuare protejat de o siguranță de 30A pe partea stângă.

Butoanele cu cadre sunt puse în locul lor în panoul înalt
Dacă geamul este deformat sau blocat atunci când se deplasează, acesta trebuie eliminat prin reglarea poziției sale față de zona de atașare cu două șuruburi. De asemenea, dacă este necesar, puteți schimba poziția mecanismului standard față de ușă. Uneltele și cablurile trebuie să fie curățate de murdărie (este mai bine să se clătească cu benzină sau cu solvent) și apoi să fie lubrifiate cu grafit sau litiu. Și asigurați-vă că verificați tensiunea cablului - nu ar trebui să se îndoaie.
După aceasta, funcționarea întregii structuri este verificată în cele din urmă. Trebuie să conduceți ESP înainte de protejare în pozițiile extreme. Apoi puneți placa de ușă pe poziție.
constatări
Pluses nu sunt completă rău, fire bune, simplitatea designului și simplitatea instalării, precum și prezența siguranței termice. Contra - creșterea zgomotului și viteza de mișcare prea mare a ochelarilor. Dar, cel mai important, acum este foarte dificil de prezis cursul funcționării lor. Nu am date despre fiabilitate și MTBF. Will - Voi informa ...
Septembrie 2000
Geamuri electrice
a fost modificat ultima dată: 10 noiembrie 2013 de către Tsypchenko Dmitry