Mulți șoferi Mitsubishi Lancer cred că nu este nevoie să actualizeze antigelul. Cu toate acestea, nu ar trebui să credeți așa, deoarece o actualizare programată a lichidului de răcire asigură funcționarea corectă a mașinii.
Agentul de răcire îndeplinește o sarcină importantă în mecanismul de răcire. Datorită antigelului, unitatea de putere a vehiculului nu fierbe. Cu toate acestea, la utilizarea mașinii, substanța își pierde proprietățile. Prin urmare, înlocuirea la timp este o procedură necesară.
Cât de des are nevoie Lancer 10 de înlocuire a antigelului?
Având în vedere importanța lichidului de răcire pentru o mașină, se recomandă înlocuirea acestuia în mod sistematic, deoarece de aceasta depinde funcționarea corectă a motorului și a întregului vehicul în ansamblu.
Informațiile despre actualizare sunt indicate în pașaportul tehnic al vehiculului. Producătorii recomandă înlocuirea o dată la 60 de mii de kilometri. Cu toate acestea, acest număr este arbitrar, deoarece totul depinde de condițiile de funcționare. De asemenea, trebuie acordată o atenție deosebită factorilor care apropie înlocuirea lichidului:
- uzura naturală a substanței;
- utilizarea materialelor de calitate scăzută;
- diluarea antigelului cu un lichid cu alte caracteristici sau apă;
- deteriorarea mecanismului de răcire;
- contaminarea sistemului;
- umplerea anterioară a fost efectuată cu erori.
Toți acești factori aduc mai aproape procedura de actualizare a antigelului unui Mitsubishi Lancer.
Deoarece substanța elimină căldura din unitatea de alimentare a vehiculului, fiecare șofer ar trebui să înțeleagă simptomele care indică o pierdere a caracteristicilor utile antigel:

Orice șofer va detecta aceste simptome, dar într-un centru de service, calitatea antigelului este evaluată de testeri speciali.
Informații importante! De îndată ce apar primele simptome care indică uzura antigelului, șoferul vehiculului trebuie să contacteze imediat un centru de service tehnic.
Înlocuirea antigelului pentru Lancer 10 și celelalte servicii ale noastre
Serviciul de întreținere tehnică actualizează lichidul antigel, iar specialiștii asigură și următoarea gamă de servicii:
- diagnostic, este întotdeauna important să se efectueze procedura, deoarece dezvăluie toate defecțiunile sistemului de răcire, precum și componentele învecinate;
- antigel de scurgere;
- spălarea sistemului de răcire;
- turnarea de material nou.
Procedura de înlocuire a antigelului Mitsubishi Lancer 10
 În serviciul nostru, mecanicii efectuează procedura în trei pași. Primul este golirea antigelului. Apoi, sistemul este spălat. Iar pasul final este infuzia substanței.
Principalele puncte ale scurgerii sunt:
- capacul rezervorului este slăbit, acest lucru este recomandat pentru a crește debitul de antigel;
- dopul este îndepărtat și substanța curge afară;
- apoi toate dopurile sunt închise.
Important! Substanța antigel este evacuată din calorifer, precum și din vasul de expansiune.
Scopul procedurii de spălare a sistemului este de a elimina diferiți contaminanți, precum și de a elimina resturile de substanțe vechi.
Anterior, pentru curățarea sistemului se foloseau diverse metode tradiționale, dar astăzi există pe piață o varietate de substanțe speciale care vor curăța sistemul de răcire al unui vehicul.
 În etapa de turnare a noului antigel, trebuie să știți exact ce va funcționa în sistem. Este important să achiziționați lichid de înaltă calitate recomandat de producătorii de vehicule Mitsubishi Lancer.
Mecanicii efectuează următorii pași:
- deconectați conducta care direcționează substanța către motor;
- antigelul este injectat prin gâtul rezervorului;
- procedura durează până când lichidul începe să curgă din duză.
- apoi completează procedura prin închiderea tuturor găurilor și rularea lichidului; va fi suficient să ruleze mașina la ralanti.
Informații importante! Toate lucrările de reparații trebuie efectuate numai într-un centru de service.
Când înlocuiți lichidul de răcire Lancer 10, este important să rețineți câteva puncte. Este interzis:
- efectuați singur actualizarea;
- folosiți materiale de calitate scăzută;
- întârzie procedura de actualizare.
Chestia este că toate aceste puncte vor cauza uzura prematură a unității de alimentare a mașinii, precum și a multor piese aferente. În plus, există un risc mare de a intra într-un accident rutier. Și eliminarea tuturor acestor consecințe va fi mult mai costisitoare decât efectuarea unei înlocuiri planificate.
Avantajele înlocuirii antigelului Lancer X în serviciile noastre auto
Dintr-o listă imensă de ateliere, este important să alegeți un serviciu de calitate. Vă recomandăm să ne contactați din următoarele motive:

Și pentru ca problemele să vă deranjeze cât mai puțin posibil, ar trebui să:
- efectuați întreținere regulată, procedura poate fi comandată în service-ul nostru;
- răspunde prompt la defecțiunile apărute;
- utilizați materiale de calitate;
- Verificați constant lichidul.
Funcționarea corectă a mașinii vă garantează siguranța, iar îngrijirea adecvată va asigura funcționarea pe termen lung.
Înlocuirea antigelului Lancer 9
Deci, să discutăm în curând un subiect presant (înghețurile Epifaniei sunt peste noi!) - înlocuirea antigelului. Să luăm un Lancer 9 experimental, mecanic, 2005, cu un kilometraj de 130.000 km.
"Merge"! Merită să goliți vechiul antigel de la un motor rece, la fel ca să scoateți capacul de la calorifer, altfel există șanse să vă ars.Să vă explic, până când sistemul se va răci, va fi sub presiune. Dacă timpul nu așteaptă, atunci ar trebui să așteptați cel puțin 30 de minute înainte de a începe manipulările.
Apropo, pentru această lucrare veți avea nevoie de: (Apă care a suferit o purificare specială, cu ajutorul căreia compuși chimici organici și minerali, săruri de metale grele și alte micro și macroelemente care pot avea efecte negative asupra unei mașini sau oricărui alte echipamente sunt filtrate) 2 buc = 9 -10 litri, cap mufa înlocuibil 14 mm, cardan jug, cheie cu clichet(extensie sau guler), precum și cleşte.
Deșurubați capacul
2. Deschideți rezervorul de expansiune
3. Deșurubați robinetul de pe calorifer. Poți adapta orice fel de scurgere, totul depinde de imaginația ta, ceea ce mi s-a întâmplat.
4. În continuare luăm antigelul în bloc. Există un dop de golire (situat lângă senzorul de presiune a uleiului din spatele motorului, nu îl veți putea vedea și nu încercați. Continuăm căutarea prin atingere. Aici veți avea nevoie de un cardan. , o priză de 14 mm și o prelungire. Vă rugăm să rețineți că este destul de dificil de deșurubat.
Scurgem blocul direct pe pământ, deoarece este dificil de abordat.
5. Iar ultimul loc din care scurgem lichidul este vasul de expansiune. Folosiți un clește pentru a strânge clema de pe furtun, trageți-o în lateral și scoateți furtunul.
Scoatem rezervorul, îl spălăm și îl punem la loc.
6. Deschideți robinetul de pe calorifer și înșurubați dopul de scurgere în poziție pe blocul cilindrilor. Apoi, scoateți unul dintre furtunurile de încălzire a corpului clapetei de accelerație. Este strâns în mod similar cu furtunul rezervorului de expansiune.
7. Completați cu apă distilată pentru clătire până când aceasta iese din furtunul de încălzire a clapetei de accelerație și din fitingul pe care a fost tensionat. În momentul în care începe scurgerea, punem încălzirea la loc și pornim motorul. Las gâtul radiatorului deschis.
Îl încălzim la temperatura de funcționare, de îndată ce ventilatoarele se pornesc, îl oprim și repetă întregul proces de scurgere, cu excepția vasului de expansiune. Cel mai bine este să lăsați din nou motorul să se răcească, altfel vă puteți opări!, deșuruband dopul blocului. De obicei, o clătire este suficientă, dar pentru liniște sufletească, recomandăm clătirea de două ori. În timpul celei de-a doua clătiri, apa trebuie să fie aproape limpede.
Gata! strângeți robinetul și dopul (pasul 7), dar închideți capacul radiatorului. Se potrivesc aproximativ 5 litri, umpleți rezervorul cu lichid de răcire nou (antigel) în funcție de nivel. Încălzim mașina la temperatura de funcționare și o oprim. Verificăm toate conexiunile pentru scurgeri și, dacă este necesar, adăugăm lichid în rezervor.
Cititori, fiți atenți la drumuri! Felicitări pentru înghețurile de Bobotează!
p.s. care, de altfel, nu sunt deloc înfricoșătoare anul acesta.
Complexitate
InstrumentNu este marcat
Conform recomandării producătorului, lichidul de răcire trebuie înlocuit pentru prima dată după 96 de mii de km sau 4 ani de funcționare (oricare vine primul), apoi la fiecare 48 de mii de km (2 ani)
Veți avea nevoie de lichid de răcire, o cârpă curată și un recipient pentru lichidul de răcire scurs cu o capacitate de cel puțin 7 litri.
Avertizări
Utilizați agenți de răcire pe bază de etilenglicol (antigel). Înlocuiți lichidul de răcire numai când motorul este rece. Lichidul de răcire este toxic, așa că aveți grijă când îl manipulați.
La pornirea motorului, capacele radiatorului și rezervorului de expansiune trebuie să fie închise. Înșurubați bine capacul radiatorului. Sistemul de răcire este sub presiune atunci când motorul funcționează, așa că dacă dopul este strâns ușor, lichidul de răcire se poate scurge de sub el.
1. Așezați mașina pe o platformă plată, orizontală.
2. Rotiți capacul de umplere al sistemului de răcire a motorului cu 90’...

3. ...și scoateți-l

4. Scoateți apărătoarea de noroi a motorului din față (consultați „Demontarea și instalarea apărătoarelor de noroi a motorului,” pagina 85).

5. Așezați un recipient sub orificiul supapei de scurgere a radiatorului sistemului de răcire, situat în partea inferioară a rezervorului radiatorului din dreapta și deșurubați dopul supapei de evacuare cu 2-3 ture.

6. ...și goliți caloriferul.
7. Strângeți dopul de scurgere

8 Cu ajutorul unui clește, strângeți clema care fixează furtunul inferior al radiatorului și glisați clema de-a lungul furtunului.

9. ...scoateți furtunul din conducta rezervorului radiatorului și scurgeți lichidul din motor într-un recipient pregătit.
Avertizare
Antigelul este otrăvitor de moarte pentru toate ființele vii. Pentru a evita poluarea mediului, scurgeți-l din radiator și motor printr-o pâlnie (de exemplu, dintr-o sticlă de plastic de sifon).
10. Montați furtunul inferior al radiatorului
11. Deschideți capacul rezervorului de expansiune și îndepărtați orice lichid de răcire rămas din rezervor (de exemplu, folosind un bec de cauciuc)
Notă
Dacă rezervorul de expansiune este foarte murdar, scoateți-l (consultați „Demontarea și instalarea rezervorului de expansiune”, pagina 106) și spălați-l.

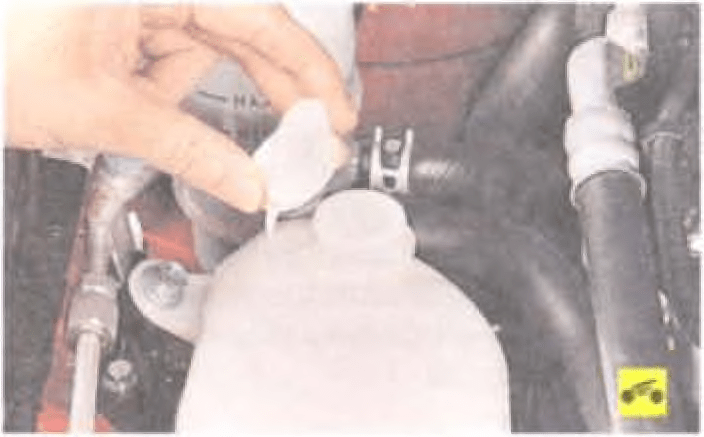
12. Umpleți sistemul de răcire a motorului turnând lichid de răcire în gâtul de umplere până când acesta începe să curgă de la gât în furtun către rezervorul de expansiune. Închideți bine capacul de umplere.
13. Umpleți rezervorul de expansiune cu lichid până la marcajul „PLIN” de pe peretele rezervorului (consultați „Verificarea nivelului și adăugarea lichidului de răcire”, pagina 57).
14 Porniți motorul și încălziți-l la temperatura de funcționare (înainte de a porni ventilatorul). După aceasta, opriți motorul, verificați nivelul lichidului de răcire și, dacă este necesar, adăugați-l în rezervorul de expansiune până la marcajul „PLIN”.
Notă
Când motorul funcționează, monitorizați temperatura lichidului de răcire conform indicatorului. Dacă săgeata ajunge în zona roșie și ventilatorul radiatorului nu pornește, porniți încălzitorul și verificați ce fel de aer trece prin el. Dacă încălzitorul furnizează aer încălzit, cel mai probabil ventilatorul este defect, iar dacă furnizează aer rece, înseamnă că s-a format un blocaj de aer în sistemul de răcire a motorului. Pentru a-l scoate, opriți motorul, lăsați-l să se răcească și deșurubați capacul de umplere. Porniți motorul, lăsați-l să funcționeze timp de 3-5 minute și închideți capacul de umplere.
Sfaturi utile
Pentru a umple mai bine sistemul fără blocaje de aer, strângeți periodic furtunurile radiatorului cu mâna. După câteva zile de utilizare a mașinii după înlocuirea lichidului de răcire, verificați nivelul acestuia. Umpleți nivelul dacă este necesar.
Dacă după un timp foarte scurt, culoarea lichidului proaspăt devine maro, înseamnă că l-ați umplut cu un fals, la care producătorul a „uitat” să adauge inhibitori de coroziune. În plus, unul dintre semnele unui fals este o decolorare completă bruscă a lichidului. Vopseaua de lichid de răcire de înaltă calitate este foarte stabilă și doar se întunecă în timp. Lichidul nuanțat cu albastru de in se decolorează. Acest „antigel” trebuie înlocuit rapid.
Dacă este timpul să înlocuiți antigelul la Mitsubishi, atunci ar trebui să cunoașteți instrucțiunile producătorului în acest sens.
Pentru Mitsubishi Lancer X, producătorul recomandă înlocuirea lichidului pentru prima dată după cumpărare după 4 ani de funcționare sau 96.000 km, oricare ați ajunge mai devreme.
ATENŢIE! S-a găsit o modalitate complet simplă de a reduce consumul de combustibil! Nu mă crezi? Nici un mecanic auto cu 15 ani de experiență nu a crezut până nu a încercat. Și acum economisește 35.000 de ruble pe an pe benzină!
În perioadele ulterioare, acesta trebuie schimbat după 48.000 km sau 2 ani.
De cât antigel ai nevoie?
Conform manualului, volumul sistemului de răcire este de aproximativ 7 litri. Trebuie avut în vedere că pentru un motor 1.5 se va folosi mult mai puțin antigel decât pentru un motor 2.0.
Nu este nimic complicat în acest proces, așa că dacă decideți să faceți o înlocuire fără ajutorul specialiștilor, atunci există multe videoclipuri pe Internet care vor spune și vor arăta totul pas cu pas.
Vă rugăm să rețineți că este mult mai dificil de înlocuit fără groapă.
De asemenea, rețineți că antigelul este o substanță foarte toxică și ar trebui să evitați inhalarea vaporilor acestuia sau contactul direct cu pielea. Dacă nu aveți dorința sau condițiile necesare, puteți apela la serviciile unui service auto bine înființat.
Ce antigel să alegi pentru Lancer 10
 Primul lucru de luat în considerare este ce fel de antigel este turnat în sistem. Deși este obișnuit să se clasifice lichidul de răcire după culoare, acest lucru este în prezent lipsit de sens. Diferiți producători își vopsesc produsul în culoarea pe care o consideră potrivită.
Asa ca poti afla cu siguranta clasa de antigel doar pastrand recipientul de la ultima inlocuire sau avand o scriere in carnetul de service. Un lichid care are o nuanță de albastru închis, sau dacă este de culoare verde închis, este antigel, valoarea lui este de câteva ori mai mică decât cea a antigelului. Dacă nu puteți determina cu exactitate clasa de antigel completată, spălați sistemul cu o substanță specială sau apă distilată.
Astăzi, antigelul este clasificat în mai multe tipuri. Pe baza proprietăților și compoziției sale, este împărțit în: G11, G12, G12+, G12++, G13. Dacă aveți o mașină, să zicem, 2008, și în timpul funcționării coroziunea poate să fi apărut deja pe piesele radiatorului, atunci pentru a o combate, un lichid din clasa G12 este mai potrivit. Și pachetul de aditivi în antigel G12+ și mai mare este potrivit pentru mașinile din 2012 și mai noi. Nu combate rugina existentă la fel de eficient, dar creează un strat protector durabil pentru a preveni deteriorarea. În ceea ce privește mărcile, este mai bine să nu economisiți bani și să folosiți producători dovediți cu un nume în care aveți încredere. Folosește magazine în care ai încredere și ferește-te de contrafacerile care au inundat literalmente piața. 
Cum se face înlocuirea?
Înlocuirea lichidului de răcire în toate mașinile Lancer 10 este aproape aceeași. Indiferent de an și dimensiunea motorului, fie el 1.6 sau 1.8, sau un model restyling, orificiile tehnice de pe radiator și blocul cilindrilor sunt situate la fel. Primul lucru de făcut este să lăsați mașina să se răcească dacă este în afara drumului.

După aceea, trebuie să deschideți capacul radiatorului pentru a evita un vid în sistem. Apoi scoatem protecția motorului și găsim un șurub pe radiator, care se află în colțul din dreapta jos. 
După ce l-am deșurubat, scurgem lichidul din calorifer. Apoi, trebuie să scurgeți vechiul antigel din bloc prin îndepărtarea furtunului inferior al radiatorului. Acordați atenție rezervorului de expansiune, poate rămâne o cantitate decentă de lichid acolo; acesta trebuie îndepărtat prin orice metodă disponibilă, de exemplu, cu un bec de cauciuc. Așteptați puțin timp ca totul să se scurgă și reinstalați furtunul și capacul radiatorului. Dacă decideți să utilizați spălarea, apoi turnați-o în sistem și apoi repetați totul din nou. Antigelul trebuie turnat în gâtul radiatorului. 
Pentru a evita blocajele de aer, puteți strânge duza cu mâinile în timp ce turnați și turnați treptat. Apoi trebuie să porniți mașina și să adăugați cantitatea necesară de antigel în rezervorul de expansiune. După aceasta, înlocuirea lichidului de răcire este finalizată. O călătorie plăcută și caldă.